Ctrl+arrow
drag by the middle mouse button
wheel on your mouse
press Shift with the wheel to scroll horizontally.
press Space with the mouse moving
Zooming in or out
pressing - and + (or =) keys
Ctrl+middle click or Ctrl+right click to zoom in
Shift+middle click or Shift+right click to zoom out
rotate the mouse wheel with Ctrl
Or, you can click in the zoom entry field (in the bottom right corner of the document window)
Zoom tool (in the toolbar on left)
Press the ` key to go back to the previous zoom, or Shift+` to go forward
Inkscape tools
left vertical toolbar editing tools
top part of the window the Commands bar
bottom of the window status bar
new empty document press Ctrl+N
New from Template press Ctrl+Alt+N
open an existing SVG document, Ctrl+O
save Ctrl+S
Save As (Shift+Ctrl+S)
Rectangle tool press F4 and click-and-drag
These tools are collectively known as shape tools.
dragging diamond-shaped handles
The Controls panel for a shape tool to tweak a shape
To undo your last action, press Ctrl+Z
redo Shift+Ctrl+Z
Moving, scaling, rotating
Selector
the arrow on the toolbar, or press F1 or Space
Move the object by dragging it.
(Press Ctrl to restrict movement to horizontal and vertical.)
Scale the object by dragging any handle.
(Press Ctrl to preserve the original height/width ratio.)
Rotate the object by dragging corner handles.
(Press Ctrl to restrict rotation to 15 degree steps.
Drag the cross mark to position the center of rotation.)
Skew (shear) the object by dragging non-corner handles.
(Press Ctrl to restrict skewing to 15 degree steps.)
While in Selector, you can also use the numeric entry fields in the Controls bar (above the canvas) to set exact values for coordinates (X and Y) and size (W and H) of the selection.
Transforming by keys
One of Inkscape's features that set it apart from most other vector editors is its emphasis on keyboard accessibility.
There's hardly any command or action that is impossible to do from keyboard, and transforming objects is no exception.
You can use the keyboard to move (arrow keys), scale (< and > keys), and rotate ([ and ] keys) objects.
Default moves and scales are by 2 px; with Shift, you move by 10 times that.
Ctrl+> and Ctrl+< scale up or down to 200% or 50% of the original, respectively.
Default rotates are by 15 degrees; with Ctrl, you rotate by 90 degrees.
However, perhaps the most useful are pixel-size transformations, invoked by using Alt with the transform keys.
For example, Alt+arrows will move the selection by 1 pixel at the current zoom (i.e. by 1 screen pixel, not to be confused with the px unit which is an SVG length unit independent of zoom).
This means that if you zoom in, one Alt+arrow will result in a smaller absolute movement which will still look like one-pixel nudge on your screen.
It is thus possible to position objects with arbitrary precision simply by zooming in or out as needed.
Similarly, Alt+> and Alt+< scale selection so that its visible size changes by one screen pixel, and Alt+[ and Alt+] rotate it so that its farthest-from-center point moves by one screen pixel.
Note: Linux users may not get the expected results with the Alt+arrow and a few other key combinations if their Window Manager catches those key events before they reach the inkscape application.
One solution would be to change the WM's configuration accordingly.
Multiple selections
You can select any number of objects simultaneously by Shift+clicking them.
Or, you can drag around the objects you need to select; this is called rubberband selection.
(Selector creates rubberband when dragging from an empty space; however, if you press Shift before starting to drag, Inkscape will always create the rubberband.) Practice by selecting all three of the shapes below:
Grouping
Several objects can be combined into a group.
To create a group, you select one or more objects and press Ctrl+G.
To ungroup one or more groups, select them and press Ctrl+U.
However, Ctrl+U only ungroups the topmost level of grouping in a selection; you'll need to press Ctrl+U repeatedly if you want to completely ungroup a deep group-in-group.
You don't necessarily have to ungroup, however, if you want to edit an object within a group.
Just Ctrl+click that object and it will be selected and editable alone, or Shift+Ctrl+click several objects (inside or outside any groups) for multiple selection regardless of grouping.
Fill and stroke
Probably the simplest way to paint an object some color is to select an object, and click a swatch in the palette below the canvas to paint it (change its fill color).
Alternatively, you can open the Swatches dialog from the View menu (or press Shift+Ctrl+W), select an object, and click a swatch to paint it (change its fill color).
More powerful is the Fill and Stroke dialog from the Object menu (or press Shift+Ctrl+F).
Yet another convenient way to change a color of an object is by using the Dropper tool (F7).
Just click anywhere in the drawing with that tool, and the picked color will be assigned to the selected object's fill (Shift+click will assign stroke color).
Duplication, alignment, distribution
One of the most common operations is duplicating an object (Ctrl+D).
The duplicate is placed exactly above the original and is selected, so you can drag it away by mouse or by arrow keys.
For practice, try to fill the line with copies of this black square:
An example image
Chances are, your copies of the square are placed more or less randomly.
This is where the Align and Distribute dialog (Shift+Ctrl+A) is useful.
Select all the squares (Shift+click or drag a rubberband), open the dialog and press the “Center on horizontal axis” button, then the “Make horizontal gaps between objects equal” button (read the button tooltips).
The objects are now neatly aligned and distributed equispacedly.
Here are some other alignment and distribution examples:
An example image
Z-order
The term z-order refers to the stacking order of objects in a drawing, i.e. to which objects are on top and obscure others.
The two commands in the Object menu, Raise to Top (the Home key) and Lower to Bottom (the End key), will move your selected objects to the very top or very bottom of the current layer's z-order.
Two more commands, Raise (PgUp) and Lower (PgDn), will sink or emerge the selection one step only, i.e. move it past one non-selected object in z-order (only objects that overlap the selection count, based on their respective bounding boxes).
Practice using these commands by reversing the z-order of the objects below, so that the leftmost ellipse is on top and the rightmost one is at the bottom:
An example image
A very useful selection shortcut is the Tab key.
If nothing is selected, it selects the bottommost object; otherwise it selects the object above the selected object(s) in z-order.
Shift+Tab works in reverse, starting from the topmost object and proceeding downwards.
Since the objects you create are added to the top of the stack, pressing Shift+Tab with nothing selected will conveniently select the object you created last.
Practice the Tab and Shift+Tab keys on the stack of ellipses above.
Selecting under and dragging selected
What to do if the object you need is hidden behind another object? You may still see the bottom object if the top one is (partially) transparent, but clicking on it will select the top object, not the one you need.
This is what Alt+click is for.
First Alt+click selects the top object just like the regular click.
However, the next Alt+click at the same point will select the object below the top one; the next one, the object still lower, etc.
Thus, several Alt+clicks in a row will cycle, top-to-bottom, through the entire z-order stack of objects at the click point.
When the bottom object is reached, next Alt+click will, naturally, again select the topmost object.
[If you are on Linux, you might find that Alt+click does not work properly.
Instead, it might be moving the whole Inkscape window.
This is because your window manager has reserved Alt+click for a different action.
The way to fix this is to find the Window Behavior configuration for your window manager, and either turn it off, or map it to use the Meta key (aka Windows key), so Inkscape and other applications may use the Alt key freely.]
This is nice, but once you selected an under-the-surface object, what can you do with it? You can use keys to transform it, and you can drag the selection handles.
However, dragging the object itself will reset the selection to the top object again (this is how click-and-drag is designed to work — it selects the (top) object under cursor first, then drags the selection).
To tell Inkscape to drag what is selected now without selecting anything else, use Alt+drag.
This will move the current selection no matter where you drag your mouse.
Practice Alt+click and Alt+drag on the two brown shapes under the green transparent rectangle:
An example image
Selecting similar objects
Inkscape can select other objects similar to the object currently selected.
For example, if you want to select all the blue squares below first select one of the blue squares, and use Edit > Select Same > Fill Color from the menu.
All the objects with a fill color the same shade of blue are now selected.
An example image
In addition to selecting by fill color, you can select multiple similar objects by stroke color, stroke style, fill & stroke, and object type.
Create Tiled Clones
Edit > Clone > Create Tiled Clones
Radial placement with Tiled Clones
It's easy to see how to use the Create Tiled Clones dialog for rectangular grids and patterns.
But what if you need radial placement, where objects share a common center of rotation? It's possible too! If your radial pattern only needs to have 3, 4, 6, 8, or 12 elements, then you can try the P3, P31M, P3M1, P4, P4M, P6, or P6M symmetries.
These will work nicely for snowflakes and the like.
A more general method, however, is as follows.
Choose the P1 symmetry (simple translation) and then compensate for that translation by going to the Shift tab and setting Per row/Shift Y and Per column/Shift X both to -100%.
Now all clones will be stacked exactly on top of the original.
All that remains to do is to go to the Rotation tab and set some rotation angle per column, then create the pattern with one row and multiple columns.
For example, here's a pattern made out of a horizontal line, with 30 columns, each column rotated 6 degrees:
To get a clock dial out of this, all you need to do is cut out or simply overlay the central part by a white circle (to do boolean operations on clones, unlink them first).
More interesting effects can be created by using both rows and columns.
Here's a pattern with 10 columns and 8 rows, with rotation of 2 degrees per row and 18 degrees per column.
Each group of lines here is a “column”, so the groups are 18 degrees from each other; within each column, individual lines are 2 degrees apart:
In the above examples, the line was rotated around its center.
But what if you want the center to be outside of your shape? Just click on the object twice with the Selector tool to enter rotation mode.
Now move the object's rotation center (represented by a small cross-shaped handle) to the point you would like to be the center of the rotation for the Tiled Clones operation.
Then use Create Tiled Clones on the object.
This is how you can do nice “explosions” or “starbursts” by randomizing scale, rotation, and possibly opacity:
How to do slicing (multiple rectangular export areas)?
Create a new layer, in that layer create invisible rectangles covering parts of your image.
Make sure your document uses the px unit (default), turn on grid and snap the rects to the grid so that each one spans a whole number of px units.
Assign meaningful ids to the rects, and export each one to its own file (File⇒Export PNG Image (Shift+Ctrl+E)).
Then the rects will remember their export filenames.
After that, it's very easy to re-export some of the rects: switch to the export layer, use Tab to select the one you need (or use Find by id), and click Export in the dialog.
Or, you can write a shell script or batch file to export all of your areas, with a command like: inkscape -i area-id -t filename.svg
for each exported area.
The -t switch tells it to use the remembered filename hint, otherwise you can provide the export filename with the -e switch.
Alternatively, you can use the Extensions⇒Web⇒Slicer extensions, or Extensions⇒Export⇒Guillotine for similar results.
Non-linear gradients
The version 1.1 of SVG does not support non-linear gradients (i.e. those which have a non-linear translations between colors).
You can, however, emulate them by multistop gradients.
Start with a simple two-stop gradient (you can assign that in the Fill and Stroke dialog or use the gradient tool).
Now, with the gradient tool, add a new gradient stop in the middle; either by double-clicking on the gradient line, or by selecting the square-shaped gradient stop and clicking on the button Insert new stop in the gradient tool's tool bar at the top.
Drag the new stop a bit.
Then add more stops before and after the middle stop and drag them too, so that the gradient looks smooth.
The more stops you add, the smoother you can make the resulting gradient.
Here's the initial black-white gradient with two stops:
And here are various “non-linear” multi-stop gradients (examine them in the Gradient Editor):
Excentric radial gradients
Radial gradients don't have to be symmetric.
In Gradient tool, drag the central handle of an elliptic gradient with Shift.
This will move the x-shaped focus handle of the gradient away from its center.
When you don't need it, you can snap the focus back by dragging it close to the center.
Aligning to the center of the page
To align something to the center or side of a page, select the object or group and then choose Page from the Relative to: list in the Align and Distribute dialog (Shift+Ctrl+A).
Cleaning up the document
Many of the no-longer-used gradients, patterns, and markers (more precisely, those which you edited manually) remain in the corresponding palettes and can be reused for new objects.
However if you want to optimize your document, use the Clean Up Document command in File menu.
It will remove any gradients, patterns, or markers which are not used by anything in the document, making the file smaller.
Hidden features and the XML editor
The XML editor (Shift+Ctrl+X) allows you to change almost all aspects of the document without using an external text editor.
Also, Inkscape usually supports more SVG features than are accessible from the GUI.
The XML editor is one way to get access to these features (if you know SVG).
Changing the rulers' unit of measure
In the default template, the unit of measure used by the rulers is mm.
This is also the unit used in displaying coordinates at the lower-left corner and preselected in all units menus.
(You can always hover your mouse over a ruler to see the tooltip with the units it uses.) To change this, open Document Properties (Shift+Ctrl+D) and change the Display units on the Page tab.
Stamping
To quickly create many copies of an object, use stamping.
Just drag an object (or scale or rotate it), and while holding the mouse button down, press Space.
This leaves a “stamp” of the current object shape.
You can repeat it as many times as you wish.
Pen tool tricks
In the Pen (Bezier) tool, you have the following options to finish the current line:
Press Enter
Double click with the left mouse button
Click with the right mouse button
Select another tool
Note that while the path is unfinished (i.e. is shown green, with the current segment red) it does not yet exist as an object in the document.
Therefore, to cancel it, use either Esc (cancel the whole path) or Backspace (remove the last segment of the unfinished path) instead of Undo.
To add a new subpath to an existing path, select that path and start drawing with Shift from an arbitrary point.
If, however, what you want is to simply continue an existing path, Shift is not necessary; just start drawing from one of the end anchors of the selected path.
Entering Unicode values
While in the Text tool, pressing Ctrl+U toggles between Unicode and normal mode.
In Unicode mode, each group of 4 hexadecimal digits you type becomes a single Unicode character, thus allowing you to enter arbitrary symbols (as long as you know their Unicode codepoints and the font supports them).
To finish the Unicode input, press Enter.
For example, Ctrl+U+2+0+1+4+Enter inserts an em-dash (—).
To quit the Unicode mode without inserting anything press Esc.
You can also use the Text⇒Unicode Characters dialog to search for and insert glyphs into your document.
Using the grid for drawing icons
Suppose you want to create a 24x24 pixel icon.
Create a 24x24 px canvas (use the Document Preferences) and set the grid to 0.5 px (48x48 gridlines).
Now, if you align filled objects to even gridlines, and stroked objects to odd gridlines with the stroke width in px being an even number, and export it at the default 96dpi (so that 1 px becomes 1 bitmap pixel), you get a crisp bitmap image without unneeded antialiasing.
Object rotation
When in the Selector tool, click on an object to see the scaling arrows, then click again on the object to see the rotation and skew arrows.
If the arrows at the corners are clicked and dragged, the object will rotate around the center (shown as a cross mark).
If you hold down the Shift key while doing this, the rotation will occur around the opposite corner.
You can also drag the rotation center to any place.
Or, you can rotate from keyboard by pressing [ and ] (by 15 degrees) or Ctrl+[ and Ctrl+] (by 90 degrees).
The same [] keys with Alt perform slow pixel-size rotation.
Drop shadows
To quickly create drop shadows for objects, use the Filters⇒Shadows and Glows⇒Drop Shadow feature.
You can also easily create blurred drop shadows for objects manually with blur in the Fill and Stroke dialog.
Select an object, duplicate it by Ctrl+D, press PgDown to put it beneath original object, place it a little to the right and lower than original object.
Now open Fill And Stroke dialog and change Blur value to, say, 5.0.
That's it!
Placing text on a path
To place text along a curve, select the text and the curve together and choose Put on Path from the Text menu.
The text will start at the beginning of the path.
In general it is best to create an explicit path that you want the text to be fitted to, rather than fitting it to some other drawing element — this will give you more control without screwing over your drawing.
Selecting the original
When you have a text on path, a linked offset, or a clone, their source object/path may be difficult to select because it may be directly underneath, or made invisible and/or locked.
The magic key Shift+D will help you; select the text, linked offset, or clone, and press Shift+D to move selection to the corresponding path, offset source, or clone original.
Window off-screen recovery
When moving documents between systems with different resolutions or number of displays, you may find Inkscape has saved a window position that places the window out of reach on your screen.
Simply maximise the window (which will bring it back into view, use the task bar), save and reload.
You can avoid this altogether by unchecking the global option to save window geometry (Inkscape Preferences, Interface⇒Windows section).
Transparency, gradients, and PostScript export
PostScript or EPS formats do not support transparency, so you should never use it if you are going to export to PS/EPS.
In the case of flat transparency which overlays flat color, it's easy to fix it: Select one of the transparent objects; switch to the Dropper tool (F7 or d); make sure that the Opacity: Pick button in the dropper tool's tool bar is deactivated; click on that same object.
That will pick the visible color and assign it back to the object, but this time without transparency.
Repeat for all transparent objects.
If your transparent object overlays several flat color areas, you will need to break it correspondingly into pieces and apply this procedure to each piece.
Note that the dropper tool does not change the opacity value of the object, but only the alpha value of its fill or stroke color, so make sure that every object's opacity value is set to 100% before you start out.
Interactivity
Most SVG elements can be tweaked to react to user input (usually this will only work if the SVG is displayed in a web browser).
The simplest possibility is to add a clickable link to objects.
For this right-click the object and select Create Link from the context menu.
The "Object attributes" dialog will open, where you can set the target of the link using the value of href.
More control is possible using the interactivity attributes accessible from the "Object Properties" dialog (Ctrl+Shift+O).
Here you can implement arbitrary functionality using JavaScript.
Some basic examples:
Open another file in the current window when clicking on the object:
Set onclick to window.location='file2.svg';
Open an arbitrary weblink in new window when clicking on the object:
Set onclick to window.open("https://inkscape.org","_blank");
Reduce transparency of the object while hovering:
Set onmouseover to style.opacity = 0.5;
Set onmouseout to style.opacity = 1;
Illustrator VS Inkscape | The Complete Guide for Vector Designers
Illustrator VS Inkscape | The Complete Guide for Vector Designers
One of the most common questions I receive is how Inkscape compares to Illustrator, and if one is better than the other.
The two applications are very similar and have a lot in common, but despite that there's still enough differences between them for a worthwhile comparison to be made.
In this post I'm going to break that all down and go over some the advantages and disadvantages of Illustrator vs Inkscape.
Before we get started I'd just like to address any potential bias.
As someone who earns their living teaching people how to use Inkscape, it wouldn't be unreasonable for you to assume that I'm approaching this with some kind of bias or agenda, but I can assure you that I'm going to be as fair and objective as possible.
And for what it's worth, I do also make Illustrator tutorials, so it's not like I don't have a vested interest in that software as well.
Illustrator VS Inkscape
Believe it or not, both applications are actually quite similar and equally capable.
It's not like the comparison you would make between something like Photoshop and GIMP, where, as much as I love GIMP, Photoshop is clearly more extensive.
And rightly so! Photoshop is the flagship product of a $100 billion corporation.
This is by no means an indictment on the GIMP team.
But when it comes to Illustrator vs Inkscape, there's not nearly as much disparity between the two programs.
Hardly any, in fact.
Let's break this down a little further.
What I Like About Inkscape
First and foremost, the thing that I love most about Inkscape is its low barrier to entry.
Illustrator is sold on a monthly/yearly subscription-based pricing model, whereas Inkscape is just completely free.
It's made by a team of passionate volunteers who built it as a labor of love.
And the reason why I think that's so important doesn't have as much to do with money as it does with how accessible that makes it.
Inkscape opens the door a little wider for hobbyists and anyone who may have a passing interest in vector design, who may not be able to justify spending money on something they're not quite sure they'll like yet.
This actually describes me at one point in time.
When I first wanted to learn about vector design over 10 years ago, I couldn't afford Adobe Illustrator.
This was before they had their monthly subscription model, and back then I believe it cost somewhere in the ballpark of $600 just to buy a copy of it.
Not only did I not have that kind of money sitting around, I certainly couldn't justify spending that much on something that was, at the time, just a hobby.
Inkscape was my foot in the door to the graphic design world, and without having it as a free alternative, I might not have ever realized just how much I enjoy design, and I might not have ever pursued it as a career either.
Because of this I can't help but wonder how many others are in the same position I was in 10+ years ago.
How many future graphic designers are out there who will one day be creating great work and providing real value to the world because of free applications like Inkscape and GIMP that allowed them to test the waters?
Less Demanding Hardware Requirements
One big advantage Inkscape has is that it's far less demanding in terms of hardware.
You can run Inkscape relatively well on some low-end consumer-grade computers, which is something that certainly can't be said for Illustrator.
As of the date of this post, Adobe's recommended hardware specifications for running Illustrator are a multi core processor, 16 GB of memory, and a GPU with 4 GB of VRAM.
Inkscape, on the other hand, runs just fine on much less than that.
In fact, the first computer I ever used Inkscape with was a refurbished Emachines that I got from Ebay for less than $200.
It didn't exactly run Inkscape with ease, but it did run well enough for me to be productive with it.
And if you compare that to 2020's standards, the technology has come far enough that pretty much any consumer-grade laptop should run Inkscape relatively well.
This reinforces my previous point about Inkscape having a lower barrier to entry.
If you're a casual user who just wants to experiment with vector design, not only do you not have to purchase software, but you won't have to purchase expensive components either.
Assuming what you have isn't too outdated, you should be able to hit the ground running with Inkscape right away.
Operating System
Another advantage Inkscape has is that it's available on all three operating systems, which is something that can't be said for Illustrator.
You can run Illustrator on Windows and Mac, but if you're a Linux user then you're out of luck, but that's okay because Inkscape is here for you.
In fact, Inkscape seems to run better in a Linux environment.
If you go back and watch some of my older videos on my YouTube channel you'll see that I'm a former Ubuntu user myself, and Inkscape ran just fine.
Functionality
In this section I'm going to get into some of the features and functionality in Inkscape that I really like, starting with gradients.
If there's one thing I can't stand about Illustrator, it's working with gradients.
It just feels so needlessly complicated and counter-intuitive.
Inkscape, on the other hand, makes it easy.
You can edit the gradients directly on the canvas, add and remove stops, change colors, and move the handles around easily.
It doesn't even take much time to learn how it works because it all just feels so intuitive.
Working with gradients in Inkscape is more efficient.
I don't understand why Illustrator doesn't use a similar approach.
I can't think of a single scenario in which their method of working with gradients is more productive.
Working with gradients in Illustrator can be cumbersome at times.
Nodes/Anchor Points
Another thing I like about Inkscape is the Edit Paths By Nodes tool.
It's a single tool that allows you to edit the nodes of an object — otherwise known as Anchor Points in Illustrator — in every conceivable way.
Illustrator also allows you to edit anchor points, but for whatever reason it's divided up among several tools.
There's the Direct Selection tool, the Anchor Points tool, the Add Anchor Points tool, and the Remove Anchor Points tool.
Inkscape lets you do all of these things with just a single tool.
It's far more efficient.
Canvas Navigation
Finally, the last thing I want to talk about is canvas navigation.
Navigating around the canvas in Inkscape is just easier.
All you have to do is press down the mouse wheel and move the mouse around.
In Illustrator you have to press down the space bar, and then click and drag your mouse.
It requires an extra click, and it also requires both hands.
In Inkscape you can navigate around the canvas with just 1 hand.
Navigating the canvas with Inkscape only takes 1 click and 1 hand.
I know that sounds like a silly comparison to make, but it's really not.
When you think about it in terms of an 8 hour work day, these little things do add up.
What I Like About Illustrator
Now I'm going to talk a little bit about what I like better about Adobe Illustrator vs Inkscape.
First and foremost, Adobe software is the industry standard.
If you want to be employed in the graphic design industry, whether it be by a studio, an agency, a media company, or even a print shop, they're most likely going to require you to be proficient with the Adobe family of software, which includes Illustrator.
So learning how to use something as prominent as Illustrator vs Inkscape can give you an enormous advantage.
Even if you don't plan on ever becoming employed as a designer, it is good to know that you have that option to fall back on as a plan B.
As far as Inkscape goes, I've never heard of an employer that requires you to know Inkscape, nor have I ever seen it listed as a job requirement.
You can still be a freelancer as an Inkscape user, but if you want to gain employment as a designer you're going to need to know the Adobe suite.
Support & Documentation
Another thing I really like about Illustrator vs Inkscape is that there's a lot more support and documentation widely available online.
So if you're running into any kind of problems or technical issues, you can probably find a solution relatively easy.
Even if you can't, just reach out to their support team.
You are a paying customer after all.
Inkscape, on the other hand, is supported by volunteers and independent content creators like myself, and we're not yet as big of a community as the Illustrator community is.
So there's been many occasions where I've had some kind weird glitch or error message in Inkscape and couldn't find any fixes or explanations for it.
I've been working to change that by creating a lot of articles and videos that address some of the common problems Inkscape users have, but I'm only one person and there's only so much I can do personally.
Compatibility
One benefit you'll certainly enjoy as an Illustrator user is how well it translates across the other Adobe applications.
Once you have a basic understanding of how Illustrator works, it becomes much easier to learn Photoshop or Premiere Pro because a lot of the basic functions are the same.
Not only that, but all of these applications work really well with each other.
You can export a layered PSD file with Illustrator and open it with Photoshop with no cross-platform compatibility issues.
You can also do the same with creating paths in Photoshop to be worked on further in Illustrator later on.
That's not to say that you can't work cross-platform with Inkscape and other open source applications like GIMP and Blender, you just won't have that same ease of use and seamless compatibility that you get with the Adobe suite.
Features
So, let's talk about some of the features that I really like in Illustrator vs Inkscape, the first of which would be the Shape Builder tool, which is my personal favorite feature in Illustrator.
The Shape Builder tool is kind of like a live path effect that allows you to perform multiple path operations at once, and directly on the canvas.
The closest you can get to something like that in Inkscape would be if you combined all of the objects together and then did a division path operation with another object, kind of like what I did in my tutorial about creating a golden ratio logo.
Then you can just delete the unwanted objects individually.
It's still not as good as the Shape Builder tool though, so hopefully Inkscape will introduce something similar in the future.
Envelope Distortions
Another thing I really like about Illustrator is the Envelope Distort feature.
This pretty much allows you to make one object fit the shape of another object.
I find this to be really useful for working with text and warping it to fit other objects and shapes.
There's even a handy list of presets that can be used with ease.
The closest thing we have to something like this in Inkscape would be the perspective tool, the bend tool, and the lattice deformation path effect.
All are useful, but not nearly as versatile as Illustrator's envelope distort feature.
Batch Exporting
The final reason why I really like Illustrator is that it saves me a lot of time in the production phase a design project, where you have to produce all of the final files and formats.
This is where the Batch Export feature really comes in handy.
It allows you to export multiple objects, in multiple different file formats, all at once.
Compare that to Inkscape where you have to save all of those files and formats individually, one-by-one.
It takes a lot more time.
Inkscape does have a batch export feature, but it's only for PNG files.
Illustrator allows you to batch export a variety of different formats.
Which Is Better?
The important question here isn't which software is better, it's which one is better for you? I don't think one is objectively better than the other, so this is something that needs to be based on your own personal needs.
Who should use Inkscape?
Inkscape would be the better option for you if you're just curious about vector design and want to give it a try.
There's really no need to commit to software licensing and costly hardware upgrades just so you can dabble around with Illustrator.
Give Inkscape a try first, then if you really like it and want to get more serious about your design work later on, you can move on to Illustrator in the future.
Once you know how to use Inkscape, you can learn Illustrator in no time.
They both function very similarly.
Inkscape would also be the better option for you if you're a web designer, an app developer, or anyone who may occasionally need some vector designs as an ancillary part of their work.
For example, let's say you're a web designer and you need to quickly put together some menu icons for a page you're designing, Inkscape would be perfect for you.
Same for app developers.
If you just need to design app icons, splash screens, and various other user interface, you'd be throwing your money away by purchasing Illustrator.
Inkscape can do all of that just fine.
The same goes for anyone else who may do some other kind of remote work online, like YouTubers, bloggers, Instagram influencers, digital marketers, so on and so forth.
If graphic design is not what you do specifically, but rather an ancillary part of your work, Inkscape is the perfect option for you.
Licensing Adobe software just to design some Google display ads would be overkill.
You can do all of that with Inkscape.
Inkscape would also be the better option for you if you work with a CNC plasma cutter and need to work with vector designs for custom steel signs, for example.
Same with cutting plotters like Cricut.
Purchasing Illustrator for this sort of work would not only be unnecessary, but it wouldn't even make your life any easier.
Vector design in this context is so basic that you'll never need anything more complex than Inkscape.
Finally, if you want to get started as a freelance designer but you don't yet have the money for Illustrator and the hardware necessary for optimal performance, Inkscape is more than enough to get you started.
Like I mentioned earlier, proficiency with the Adobe Creative Suite is often a job requirement when seeking employment, but if you want to be a freelancer then it doesn't matter which tool you use.
The clients who hire don't care whether you're using Illustrator vs Inkscape, they just care about whether or not you can solve their problems.
I've been a freelancer for over 8 years and have designed logos for thousands of happy clients using Inkscape, and I can count on one hand the number of times I've been asked what software I'll be using to create their logo.
And even then, they were just asking because they were curious.
It's like they ran away in disgust after I said "Inkscape."
Who should use Illustrator?
If you're serious about a career as a graphic designer, and you'd like to seek employment in this field someday, you should absolutely focus on learning Illustrator vs Inkscape.
Like I mentioned earlier, Adobe software is the industry standard, and it doesn't look like that's going to change any time soon.
And I'll say the same for freelancers as well.
Yes, you can get away with using Inkscape as a freelancer, but if you can afford Illustrator and it's practical for you to license a copy of it, you absolutely should.
There's just too many issues you'll run into down the line, like outputting your work in a CMYK color format, and compatibility issues when working with files and templates that were created by other designers using Adobe software.
Illustrator is also a great option if you're already paying for the Adobe Creative Suite.
For example, let's say you're a YouTuber who regularly edits their videos with Premiere, or a Photographer who uses Photoshop to touch up their photos.
If you're already paying for an Adobe subscription, then yeah, get your money's worth and use Illustrator.
I mean, you're already paying for it!
The same applies for students.
I know a lot of schools supply their students with free copies of Adobe software, so if that's the case for you then give it a try and see if you like it.
It's not like you have anything to lose.
Conclusion
One final point I'd like to make is that Illustrator and Inkscape are just tools, and a tool will only ever be as good as the person using it.
A talented designer can make a better logo with crayons and a napkin than a beginner with the latest greatest software running on a super computer.
It's not the tools that matter, it's the person using the tools that matters, so try not to overthink it.
And before I close this post out, I'd just like plug my Inkscape Master Class, which is a collection of over 50 videos I go through every single tool and feature in Inkscape and explain what it is and demonstrate how it works.
Check that out if you're interested in learning more about Inkscape.
And if you'd like to learn more about Illustrator, maybe check out my other channel for Illustrator tutorials.
I've been putting a lot of work into that channel lately and really trying to ramp things up over there.
If you have any questions leave a comment below, and as always, thanks for watching!
10 Hidden Inkscape Secrets That Will Improve Your Workflow
10 Hidden Inkscape Secrets That Will Improve Your Workflow
Inkscape is a capable open source alternative to commercial vector graphics applications like Illustrator and CorelDraw.
It has a lot of features that make it shine, but many of Inkscape's most useful features are nestled in obscure areas.
In this post I'll be sharing 10 of those hidden features and how they can improve your workflow once you're aware of them.
10 Hidden Features in Inkscape
One of the benefits of having used Inkscape on a near full-time basis for the past 8 years is that I've become quite familiar with it.
I've learned a lot of handy tricks and shortcuts that have saved me countless hours in the long run.
#1: Aligning Nodes
In Inkscape you can align and distribute individual nodes the same way you would align a selection of objects.
To do so, select multiple nodes with the Edit Paths By Nodes tool and navigate to the Align & Distribute menu.
You'll see a dedicated panel titled "Nodes" that allows you to align your nodes the same way you would align objects.
This can come in handy if you're trying to alter your objects so that they have some degree of symmetry.
#2: Alt-Clicking Multiple Objects
We all know that you can select multiple objects in Inkscape by shift-clicking them, or by clicking and dragging a selection around them, but a lesser-known technique for selecting multiple objects is to hold Alt on your keyboard and click and drag a red line through them.
This is very useful because it allows you to select multiple objects with more precision than if you were to simply create a bounding box around them.
With a bounding box you have no choice but to select every object within the boundaries, even if they're objects you don't want to select.
Alt-clicking allows you to exclude those objects.
#3: Scale, Shear, and Rotate Nodes
As we already know, the Select Tool allows you to select objects, scale them, rotate, and shear them.
What you may not know, however, is that you can do the same with individual nodes by activating a setting in the tool features of the Edit Paths By Nodes tool.
Within the tool settings at the top-right side of your screen you should see an icon labeled "Show transformation handles for selected nodes," depicted as a series of four arrows.
Activating this setting will allow you to edit the individual nodes of an object the same way you would edit an object itself with the Select Tool.
This is particularly useful for creating custom shapes with symmetry.
#4: Selecting Objects By Fill & Stroke Data
There's various different ways to select multiple objects in Inkscape, but a lesser-known method that has proven to be very useful in my own workflow is to select individual objects by fill color, stroke color, or fill and stroke color.
This can be accomplished by selecting an object and navigating to Edit > Select Same > Fill & Stroke.
Inkscape will then select every other object on the canvas with the same fill and stroke color.
You can also select objects by…
Just the fill color
Just the stroke color
Stroke style
Object type
This can be useful when working with complex designs with many objects.
I've personally found this to be useful when designing and editing patterns.
#5: Creating Custom Templates
Within Inkscape there's a handy feature that allows you to open a new document based on a specific template.
If you navigate to File > New From Template, you'll have the option of opening a new document that is already sized to fit specific branding assets like business cards, DVD covers, and desktop wallpapers.
What you may not know is that you can manually create your own templates in SVG format and add them to this list by navigating to (C:) > Program Files > Inkscape > Share > Templates and pasting them in there.
And the next time you restart Inkscape your custom templates will populate in that list.
I've personally found this to be useful for creating templates for certain types of designs that I create frequently, like YouTube thumbnails and cover graphics for social media.
#6: Batch Export PNG Images
Inkscape has a setting in its Export menu that allows you to export multiple objects as individual PNG files, but it's easy to miss it if you're not looking for it.
Simply tick the box labeled "Batch export all selected objects" before exporting your work.
This is particularly useful for designing something like an app icon, where you need to generate the same design in many different sizes.
#7: Open Illustrator Files
One of the biggest downsides of using open source software as a graphic designer is some of the cross-platform compatibility issues you'll run into when a client or another designer wants to send you an Adobe-specific file to work with, like Illustrator's .AI format.
However, you can easily open Illustrator files with Inkscape by simply changing the file's name from .ai to .pdf.
Inkscape will then treat the Illustrator file like a PDF file when you go to open it.
This also works in reverse.
If someone requests an Illustrator file specifically, just save your work as a PDF document and change the name so that it ends in .ai.
#8: Turning Objects Into Patterns
There's many different ways to create patterns from objects in Inkscape, but one of the easiest ways is to simply select the object and go to Object > Pattern > Objects To Pattern.
You'll then be able to activate the Nodes tool and maneuver the handles to adjust the pattern to your liking.
#9: Converting Objects To Bitmaps
Inkscape allows you to quickly convert your vector designs into raster bitmaps if you so desire.
You can do this by selecting your work and navigating to Edit > Make A Bitmap Copy.
Not only will Inkscape generate a raster copy of your selected design, but it will save a copy of it in whatever folder you currently have your work saved in.
This is useful because vector graphics tend to retain more data than raster graphics, and they take up more disk space because of it.
This means that if you're working on a large, complex design with lots of vector objects, you may run into performance issues with your computer.
Converting your designs to bitmap can help mitigate that by freeing up system resources.
#10: Custom Angle Guides
As you may already know, you can create guides in Inkscape by clicking and dragging on the rulers on the top and left edges of your document.
By default, you'll be able to create both horizontal and vertical guides, as well as guides at 45 degree angles.
What you may not know though, is that you can manually adjust the angle of the guide by double-clicking it, which will bring up a settings menu.
This will allow you to adjust some of the properties of that guide, like its color, position on the canvas, and its angle.
This can prove useful when designing geometric shapes that need to be drawn at specific angles.
Conclusion
That should do it for this list of hidden features in Inkscape.
Leave a comment below to let me know what you think.
Did you already know about any of these features? And more importantly, now that you do know about them, will you be using them? As always, thanks for watching!
How To Create Double Exposure Logos with Inkscape
How To Create Double Exposure Logos with Inkscape
In this tutorial I'll be demonstrating how to create double exposure logos using Inkscape.
Double exposure is a technique that allows you to create an optical illusion in which two objects are exposed at once.
In order for this to work in a logo design, the objects will be merged together to make a single object.
This is something that is usually implemented in photography and photo editing, but if done right it can work just as a logo design as well.
The following is just a brief overview of the steps taken to create our double exposure logo.
Please watch the video tutorial at the top of the page for complete step-by-step instruction.
Create A Double Exposure Logo
To create a double exposure logo with Inkscape, we're first going to need a couple of objects to work with so we can combine them together.
As you can see in the thumbnail of the video, I merged together a bear with a skyline of trees.
I got these graphics from Pixabay.
Click the image below to be taken to the download page for the corresponding graphic.
Make sure to download the SVG file when you're on the download page, otherwise the techniques will be using in this tutorial won't work.
Once you've downloaded the two graphics, import them into Inkscape, give them each different colors, bring their opacity down roughly in half, then place them over each other as depicted below.
We'll be taking an intersecting sample of these two objects, so make sure to position them wherever you'd like that sample to be taken.
In order to generate an intersecting sample we'll be using the Intersectionpath function.
However, if you execute this function with the graphic as it you will end up with the tops of the trees being excluded from the design.
We want those trees to be included, so we're going to manually draw an object going around them and through the bear.
Now we need to unify that newly-created shape with the bear, so select both of them and navigate to Path > Union.
Now we can generate our intersection sample.
To do this, select both the bear and the trees, then navigate to Path > Intersection.
At this point the design is pretty much finished.
We just have to bring the opacity back up to 100%, fill it with whatever color you'd like, then add some text.
And that's it! That's how you can go about create a double exposure logo with Inkscape.
If you have any questions simply leave a comment below.
As always, thanks for watching!
12 Professional Logos Designed with Inkscape | 2020 Edition
12 Professional Logos Designed with Inkscape | 2020 Edition
A couple of years ago I made a post showcasing some of the logos I had designed for my clients using Inkscape over the previous 12 months.
I figured I'd make a new post doing something similar where I share some more professional logos designed with Inkscape over the past year.
I design logos for a lot of clients every year, and I think it's important to regularly demonstrate that open source software can be used professionally, so I might make this an annual thing.
Professional Logos Designed with Inkscape
The following are examples of logos that I've created for actual paying clients since April of 2019.
Each logo was designed with my vector graphics software of choice — Inkscape.
1. CityTour1
This logo is for a guided walking tour in New York City.
The design was inspired by the lettering and style of the signs on the subways.
The walking figure in the bottom-right of the icon was inspired by the stop/walk street signals, which is a perfect fit since this is a walking tour.
2. Songs Of War
This logo is for a medieval-themed board game.
I took medieval-style font and added some character to it with perspective and an arch.
And if you look closely, you'll see that the F in "Of" is a sword.
This sword icon was later on used as a standalone icon variation of the logo.
3. Simply Irresistible
This design was for a healthy cafe that didn't have a particular theme or type of food they serve.
It's just a general cafe, so it was challenging to come up with a fitting design for it.
In the end I went with a simple depiction of a wordmark design over a cutting board, and with the I in "Simply" represented by a knife.
I think it has a modern, simple, and casual look that is fitting for a healthy cafe.
4. Sticky Site Content
Sticky Site Content is a writing service.
The overarching theme of this writing service is that they specialize in writing content for the web that prevents users from bouncing (or leaving the site without clicking on anything else,) so they essentially "stick" around.
My approach for this logo was to place a subtle thumbtack (for "sticking") within the negative space of the letter S and use that as an icon.
For the fonts I used a pairing of Acre and Dynalight — one of my favorite duos that I listed in an article about logo font pairings I wrote last year.
I was so happy with how this design came out that I featured it on my portfolio.
5. K5 Logo
The goal for this logo was to create a retro look, but not just any retro look.
It had to be specific to the 60's.
The client wanted it to look like something you would see before an old television show.
In the end I went with an iconic mark that combines the K and 5 and extends into a surrounding emblem to make it look unique and distinguished.
I had to look at a lot of examples of design from this era to really know how to approach this one.
6. Philadelphia Skyline
This logo was for a local client who wanted something Philadelphia-related.
I created an emblem-style design with a text banner going over it and the Philadelphia skyline in the background.
The client ended up not using this design, so it's available for sale if interested.
7. Panda Logo
This design was meant for a SAAS business.
The name is pretty straightforward in suggesting what should be depicted in the logo — a panda and a beehive, so that's what I designed.
This is a simple panda holding a beehive.
I gave it a casual, whimsical style.
8. Assistem
This logo is for an S.O.S.
device for the elderly.
It's a single button that when pressed it connects you with a relative or loved one.
The name is a play on "assistance" and "stem", which means voice in Dutch.
The sentiment this client wanted me to communicate with his logo is "the voice that leads you back home," so I designed an icon that depicts a simple house with sound waves coming from it.
I paired it with Michroma — a really nice technological-style font.
I added this one to my portfolio as well.
9. Dog Tracing
Logos can sometimes start off as a photograph.
This client wanted me to use a picture of his dog as inspiration for his logo, which is exactly what I did.
I've actually gotten a lot of clients wanting me to create logos for them using their photographs ever since I made a tutorial about doing so with GIMP last year.
10. GDQuest
GDQuest is an educational platform for learning about game design with Open Source software.
They have a pretty big YouTube channel as well (some of you may be subscribers yourselves!) Last year I had the honor of redesigning their logo.
My approach was to depict G and D as gears to represent creating something.
I made the typography and colors have a fun, playful style suitable for gaming.
11. Farm Academy
This is one of my favorite professional logos designed with Inkscape because of its use of negative space.
I've always been a big fan of using negative space within logos, and there was a perfect opportunity for it here.
The goal for this logo was to depict something relating to both farming and science, so I went with a microscope that has a chicken sitting in some grass within the negative space.
The client ended up selecting a different design, so this one is available for sale if interested.
12. Supply Co
The goal for this design was to depict something industrial and vintage with a super hero-like theme.
I ended up creating a simple letter A with a superhero mask overlaying it to represent the arm of the A.
Pretty straightforward.
The client ended up not using this design, so it's available if you're interested.
That should do it for this year's edition of professional logos designed with Inkscape.
Don't let anyone tell you that open source software can't produce professional results!
6 Reasons Why Union Is Not Working In Inkscape | Path Functions
6 Reasons Why Union Is Not Working In Inkscape | Path Functions
Merging objects together via the Union path function is one of the most basic and frequently-used functions in Inkscape.
However, it doesn't always work the way you expect it to work.
In this post I'll be covering 6 common reasons why union is not working in Inkscape.
This also applies to other path functions like difference and intersection as well.
Path Functions
Path functions in Inkscape allow you to dictate how objects interact with each other.
You can merge objects together, use one to cut a hole in the other, create a new object from the intersecting area of several objects, etc.
As powerful as path functions are though, they don't always work as expected.
This is usually because path functions only work on individual objects that are paths.
So this means objects like raster images, clips, and masks are excluded (for the most part.)
One problem you may run into frequently if you're a newcomer to Inkscape is certain path functions (like Union) not working.
This is something that used to confuse me as well when I was learning Inkscape.
It may not make sense just yet, but I can assure you there is a logical explanation for why union is not working in Inkscape.
Let's explore some of the reasons this may be happening.
Common Reasons Why Union Is Not Working In Inkscape
If a basic path function like Union is not working in Inkscape, it's because path functions only work on individual objects that are paths.
Make sure that your objects aren't grouped together.
If you find it easier to learn in video format then be sure to watch the video tutorial I've put together located at the top of the page!
Reason #1: Your Objects Are Grouped Together
The most common reason why union is not working in Inkscape is usually because you're trying to unify objects that are grouped together.
Path functions (like union) only work on individual objects that are paths.
They will not work on objects that are grouped together, so make sure to ungroup your objects by pressing control + shift + g (you may have to do this a few times to completely ungroup everything) then try again.
Reason #2: Text Objects
Performing path functions on text objects is a little tricky.
If your text object is still an editable text object then all of the path functions should work just fine.
You can determine if it's still a text object by referencing the little node in the bottom-left corner of the object.
You can also grab the Text Tool and see if it's still editable.
However, if you have converted your text object to a path then the path functions will not work.
The reason for this is because when you convert a text object to a path, the result is a grouping of individual letters, and as I've outlined above, path functions do not work on groups of objects.
So the fix for this is to simply ungroup your text object.
Reason #3: Strokes and Lines
Certain path functions (like union) only work on objects that have a fill area.
In the following example, the green circle has a full area, but the black stroke does not.
Since there's no fill area of the black line, there's nothing there to merge with the green circle as far as Inkscape is concerned.
If you unify these two objects together, you're just going to end up with a green circle.
If you want to unify the line and the circle together, you'll first have to convert the stroke to a path by selecting it and navigating to Path > Stroke to Path.
When you do this, the black line essentially becomes the fill area and you should be able to unify them now.
Reason #4: Clipped Objects
Another reason why union may not be working as expecting is because you're trying to apply it to an object that is clipped with another object.
A clipped object is not a path, so if you try performing path functions on a clipped object it is not going to work the way you expect it to work.
As you can see in the example above, the result of unifying the clipped blue star with the green circle is that Inkscape referenced the blue square, even though it wasn't visible any longer.
You simply cannot unify clipped objects in Inkscape.
Reason #5: Masked Objects
Path functions do not work on masked objects for the same reason they don't work on clipped objects — they are not paths.
In the example above I applied a raster image to a star to give it a grunge texture (I have a tutorial on that here if you want to check that out.)
If I were to unify these objects together, the result would be a green combination of both shapes, but without the texture.
This is because you cannot perform path functions on masked objects.
If I wanted to apply this texture to a combination of the two shapes, I'd need to unify then together first then apply the text.
Reason #6: Objects With Filters Applied
The final reason why a path function like union is not working in Inkscape is because you're trying to use an object that has a filtered applied, like the example below.
You theoretically can unify objects that have filters so long as they're paths.
However, the union function may not work as you expected.
This is because takes the properties of the lowest object and applies it to the new unified object.
So if I were to unify the two objects depicted above, the result would be a green combination of the circle and the square.
If I wanted the result to be a combination of the circle and the square with the filter applied, I would need to position the square beneath the circle.
Conclusion
These are the only 6 reasons I can think of why a path function like union wouldn't be working as expected.
If none of these addressed your problem then leave a comment below and I'll see if I can help.
As always, thanks for watching!
How To Cut A Hole In An Object With Inkscape | Beginner Tutorial
How To Cut A Hole In An Object With Inkscape | Beginner Tutorial
In this tutorial I'll be demonstrating how to cut a hole in an object with Inkscape.
This is a very basic function that is handy to know when working with vector objects, and it's a great lesson for beginners and first-time users of Inkscape.
The following is an overview of the steps taken to achieve this effect.
If you'd like a more in-depth explanation with step-by-step instructions, I'd highly recommend that you watch the video tutorial at the top of the page.
Cut A Hole In An Object With Inkscape
To cut a hole in an object with Inkscape, place the object you'd like to cut the hole with over the object you'd like it cut into, select them both, and navigate to Path > Difference.
In order to cut a hole in our object, we first need to define what shape the hole will be, and what object we'll be cutting the hole into.
For this tutorial I'll be using the following red square and blue star as an example.
My goal is to cut a hole in the red square using the blue star so that there's a star-shaped hole in the square with transparency/negative space showing through.
I placed both objects on a checkerboard pattern to help illustrate where the negative space (the "hole") will be.
Path Functions
To accomplish this we'll be using one of Inkscape's path functions.
More specifically, a path function known as Difference.
The Difference path function allows you to subtract an object from another object.
However, in order for it to work properly, there's a few conditions that need to be met…
The object you wish to subtract must be positioned above the object you wish to subtract it from.
Whichever object is on top is going to be what gets cut into the object beneath it.
Both objects must be pure vector paths otherwise it will not work.
They cannot be photos, raster images, text objects, or anything else that isn't a path.
It also cannot be paths that have filters, clips, or masks applied.
Both objects must be individual paths.
This particular path function will not work on groups of paths.
Everything must be ungrouped, and it cannot be more than 2 objects.
That said, let's get started.
The first thing I want to do is make sure that the object I wish to cut the hole with is positioned above the object I'm cutting it into.
In my example it would be the star.
So I'm going to make sure the star is raised to the top by selecting it and clicking the Raise Selection To The Top icon in the top toolbar.
Alternatively, you can simply press the Home key on your keyboard instead.
Click and drag your object over the object you'd like to cut the hole into and position it exactly where you'd like the hole to be.
Now, select both objects.
You can select both objects with the Select tool by holding Shift and clicking on each.
You can also select them by clicking and dragging to create a bounding box that encapsulates them both.
With both objects selected, navigate to Path > Difference.
If done correctly, you should have successfully cut a hole in your object, as indicated by my example below.
Notice the checkerboard pattern showing through the negative space where the hole is.
And that's all there is to it!
Learn More
If you'd like to learn more about all of the other path functions and how they work, I have an entire video series where I explain each of them and demonstrate how they work in my Inkscape Master Class.
We also have a private community where I can give you one-on-one assistance if you have questions about anything or need clarification.
If you have any questions or run into any problems with this tutorial simply leave a comment below.
As always, thanks for watching!
How To Crop A Photo with Inkscape in 4 Steps | Video Tutorial
How To Crop A Photo with Inkscape in 4 Steps | Video Tutorial
In this tutorial I'll be demonstrating how to crop a photo with Inkscape in 4 simple steps using the Bezier Pen and clipping masks.
Learning how to crop a photo with Inkscape may be a bit redundant if you're also a GIMP user.
GIMP would be a more suitable tool for cropping photos, so be sure to check out my tutorials on doing so with GIMP if you're interested.
However, if you don't feel like installing and learning new software, you can absolutely crop photos with Inkscape.
How To Crop A Photo with Inkscape
The following is a brief overview of the steps taken to crop photos.
For complete step-by-step instructions please watch the video tutorial at the top of the page.
For this tutorial I'll be using the following example photo…
Step 1: Outline Your Subject with The Bezier Pen
Knowing how to crop a photo with Inkscape is a practice in using the Bezier Pen, because that's the tool we'll be primarily using.
Import your desired photo into Inkscape then manually create individual points around your subject resulting in a rudimentary outline.
Don't worry about the curved edges not being smooth, we're going to address that later on.
Step 2: Create Additional Outlines Around The Negative Space Areas
The next step is to take your Bezier pen and manually create some more outlines around any areas of negative space that may exist within your subject.
In my example photo, those areas would be the space between the girl's arms, hands, neck, and shoulders.
Now we must subtract those areas from the overall outline we originally created.
To do that, select all of the objects representing the negative space areas by holding Shift and clicking them, then unify them together by going Path -> Union.
Now select both the unified negative space objects and the main outline by holding Shift and clicking them, then navigate to Path -> Difference.
This will subtract the negative space areas from the main outline, although nothing will visibly change on your screen just yet.
Step 3: Smooth The Nodes Of Your Outline
Next, we're going to give our outline a smooth contour with the Edit Paths By Nodes tool (keyboard shortcut: n).
Select all of the individual nodes (except the nodes that represent corners) and click on the icon labeled "make selected nodes auto-smooth" in the toolbar at the top of the screen.
If you don't see the label simply hover your cursor over the icons until the label populates.
Make sure to avoid the corner nodes, represented by the node that separate the knuckles in my example photo.
This will ensure that the edge of your outline accurately follows the smooth contours of your subject.
Step 4: Use Your Outline As a Clipping Mask
In the final step we're going to use our outline as a reference for cropping our photo.
Below you will see that I made my outline red, partially transparent, and removed the outline so you can see how the object will be cropped.
This is purely for demonstrative purposes.
You do not need to do the same.
Select both the outline and your photo, then navigate to Object -> Clip -> Set.
This will tell Inkscape to only display areas of the photo where the outline exists, and all other areas will be excluded and become transparent.
I added a checkerboard pattern to the background of my photo to demonstrate that we have successfully cropped our subject.
And that is how to crop a photo with Inkscape!
If you have any questions please leave a comment below.
As always, thanks for watching!
How To Create Vintage Text Posters with inkscape
How To Create Vintage Text Posters with inkscape
In today's tutorial I'll be demonstrating how to create a vintage-style art deco poster using Inkscape.
The text objects will be stacked on top of each other with a banner in the center.
We'll also be doing a bit of texture masking to give the design more of an aged look.
The following is just a brief overview of the steps taken to create these text posters.
For complete step-by-step instructions please watch the video tutorial at the top of the page.
Tutorial Resources
The resources we'll be using for this tutorial are as follows…
To get us started, the first thing we're going to do is create separate lines of text for our poster.
Then we will apply the fonts listed in the resources section above.
I'll be using League Gothic for all of the text objects except the middle text object ("VINTAGE") which we will use Zabatana for.
Next we're going to size up all of the text objects so that they're all equal in width, except for the middle text which will be fairly larger.
Now we're going to create a rectangle over the middle text object that will represent a banner.
We'll add some fish tails to the banner and create a slightly larger red offset.
Now we'll use that red offset to subtract from the fish tails of the ribbon.
Next we're going to shear the text up slightly.
Then we'll create a border going around the outside of the stacked text.
We'll add another slightly smaller outer border as well.
And then we'll add little accent pieces to the top and bottom corners of the border.
Now we can go ahead and add some color.
And the final step will be to apply our grunge texture as a mask.
And that should do it for our design.
That is is how you can create vintage text posters with Inkscape.
If you have any questions simply leave a comment below.
As always, thanks for watching!
3 Reasons Why Your Objects Aren't Visible in Inkscape
3 Reasons Why Your Objects Aren't Visible in Inkscape
In this post I'll be explaining the only 3 reasons why your objects aren't visible in Inkscape and how to fix it.
This is a rather common problem with Inkscape and it can be frustrating if you don't know why it's happening.
The following is a written explanation.
If you'd prefer a video explanation then I have a video tutorial at the top of the page.
When Objects Aren't Visible in Inkscape
Let's say you go to create a circle or ellipse, but nothing shows on the canvas.
All you can see is the bounding box around the object and the editable properties you'd see on any other ellipse.
It might look something like this…
You'll notice that it's nearly impossible to select this invisible object.
The only way to do so is to press control + a on the keyboard, which selects every object on the canvas (including the invisible object.) Or you can also click and drag a large selection over the general area where the circle was drawn, which should select it.
Why Objects Aren't Visible in Inkscape
If your objects aren't visible in Inkscape, it's most likely for one of three reasons: either there's no set fill and stroke color, the alpha channel of the fill and/or stroke color has been reduced to zero, or the opacity of the object has been reduced to zero.
Let's briefly go over 3 reasons why your objects may not be visible.
Reason #1: There's No Fill & Stroke Colors Set
One reason why an object you've just created isn't showing could be because there's no set fill and stroke color.
Have a look at the bottom-left of your screen.
Whenever you have an object selected, there should be a display indicating what the fill and stroke colors are.
If your fill and stroke indicators read "None" for both, then that's probably why your objects aren't visible.
Simply click on any color you'd like in the color selector and your object will become visible.
If not, read on.
Reason #2: The Color's Alpha Channel Is At Zero
If you do have a fill and/or stroke color set and your object still isn't visible, it could be because the alpha channel of the color has been reduced to zero.
Maybe your screen looks something like this…
If that's the case then you'll have to open the Fill & Stroke Menu by pressing control + shift + f on your keyboard.
Click on the Fill tab, then click on the HSL tab and have look at the last row that reads A: (shorthand for alpha channel.)
If that alpha channel is set to 0 then that would explain why your objects aren't visible.
Click and drag it to the right to bring up the visibility, or simply type 255 into the box where it currently reads 0.
Reason #3: The Object's Opacity Is Set To Zero
The final reason why your objects may be invisible in Inkscape is because the opacity of the object is set to 0%.
Let's have another look at the Fill & Stroke menu.
At the very bottom you'll see a row for object Opacity (%).
If your object's opacity is set to 0% like mine is in the screenshot above, simply click and drag to bring the opacity up to 100% and your object should become visible.
If these written instructions aren't clear enough then I would suggest watching the video at the top of the page.
It's only a few minutes.
If you've checked all 3 of these steps and your objects aren't visible in Inkscape still then leave a comment below and I'll see if I can help.
As always, thanks for watching!
Quick Fix: Inkscape Fill and Stroke Menu Not Showing
Quick Fix: Inkscape Fill and Stroke Menu Not Showing
In this post I'll be going over a quick fix for why your Fill and Stroke Menu may not be showing in Inkscape.
In short, if your fill and stroke menu is not showing, it's probably because it's minimized in a tab to the right of your screen.
Let's explore a bit.
Inkscape Fill and Stroke Menu Is Not Showing
If your Inkscape fill and stroke menu is not showing, it's most likely because it's minimized in a tab to the right of your screen.
You can make the menu appear by clicking on the tab.
If you look at the following screenshot, you'll see the Align and Distribute menu visible, but not the Fill and Stroke menu…
Click to enl
Notice the vertical text to the right of the screen, outlined in red.
The Fill and Stroke menu is active on your document, but it's not showing because it's minimized in that tab.
Go ahead and click on that tab to make it visible.
You can also minimize the tab again by clicking the arrow icon in the upper-right corner of the menu.
Another reason why your fill and stroke menu may not be showing is because it's minimized within another menu, as depicted below…
Click to enl
So, if you don't see the menu minimized vertically, check to see if it's minimized horizontally within any other dockable menus you may have open.
Those are the only reasons I can think of why your fill and stroke menu may not be showing.
It's also possible that it's active as a floating window and off screen somewhere, but it's not likely and would be easy to figure out if so.
Leave a comment below if this doesn't answer your question though.
Finally, if you're wondering why your Inkscape installation looks different than mine, it's because I'm using a third-party dark theme along with a custom icon pack that I designed myself.
I have a tutorial for how you can do the same here if interested.
How To Make your SVG Background Transparent in Inkscape
How To Make your SVG Background Transparent in Inkscape
In this tutorial I'll be demonstrating how to make your SVG background transparent in Inkscape.
This can be done by simply ticking a box in the Document Properties menu.
SVG Format
Scalable Vector Graphics (SVG for short) is the native file format that Inkscape runs on.
Whenever you open up a fresh Inkscape canvas, you're working on an SVG file in the SVG environment, and that's the format you'll have to save your document as if you'd like to be able to edit it later on.
Making The SVG Background Transparent
When you open up Inkscape you may be confused to see that the background of the canvas is white by default.
Inkscape opens with a white background by default
Although the document may appear to have a white background, it's actually a transparent background.
They just made it white because they had to fill it with something.
If you were to export anything from your document to PNG format though, you'd clearly see that there's a transparent background.
If you'd like to make your SVG background transparent in the sense that it displays a grayscale checkerboard pattern (like GIMP and other applications do) instead of white, you can do so by navigating to File > Document Properties and ticking the box that read Checkerboard Background.
Once ticked, your checkerboard background should render in Inkscape in real time…
Your SVG background will be no more (or less) transparent than it previously was when it was filled with white.
This just changes the display, which can be really helpful if you're working with a lot of white objects.
Filling The Background with Color
Finally, if you'd like the background of your SVG to have a color fill, this can also be accomplished via the Document Properties menu.
Simply click on the white stripe positioned next to where it says Background Color.
A color selector will pop up on your screen.
It's important to note that your SVG background will continue to be transparent despite the color fill as long as the A column (which represents the transparency of the color) remains at 0.
If you'd like the document to actually have that background color (even on exports) then you can bring that column up from 0 to 100.
And that should do it for working with backgrounds in Inkscape.
If you have any questions that weren't addressed in this post just leave a comment below and I'll write back if I can help.
Wrap Text Around A Circle with Inkscape | Beginner Tutorial
Wrap Text Around A Circle with Inkscape | Beginner Tutorial
In this tutorial I'll be demonstrating how to easily wrap text around a circle with Inkscape.
This is something that can be done in 2 clicks! Let's get started.
A few years ago I put together a brief video tutorial demonstrating how to wrap text around a circle with Inkscape.
You can watch it here…
This is not something that is too difficult to explain in written format though, so if you're pressed for time and would prefer a quick written overview, read on.
Wrap Text Around A Circle with Inkscape
To wrap text around a circle with Inkscape, simply select both the text and the circle, then navigate to Text > Put on Path in the menu.
Here's a couple of examples to get us started.
We have a circle and we also have some text…
To wrap the text around a circle we will be using the put on path feature.
Simply select both the text and the circle, either by shift-clicking them or clicking and dragging a selection over both (using the Select tool,) then navigate to Text > Put on Path in the menu.
This will place your text around the outside edge of the circle…
You can change the position of the text on the circle by rotating just the circle.
Make sure you only rotate the circle though! If you try to rotate the text itself it will remove it from its position on the path.
If you'd like to alter how much of the circle's circumference the text occupies, you can scale the circle up or down accordingly.
Notice how the space that the text occupies changes as the size of the circle changes.
It should also be noted that you can continue to edit your text with the Text tool, the same way you would any other text object, when it's placed on a path.
So you can still change the font, size, and contents if you'd like.
Wrap Text Around The Inside Of A Circle
If you'd like to wrap your text around the inside of the circle rather than the outside, you can reverse the path of the circle by simply clicking on the circle and navigating to Path > Reverse in the menu toolbar.
This will flip the orientation of the circle, even though nothing visually changes…
And that is how you can wrap text around a circle with Inkscape! Once you are finished, simply click on the text and convert it to a path by going to Path > Object To Path.
This will finalize the text around the circle so that it doesn't get lost later on when designing further.
Repeating an Object Around a Shape with Inkscape
Repeating an Object Around a Shape with Inkscape
In this tutorial I'll be demonstrating how to use Inkscape to take an object and repeat it along the contours of a shape.
To do this we'll be using a handy path effect called Pattern Along Path.
The following is just a brief overview of the steps taken to create this effect.
For complete step-by-step instructions I would highly recommend that you watch the video tutorial at the top of the page.
Creating Patterns Along a Path in Inkscape
The following depiction outlines what we'll be able to do.
The object to the left will be repeated along the shape of a circle and a wavy line, as indicated on the right.
The first thing we need to do is start out with an object.
It can be any object you want — a circle, a square, stars, letters, etc.
For this tutorial I'll be using the following design because I think it makes for a neat pattern when repeated.
Copy the object to your clipboard by selecting it and pressing control + c on your keyboard.
Then, create the path that you'd like to repeat it along.
For this example I'll be using a circle.
Select the circle then navigate to Path -> Path Effects and choose Pattern Along Path from the drop down menu and click Add.
Nothing will happen to your design just yet, but the Pattern Along Path menu should populate.
In the menu, select "Repeated, stretched" from the drop down menu, then click the lock icon on the right hand side that reads "link" when you hover your cursor over it.
Once you click the link button, it will tell Inkscape to take whatever you have copied to your clipboard and wrap copies of it around your selected path…
This can work with any path you'd like! Here's how it looks applied to a wavy line…
And there's a lot more that the pattern along path feature can do, like add spaces between each object, stretch out a single object rather than repeat it, etc.
I would recommend you play around with it a bit and let your creativity run wild!
How To Remove Rounded Corners from Rectangles in Inkscape
How To Remove Rounded Corners from Rectangles in Inkscape
Today I'll be providing a simple fix to a very common (and aggravating) problem — removing rounded corners from rectangles in Inkscape.
How To Remove Rounded Corners from Rectangles in Inkscape
To remove rounded corners from rectangles in Inkscape, simply grab the Rectangle tool, select the rectangle, then click the icon in the toolbar labeled "Make corners sharp".
This is a common problem a lot of newcomers to Inkscape run into.
Inkscape has a way of remembering properties from objects you've previously created, so if you've recently created a rectangle with rounded corners, that's exactly what Inkscape is going to generate next time you create another rectangle.
This can be frustrating if you want your rectangle to have sharp corners.
When you have the Rectangle tool activated and your rectangle selected with it, there should be an icon that appears in your toolbar that reads "make corners sharp" if you hover your cursor over it.
Here's a screenshot in case you're having trouble locating it…
The "make corners sharp" icon outlined in red.
Simply click on that icon to removed rounded corners from your rectangle.
If the icon is grayed out and you're unable to click on it then that means you're rectangle already has sharp corners.
If your rectangle still appears to have rounded corners then it's probably because your rectangle has a stroke with a rounded join.
In that instance you can correct that by opening the Fill & Stroke menu (control + shift + F), select the Stroke Style tab, and where it says Join click on Miter join to the right.
If the make corners sharp tag is still grayed out, your rectangle doesn't have a stroke, yet it still has rounded corners, then it's probably because your rectangle has been converted to a path and is no longer recognized as a rectangle object by Inkscape.
In that instance you'll either have to re-create the rectangle altogether or manually add sharp corners using other tools like the Edit Nodes tool, or the Bezier Pen.
Why Your Text to Path is Upside Down in Inkscape
Why Your Text to Path is Upside Down in Inkscape
Inkscape allows you to shape, alter, and warp text in a variety of different ways.
One problem you may run into though is that your text to path is upside down in Inkscape.
In this post I will briefly explain why that happens and how you can easily correct it.
Inkscape Text To Path Upside Down
If your text to path is upside in Inkscape, you can correct it by selecting the path and navigating to Path -> Reverse.
This will reverse the side of the path that the text is placed on.
So here we have some upside down text in Inkscape…
We want the text to be on top of the path rather than underneath it, correct? The reason Inkscape is displaying the text upside down is based on the direction of the path that it's placed on.
Every path in Inkscape has a direction, even though it isn't visually evident.
It has a starting point and an end point.
You can read more about paths here.
When placing text on a path, Inkscape references the start point of the path to determine where to place the text.
So if your text on a path is upside down, the solution is to reverse the direction of the path using the Reverse function.
Select the path that the text is on and navigate to Path -> Reverse.
Make sure that you have the path selected; not the text.
This is a common mistake I see a lot of newbies make.
Reversing the path will flip the start and end points of your path, which should also flip your text from upside down to right side up…
The same effect can also be achieved by flipping the object itself vertically or horizontally, but this is only a viable option if the object you're working with is symmetrical on the axis in which you're flipping it.
If you were to apply that to a path like the example depicted above, you would end up reversing the appearance of the curve, which I have to assume is an undesirable result.
Either way, that's how you can correct your upside down text in Inkscape! If you have any questions simple leave a comment below.
How To Create A Material Design Pattern with Inkscape
How To Create A Material Design Pattern with Inkscape
In this tutorial I'll be demonstrating how to create a vector material design pattern with Inkscape.
The pattern is an abstract design with layered waves.
The finished pattern could work well for clipping text and various other objects.
The following is just a brief overview of the steps taken to create this material design pattern.
For complete step-by-step instructions, please watch the video tutorial at the top of the page.
Material Design Pattern
For this tutorial I'll be working with a predetermined color palette.
If you'd like to follow along with what I'm doing then feel free to download the palette below and paste it into Inkscape, otherwise you can use your own colors if you'd like.
Click for full size i
The first thing we're going to do is create a large square — roughly 800 pixels in width and height, but it doesn't need to be exact.
Bring the opacity down to roughly 50%.
Now we're going to use the Draw freehand lines tool to draw some wavy lines going over the square.
You can learn more about Inkscape's tools and uses in my overview tutorial.
In the tool settings menu make sure to select Spiro and set the smoothing to 46 (or somewhere thereabouts.)
This will allow us to create curved lines with smooth edges.
Next, select all of the lines and combine them together by going to Path -> Combine.
Then, select the combined lines along with the square and navigate to Path -> Division.
This will divide the square into separate pieces based on the spiro lines we previously created.
Bring the opacity of everything back up to 100% and color them using the palette (or any other colors of your choosing.)
The final step is to duplicate each piece individually, make it black, lower it, and give it a slight blur.
This will create the appearance that each wave is made of material and layered above the other waves.
Now we can group everything together and use another object as a clipping path.
For this tutorial I used the Inkscape logo as an example, but you can use any object you'd like.
And with that our material design pattern is complete! If you have any questions simply leave a comment below.
As always, thanks for watching!
Create Simple Line Art Designs with Inkscape
Create Simple Line Art Designs with Inkscape
In this tutorial I'll be demonstrating how you can use Inkscape to create simple vector line art designs that could work great for t shirt designs, logos, monograms, and more.
This tutorial specifically will be utilizing a sunny mountain landscape with pine trees as an example, but you can use this lesson to create any other type of design you'd like.
The following is just a brief overview of the steps taken to create this design.
For complete step-by-step instructions, please watch the video tutorial at the top of the page.
Inkscape Line Art Designs
We'll be constructing the entire design from strokes and utilizing the cut path and combine features a lot throughout this tutorial.
We'll be working with a consistent stroke size of 5 px throughout this tutorial.
That said, the first steps will be to create 3 of the elements individually — the circle that will be used as the emblem for the entire design, the sun, and the mountain.
Then we'll center them up and use the cut path feature to slice off the pieces that need to be removed.
Next we'll create some individual lines to be used at the foreground — in this instance, a lake or some body of water.
Once again we'll use the cut path feature to slice off the ends of the lines that stick out from the circle, as well as the circle itself where it intersects with the lines.
Now we'll create some random rectangles to place over segments of the lines.
We'll be using those to break up the lines a bit.
Once broken up, the lines will give the appearance of moving water.
Now we'll create a couple of simple pine trees to complement the design.
The pine trees will be placed at both side of the design.
They make for a nice accent piece that adds a bit more depth to the overall design.
Now we'll wrap some text around the top of the circle as a finishing touch.
And with that the design is complete! You can color it in however you'd like.
Just make sure to convert the strokes to paths once you're finished, as I did in the video tutorial.
If you have any questions simply leave a comment below.
As always, thanks for watching!
How To Apply Textures To Objects with Inkscape | Beginner Tutorial
How To Apply Textures To Objects with Inkscape | Beginner Tutorial
In this tutorial I'll be demonstrating how easy it is to apply textures to objects with Inkscape.
This makes for a great beginner tutorial.
Apply Textures To Objects with Inkscape
In order to apply textures to objects with Inkscape we will be using the Masking feature.
In short, masking is when you use a photo as somewhat of a filter and apply it over an object.
The object you apply it to can be virtually anything — vector shapes, texts, other photos, etc. This is one of those things that is easier to demonstrate than it is to explain, so let's dig in a little deeper.
In this demonstration I'll be using the Inkscape logo as an example.
This is the object I'll be applying our texture to…
The texture I'll be applying to this object is as follows…
Example grunge texture
If you'd like to download this texture (and various other textures as well) be sure to check out my free pack of grunge textures.
What I'm going to do is place the texture over the object I'd like to apply it to.
Then I'm going to bring down the opacity of the texture enough for me to see the object beneath it and where it lines up.
Once we apply the masking feature, Inkscape will take the black areas of the texture and make them transparent on the object.
The white areas of the texture will have no effect on the object.
This works for gradients and other shades as well — darker shades become more transparent the darker they get, and lighter shades have less of an effect the lighter they get.
To see this in action, select both objects (the texture and the object you're applying it to,) bring the opacity back up to 100%, then go to Object -> Mask -> Set.
Make sure that the texture is placed on top of the object and not beneath it.
The masking feature uses the top object as the mask.
It's important that both objects are selected, and it's also important that the texture is layered on top of the object, otherwise it won't work.
The result is as follows…
If you look closely, you'll see that the black areas from the texture were subtracted from the Inkscape logo.
White areas of the texture had no effect on the logo.
Video Tutorial
Check out the following video tutorial on the Masking feature in Inkscape to learn more about how to apply textures to objects with Inkscape.
This is a lecture taken directly from my Inkscape Master Class.
If you'd like to learn more about how Inkscape works and be a part of our private community, feel free to check it out! If you have any questions just leave a comment below.
As always, thanks for watching!
Inkscape Pasting As Bitmap | Why It Happens And A Simple Fix
Inkscape Pasting As Bitmap | Why It Happens And A Simple Fix
If you're an Inkscape user on Windows, you've probably run into a problem with Inkscape pasting as bitmap when working with vector objects.
In this post I'm going to outline a couple of quick fixes for that.
Inkscape Pasting As Bitmap
When working with Inkscape, I'll occasionally copy vector elements from one document and paste them into another.
Most of the time it works without a hitch, but every once in a while Inkscape will paste the object as a rasterized bitmap (made of pixels) rather than a vector object.
The object on the left is a vector object.
The object on the right is a rasterized bitmap.
This is something that I've never been able to reproduce, and I've never seen it happen under consistent conditions.
It appears to be completely random, and it appears to only happen on Windows because I've never experienced this on a Linux operating system.
What's more, it seems to completely corrupt all copy and pasting functions within Inkscape, because if I attempt to copy and paste a different object, it still pastes the previously copied object as a bitmap.
This is obviously some kind of bug within Inkscape, and I'm 99% certain it's Windows-related.
The Solution
Inkscape pasting as bitmap indicates that the copy and paste function within the application has been corrupted.
The solution is to either restart Inkscape or clear your clipboard.
Solution #1: Restart Inkscape
One workaround for this problem is to simply save your document and restart Inkscape.
That always seems to do the trick, but in my opinion this isn't optimal because having to restart Inkscape every time this happens is rather cumbersome, so let's explore a better option.
Solution #2: Clear Your Clipboard
This is what I like to do when I'm having a problem with Inkscape pasting as bitmap.
You can clear your clipboard by simply copying something else within Inkscape.
However, it has to be some kind of input text within the user interface.
If you copy an object on the canvas it's not going to work.
What I like to do is highlight the color code in the Fill & Stroke menu by double-clicking the text, then pressing control + c on the keyboard (it doesn't have to be the fill & stroke menu though, it can be any text within the Inkscape user interface.)
This will clear the clipboard within Inkscape, and then you'll be able to copy and paste your vector object as an actual vector object, like you should be able to.
I understand that this is quite a wonky fix, but it's the best we can do until the Inkscape team addresses this problem.
I've seen posts for it on Launchpad, but no official acknowledgement of it yet.
Let's hope Inkscape 1.0 rectifies this problem once and for all.
All 21 Inkscape Tools and Uses Explained
All 21 Inkscape Tools and Uses Explained
In this post I'll be explaining all 21 Inkscape tools and uses, along with a brief demonstration of how they work.
Inkscape is an open source vector graphics application similar to Adobe Illustrator.
It has much more to offer than just the 21 tools located in its toolbar, but this guide should serve as a good starting point for understanding the basics of Inkscape if you're new to the software.
Inkscape Tools and Uses
Select and Transform
The Select tool allows you to activate, move, rotate, shear, and scale single or multiple objects at a time.
Edit Paths By Nodes
The Edit Paths By Nodes tool allows you to alter the properties of a vector object relative to its coordinates on the X and Y axis.
Editable properties include nodes (or coordinate points of an object) and lines.
Tweak Objects
The Tweak Objects tool allows you to make compound alterations to multiple objects, paths, and colors at a time.
Alterations include moving multiple objects at once, shrinking, rotating, or duplicating them.
It also allows you to make adjustments based on colors and blurs.
Zoom
The Zoom tool allows you to increase or decrease your view of the canvas.
You can zoom in to see fine details, zoom out to get a more complete view of the canvas, or set the view ratio to 1:1 in order to see how the canvas looks at full size.
Measurement
The Measurement tool allows you to assess the length, width, height, radius, or diameter of specific objects in the following units of measurement: px, mm, pc, pt, in, cm.
Squares and Rectangles
The Squares and Rectangles tool is used to create 4-sided vector objects, including squares and rectangles.
The tool allows you to create rectangles with either perfect right angle corners or rounded corners to varying degrees.
3D Boxes
The 3D Boxes tool allows you to quickly create three-sided vector boxes that appear as if they're three-dimensional.
The X, Y, and Z axis can be adjusted indepently in order to determine the box's width, height, and depth.
Circles, Ellipses, and Arcs
The Circles, Ellipses, and Arcs tool can be used to create vector objects with curved edges, including circles and ellipses.
The tool also allows you to create partial ellipses in pie chart style.
Stars and Polygons
The Stars and Polygons tool allows you to create both stars and polygons.
When creating stars, you'll be able to determine the number of corners the star has, the spoke ratio between each star, and you can choose to give your star rounded corners as well.
When creating polygons, you'll be able to determine the number of sides/corners and you can choose to make them rounded if you'd like.
Spirals
The Spirals tool is used to create vector paths that follow a spiral trajectory.
The tool allows you to adjust the number of turns the spiral has as well as its divergence from its center point.
Draw Freehand Lines
The Draw Freehand Lines tool is used to draw vector paths that follow the trajectory of your hand movement.
Bezier Pen
The Bezier Pen is used to create vector paths by creating a series of individual points known as nodes.
The paths can have straight edges or curved edges.
Draw Calligraphic or Brush Strokes
The Draw Calligraphic or Brush Strokes tool allows you to create freehand vector objects using a classic brush stroke and shape of your choosing.
Text Objects
The Text Objects tool is used to create vector text and wording of your choosing.
It allows you to flow your text into a bounding box, or simply generate it all on one line.
You can also adjust the font, size, orientation, spacing between letters and words, as well as various other adjustments.
Spray Objects
The Spray Objects tool allows you to generate vector objects by spraying them onto the canvas based on a shape of your choosing.
Erase Existing Paths
The Erase tool is used to delete segments of vector paths in a freestyle technique that is based on the trajectory of your hand movement.
Fill Bounded Areas
The Fill Bounded Areas tool, commonly known as the bucket fill tool, allows you to fill empty spaces with a predetermined fill color.
In order for the tool to work, the area you're filling in must be completely surrounded by a closed path.
It will not work on empty spaces that bleed out into the open canvas.
Create and Edit Gradients
The Create and Edit Gradients tool allows you to give vector objects multiple colors that fade into each other, otherwise known as gradients.
The tool also allows you to edit the gradients based on colors used, number of colors, and the position of the colors relative to the object the gradient is being applied to.
The gradients can follow either a linear (straight) or radial (rounded) path.
Meshes
The Meshes tool is used to give vector objects a gradient that follows a grid (mesh) or a cone shape (conical).
Pick Colors From Image
The Pick Colors From Image tool, commonly referred to as the dropper, allows you to set an object's fill and stroke color based on another object's color.
The tool allows you to sample colors from both vector and raster images.
Diagram Connectors
The Diagram Connectors tool allows you to create diagrams by generating paths and boxes that link objects together.
The Select Tool
Watch the video below for a more in-dept explanation of the Select Tool, which is probably the tool you'll be using more frequently than any other.
The video above is from my Inkscape Master Class — a series of 50+ videos where I go over every tool and feature in Inkscape and explain what it is and demonstrate how it works.
If you're looking for a more in-depth explanation of all Inkscape tools and uses, including every other feature and function Inkscape has to offer, then feel free to check it out! I'll be there to help if you have any questions.
How To Flow Text Around An Object with Inkscape
How To Flow Text Around An Object with Inkscape
In this tutorial I'll be demonstrating how to make your text flow around objects in Inkscape without having to manually add spaces and line breaks.
We'll be using the Flow Into Frame feature, which will leave us with completely editable text that wraps nicely around any objects of your choosing.
The following is just a brief overview of the steps taken to achieve this effect.
Please watch the video tutorial at the top of the page for complete step-by-step instructions.
Flow Text Around An Object
For this tutorial I'll be using the following example image…
The goal is to make the text occupy all of the colored area without it overlapping with the headphones.
To accomplish this we are going to manually create a vector tracing of whatever object(s) we'd like the text to avoid.
Grab the Bezier Pen and manually create a green tracing of the object(s) you'd like the text to avoid.
It doesn't have to be green, I just chose green because it contrasts with the image so that I could see it better.
It doesn't have to be an exact tracing.
A rough outline will work.
Now we're going to create a blue rectangle over the entire image.
This area represents where the text will be, so we'll be subtracting the green area from it shortly.
Before we subtract the green area, we'll use the Dynamic Offset feature to give the subject some padding.
This is because we don't want the text to run all the way to the edge of the subject; we'd like there to be a little bit of space.
Now we can subtract the green area by selecting both the blue and green objects and performing Path > Difference.
Then take the remaining shape and perform Path > Simplify to ensure that the object isn't too complex for the text function to work.
Once you've done that, go ahead and generate some text using the Text tool.
Then, select both the text object and the blue shape and go to Text > Flow Into Frame.
This will flow the text into the blue object.
Credit: https://en.wikipedia.org/wiki/Inkscape
Now you can go ahead and edit the text however you'd like.
You can change the font, color, justification, line spacing, kerning, or anything else that you would normally edit on a text object.
For this example I simply copy and pasted an excerpt from the Inkscape Wikipedia Page.
Once you're finished, grab the blue object and remove its fill color so that it's no longer visible.
Make sure not to delete it.
If you delete it then the text will be removed from the frame.
And with that we are finished! That is how you can flow text around an object with Inkscape.
If you have any questions just leave a comment below, and as always, thanks for watching!
Rotating Objects in Inkscape | The Complete Beginner's Guide
Rotating Objects in Inkscape | The Complete Beginner's Guide
In this post I'll be going over how to rotate objects in Inkscape; including rotating multiple objects and rotating objects around a point.
Rotating Objects in Inkscape
Rotating objects in Inkscape is so incredibly simple that there isn't even a dedicated tool for it like there is in Illustrator — it's all done with the Select tool.
Here's a brief overview of how it works.
Rotating An Object
To rotate an object, first grab the Select tool and click on the object in order to select it.
You will notice the scaling handles around the perimeter of the bounding box, represented by the black arrows.
You can click and drag on these arrows to scale your object.
Once you have your object selected, simply click on it again to bring up the rotation handles.
You can now click and drag on those handles to rotate your object.
Rotating An Object Around A Point
Rotating an object around a point in Inkscape is quite simple.
Once you bring up your rotation handles, you'll see a tiny cross in the center of the object.
That cross represents the axis on which the object rotates.
You can click and drag that cross and place it anywhere you'd like on the canvas.
Rotating Multiple Objects
Rotating multiple objects with Inkscape is similarly easy.
All you have to do is select all of the objects you'd like to rotate.
You can select multiple objects by holding Shift and clicking on each of them.
Once you've selected multiple objects, you can rotate them the same way you'd rotate a single object — by clicking on one of them with the Select tool in order to bring up the rotation handles, then using the rotation handles to rotate your multiple objects.
Rotating Multiple Objects Around A Point
You can rotate multiple objects around a point the same way you would a single object — by placing the little cross in the center of the design wherever you'd like the rotation point to be.
Incremental Rotation
If you'd like to rotate object(s) incrementally, you can hold Control on your keyboard while clicking and dragging.
This will confine the rotating to 15 degree increments.
If you'd like to change the incremental units, you can do so by going to Preferences (control + shift + p), then navigating to Behavior -> Steps and changing the value from 15 to whatever you'd like.
And that should do it for this lesson.
If you have any questions simply leave a comment below.
How To Create A Multi Page PDF with Inkscape
How To Create A Multi Page PDF with Inkscape
As a graphic designer I have created plenty of PDF documents, and Inkscape has always been my tool of choice for doing so.
Unfortunately there's no way to create a multi page PDF with Inkscape though, but there are some very simple workarounds for accomplishing this.
Why Inkscape Doesn't Support Multi Page Documents
The reason why Inkscpape can't create multi page documents is because Inkscape works in the SVG environment, and as it currently stands, the SVG format does not support multi page documents.
There is good news in that it may be added to SVG 2.0, but for now we'll have to resort to workarounds in order to create a multi page PDF with Inkscape.
Creating A Multi Page PDF with inkscape
In order to create a multi page PDF with Inkscape you must design each page individually and save it as its own individual PDF document.
Then you can merge them all together using any one of a variety of tools.
Here are some that I've used personally and would recommend…
1.) PDFsam
This is what I currently use and would recommend to anyone using the Windows operating system.
PDFsam is a desktop application that allows you to edit PDF documents in a variety of different ways.
You can merge multiple documents, split them up into different pages, rotate the pages, etc.
There's a free version and a premium version.
I don't know exactly what the premium version does, but if you only need to merge PDF documents then the free version is all you'll need.
The software is pretty easy to use and self-explanatory for the most part.
2.) PDF Chain
Source: pdfchain.sourceforge.net
This is what I used when I was an Ubuntu user, and it's what I'd recommend for all Linux users looking to create a multi page PDF with Inkscape.
PDF Chain is a desktop application that allows you to merge PDF documents.
The UI couldn't be more simple and to-the-point.
Highly recommended.
3.) PDF Merge
Finally, there's PDF Merge — a free web-based application that allows you to merge PDF documents.
This would be the ideal option for those of you who may be Mac users and can't find a free alternative to the aforementioned applications, or maybe if you simply don't want to download additional software just to create a multi page PDF with Inkscape.
PDF Merge also allows you to split, rotate, compress, etc.
PDF documents directly through your web browser.
Check them out for a full list of what exactly it can do.
How To Create Vector Textures Using Inkscape
How To Create Vector Textures Using Inkscape
In today's tutorial I'll be demonstrating how you can use Inkscape to create vector textures to apply to your designs.
This will be a little different than other tutorials I've done where I demonstrate how to mask a rasterized image on top of an object.
Instead, we'll be producing true vector textures with nodes that you can alter the same way you would any other vector graphic.
The following is just a brief overview of the steps taken to create these textures.
For complete step-by-step instructions with voice narration, please watch the video tutorial at the top of the page.
How To Create Vector Textures
The first step is to grab a photograph or raster texture that you'd like to vectorize.
For this tutorial I'll be using the following image of a piece of wood.
I would recommend checking out Pixabay for free texture images.
Go ahead and paste your texture image into Inkscape, select it with the Select tool, then go to Path > Trace Bitmap.
The Trace Bitmap menu should appear.
In the Trace Bitmap menu we'll be focusing our attention to the Single Scan area.
You'll notice there's three different tracing methods: brightness cutoff, edge detection, and color quantization.
You'll also notice an invert option in case you'd like to create an inverted tracing of your photo.
On the right side of the menu you'll see a preview of what will be generated.
The white areas represent transparency, or negative space, and the black areas represent the vector tracing that will be created.
Go ahead and cycle through each of the the three tracing methods and click Update to preview the tracing that will be created.
The best option to use will be determined by the composition of whatever photo you're using, so the only way to know is to try it out yourself and see how it looks.
Once you're happy with the preview, go ahead and click OK to generate your tracing.
The result will be a true vector graphic that you can use in all of the ways that you'd use any other vector graphic.
You can change the colors, apply path function, and even alter the individual nodes with the Nodes tool.
One way that I always love to use vector textures is applying them to text using the Path > Difference path function.
If you want to learn more about path functions and how Trace Bitmap works in Inkscape, be sure to check out The Inkscape Master Class — a collection of over 50 videos where I go over every single tool and feature in Inkscape and explain what it is and demonstrate how it works!
If you have any questions simply leave a comment below.
As always, thanks for watching!
Create Wavy Lines Using Lattice Deformation In Inkscape
Create Wavy Lines Using Lattice Deformation In Inkscape
In this tutorial I'll be demonstrating how to create these wavy lines using the Lattice Deformation path effect in Inkscape.
This would be a great tutorial for a beginner or first-time user of Inkscape.
The following is just a brief overview of the steps taken to achieve the effect.
For more in-depth step-by-step instructions, please watch the video tutorial at the top of the page.
Wavy Lines Effect
To get started, we'll use the Bezier Pen to create a single horizontal line on the canvas.
Next we will create a series of duplicate copies of the line and space them out evenly.
We will accomplish this with the Duplicate function (control + D) and with the Distribute function in the Align & Distribute menu.
Finally, we will combine the lines into a single unit with the Combine function (control + k).
Again, if any part of this explanation sounds ambiguous to you, I would advise watching the video tutorial.
It covers everything in detail.
Now we will apply the Lattice Deformation path effect to the design.
Lattice Deformation
Lattice Deformation is a new path effect that was recently added to Inkscape.
It allows you to warp objects using individual nodes.
The location of the nodes is dictated by a grid.
Select the object, then go to Path > Path Effects.
Once the path effects menu open, click the plus icon (+) on the menu to add a new path effect.
Then, from the list of path effects, choose Lattice Deformation and click Add to apply it.
Now if you grab the Nodes tool, a grid will appear over your lines with a series of individual nodes that you can click and drag.
As you move them, you'll notice the design warping according to wherever you move the cursor.
Go ahead and move the nodes around whimsically until your lines have a nice wavy flow to them.
Once you've altered your design to your liking, you can finalize it by going to Path > Object to Path.
Then you can convert the strokes to paths by going to Path > Stroke to Path.
You can now color in and stylize your wavy lines however you'd like.
That should do it for today's tutorial.
If you have any questions just let me know, and as always, thanks for watching!
Create Mesh Gradient Backgrounds with Inkscape
Create Mesh Gradient Backgrounds with Inkscape
In today's tutorial I'll be demonstrating how to create mesh gradient background patterns with Inkscape.
The idea behind the effect here is that the design is made up of a bunch of individual triangles that all have a single solid fill color, but when viewed in totality they create the illusion of a mesh gradient.
The following is just a brief outline of the steps taken to achieve the effect.
For complete step-by-step instructions, please refer to the tutorial video at the top of the page.
Create A Mesh Gradient Background Pattern
The first step is to create a simple rectangle in whatever size you'd like your background to be.
Next we will grab the Mesh Gradients tool and make sure your presets match mine depicted in the screenshot below…
Now select your rectangle and apply a mesh gradient by clicking on the Mesh Gradient button in the Fill & Stroke window.
Your rectangle should now look something like this…
With the Gradients tool selected, click on each individual node and click on a color from the color bar at the bottom of your screen in order to fill that area of the mesh with your chosen color.
Do this for all of the nodes until you have a nice balance of your desired colors.
You can now click and drag each of the individual nodes in order to give the design a whimsical, swirling sort of look.
The gradient portion of the design is complete.
Now we will move on to applying a polygonal overlay.
Create a perfectly symmetrical square and divide it into two separate objects diagonally.
Now simply create a bunch of copies of the two pieces and overlay them onto the rectangle containing your mesh gradient in order to form a triangle pattern.
Next, cycle through each individual triangle and remove the fill color.
Use the Dropper tool to fill it with the color of the gradient beneath it.
You should end up with something like this…
If you want, you can go through and darken and/or lighten individual triangles manually as I've done.
This can give your design a more personalized touch.
Now go ahead and export your design, and that should do it! Our mesh gradient background is complete.
If you have any questions or run into any problems, simply leave a comment below.
As always, thanks for watching!
How To Create Line Style Letters with Inkscape
How To Create Line Style Letters with Inkscape
In today's tutorial I'll be demonstrating how you can use Inkscape to create simple line art-style letters and words that can be used individually as logos or as some kind of typography design.
The following is just a brief outline of the steps taken to achieve the end result.
For complete step-by-step instructions with voice narration, please refer to the video tutorial at the top of the page.
Vector Line Art Letters
The first thing we're going to do is generate a series of strokes that are 10 px in thickness and have a rounded cap.
We'll use the Bezier Pen to create the first line, then we'll make a bunch of duplicate copies and space them out evenly.
Next we'll rotate them so that the corners run vertically and horizontally, bring the opacity down to 50%, then center our letter/text on top.
Make sure you've converted your text object to paths first.
For this sort of design I recommend using a heavy weight font.
I went with Montserrat Heavy.
Now we'll select the lines and the text and go to Path > Cut Path.
This will result in the lines being broken apart in the shape of the letter.
Simply delete all of the lines outside of the letter area.
Select the remaining lines and convert them to paths by going to Path > Stroke to Path.
Next, grab the Nodes tool and select the two nodes at the end of one of the lines.
With the two nodes selected, click on the button that says Combine Selected Nodes in the top toolbar.
This will combine the two nodes together so that they form a point.
Go through and repeat this process on the rest of the design.
Once completed, you can bring the opacity of the design back up to 100% and you're finished!
If you have any questions simply leave a comment below, and as always, thanks for watching!
5 Ways To Export CMYK with Inkscape | PNG, JPG, PDF, Vector & More
5 Ways To Export CMYK with Inkscape | PNG, JPG, PDF, Vector & More
If you use open-source design software like Inkscape and GIMP, you've probably designed something to be printed professionally, only to have it be rejected by the print shop because it's in RGB color format and not CMYK.
There are several ways to export CMYK with Inkscape though, and in this post I'll be going over 5 of my favorite methods for doing so.
CMYK vs RGB
You may be wondering what the difference is between these two color models.
Color management is so complex and advanced that it's an entire skill set in and of itself, but I'll try to break it down in a very simple and understandable way.
RGB
RGB is a subtractive color model that uses some combination of three different colors of light — red, green, and blue — to form every other color within its spectrum.
Since RGB uses light to generate colors, it provides for a more vibrant and diverse spectrum than CMYK does.
This makes the RGB format ideal for use on screens and digital displays because they can produce a wider variety of colors.
RGB format is not ideal for print though because there's a pretty good chance that some of the colors you're using are outside of the range of what can be produced with ink.
I've found this to be particularly true with neon shades of green, blue, orange, pink, etc.
Source: https://en.wikipedia.org/wiki/Color_s
Printing documents that use RGB color format usually results in the colors appearing muddy and desaturated.
Some print shops (like VistaPrint) handle the spot conversions quite well, but most print shops will reject documents in RGB format because they don't want to be held responsible for the finished product looking different in print than it does on the customer's digital display.
Source: https://en.wikipedia.org/wiki/File:RGB_and_CMYK_comparison
This is why you should work in the CMYK color format when you're designing something to be printed.
CMYK ensures that your design will look the same in print as it does on your screen.
CMYK
CMYK is an additive color model that uses some combination of four different colors of ink — cyan, magenta, yellow, and black — to produce all of the other colors.
Although it provides for less vibrant color options, working within the CMYK color space ensures that none of the colors you're working with will be outside of the range (or "gamut" as it's called) of what can be produced in ink.
How To Export CMYK with Inkscape
One of the biggest downsides of using Inkscape is that it currently can only produce documents in RGB format, making it a nightmare for print design.
However, there are some workarounds.
They're far from perfect, but they will allow you to export CMYK with Inkscape in some capacity.
Let's have a look.
1. Scribus
Scribus is an open source desktop publishing application similar to Adobe InDesign.
The great thing about Scribus is that it allows you to open PDF files that were originally created in Inkscape and export them in CMYK color format.
I made a video tutorial about it a few years ago…
Follow the instructions in the video tutorial if you need an editable PDF file in CMYK format.
As demonstrated in the video, the PDF file that you generate will remain an editable vector file that can be opened with Inkscape, Illustrator, CorelDraw, or any other vector graphics software.
2. Krita
Much like GIMP, Krita is also an open source image editing and photo manipulation application.
Unlike GIMP though, Krita comes with the ability to generate CMYK files built-in.
To generate a CMYK PNG or JPG file with Krita, simply open your document and go to Image > Properties, click on the Image Color Space tab, and choose CMYK/Alpha from the Modes drop down.
Go ahead and click OK to finalize.
All you have to do now is simply go to File > Export and choose the format you'd like to generate your CMYK file in.
Using Krita to export CMYK with Inkscape is ideal if you need a rasterized format like PNG, JPG, TIF, etc.
However, there's no way to create editable vector files (like PDF) with Krita.
3. RGB2CMYK
Rgb2cmyk.org is a free online tool that allows you to upload an RGB document and generate it with a CMYK color profile in either JPG or TIF format.
The site is great if you need to export CMYK with Inkscape in raster formats.
It's very simple, self-explanatory, and helpful.
However, much like Krita, this solution isn't viable if you need an editable vector file like PDF.
One problem I've noticed with rgb2cmyk.org is that the color conversion is sometimes pretty far off.
This is to be expected any time you convert an RGB document to CMYK, but the difference here can be pretty stark.
I've encountered color banding and contrasting issues at times.
4. The ExportPDFCMYK Extension
ExportPDFCMYK is a third-party extension for Inkscape that allows you to save your work in PDF format with a CMYK color profile.
Unfortunately this extension is only available for Linux users, so if you're a Windows user and you need to export CMYK with Inkscape, you'll have to look elsewhere.
For you Linux users though, you can find the download link and installation instructions on the Wiki page.
One downside to using this extension is that it only produces PDF files, so you'll have to use one of the other solutions if raster formats are required.
5. Illustrator Free Trial
The final method to export CMYK with Inkscape — and this is my personal favorite — is to simply use Illustrator to make the conversion.
I know that Illustrator's price tage isn't justifiable for some of you, but if you're in a bind and you really need a CMYK document, it may be worth it to download the free trial so you can export your work.
Illustrator really is the best way to produce CMYK documents that you originally created with Inkscape because it allows you to produce them in any format you want, including editable vectors in SVG, EPS, PDF, and AI formats, as well as rasterized formats like JPG, PNG and TIF.
And the great thing about Illustrator is that it's what most print shops use in preparation, so you'll never have to worry about cross-platform discrepancies.
To convert your work to CMYK format with Illustrator, first save your Inkscape document as an SVG file, then open it with Illustrator.
Now go to File > Document Color Mode and select CMYK Color.
You'll know your document is within the CMYK gamut by referring to the canvas tab at the top of the screen, which will indicate either RGB or CMYK.
Now all you have to do is simple save or export your document in any format you'd like, and you're all set!
Inkscape Logo Template: Video Tutorial and Free Download
Inkscape Logo Template: Video Tutorial and Free Download
Today I'll be demonstrating how to create a circular banner logo with Inkscape, and I'll also be including a free download to the template that you can edit and use however you'd like (in case you'd rather not follow the tutorial.) The logo has two circular banners — one going around the top and the other around the bottom — with editable text.
You can place whatever imagery you'd like in the center.
The following is just a brief overview of the steps taken to create this logo.
For complete step-by-step instructions with voice narration, be sure to watch the video tutorial at the top of the page.
If you'd just like to grab a copy of the template and be on your way, skip down to the end of the post.
Creating A Logo with Inkscape
The first step to is to create a large circle in the center of the page.
This is going to act as a reference point for the entire design.
Then we'll add a couple of more circles, only without a fill and with a stroke size of 75 pixels.
Make one of the rings a different color and slightly smaller than the other.
Next we'll create three separate hexagons that gradually decrease in size and place them over the bottom third of the two rings.
These will serve as a reference point for where we cut the rings to make the circular banner.
Using some path effect magic, we'll go ahead and clip off the designated areas of the rings using the hexagons.
We'll be left with the base shape for the banner.
Now we'll use the Edit Paths By Nodes tool to add a couple of fishtail ends to our banner.
The foundation of our logo is now set.
Lets going ahead and use the Bezier Pen in Inkscape to manually draw in some shapes where shadows would typically be, then color it in however you'd like.
For this logo the color I chose for the banner template is #FF002A.
Now it's time to add some text that follows the circular edges of the banner.
In order to do that, we'll create a smaller circle within the center of the page.
Go ahead and grab the text tool, write out some text, then we'll use the Put On Path function to wrap the text around the edge of our logo.
This next part is optional, but if you'd like to add another banner going around the top, simply duplicate the entire graphic and flip it vertically.
Make sure to edit your text accordingly though.
And with that, our logo design is complete!
Free Template Download
A free template of this logo can be downloaded in Inkscape SVG format here: free-logo-template.zip
The text is completely editable.
Simply open the SVG file with Inkscape, grab the text tool, then click on the text in order to replace it with your own.
The green circles inside the design represent the paths that the text is place on.
You can use the Select tool to rotate those circles in order to rotate your text along with it.
Once you've finished adding your text, select the text objects and go to Path > Object To Path, then delete the green circles and you're good to go!
Font Download
Just so you know, the font used for this template is League Gothic.
Make sure to download and install that font before you open the Inkscape template, otherwise Inkscape will display whatever your system's default font is instead.
Usage Rights
You may use this logo template for both personal and commercial purposes.
All I ask is that you don't reupload the source SVG file and make it publicly available anywhere else.
Aside from that, enjoy!
Create Isometric Carved Letters with Inkscape
Create Isometric Carved Letters with Inkscape
In today's tutorial I'll be demonstrating how to create isometric carved letters with Inkscape, where it appears as if the letters have been carved into the surface.
I made a similar tutorial back in 2016, but my approach will be different this time.
In the previous tutorial we set up an isometric grid and drew each letter/number freehand.
This time, we'll be using a stock font and distorting the desired word/lettering to fit an isometric grid.
The following is just a brief overview of the steps taken to achieve this effect.
Please refer to the video tutorial at the top of the page for complete step-by-step instructions.
Fonts
First we'll need to download and install the font being used in the tutorial, which is 8 Bit Wonder.
I chose this font because it's a nice, square font with sharp corners and no round edges.
This technique can theoretically work on a font with rounded edges, but it'll be a little more tricky and should only be approached by advanced users.
The font can be downloaded here: 8 Bit Wonder.
Check my tutorial for installing fonts in Inkscape and GIMP if you need help getting the font installed.
Creating Isometric Letters
Once we have our font installed, we'll write out the word we want to apply the effect to.
For the sake of this tutorial I'll just be used the word "TEXT" for example.
Then convert the text to a path, ungroup it into individual letters, make everything green, and bring to opacity down to roughly 50%.
Next we're going to use the Select tool to shear the text one step to the left, then rotate it two steps counter-clockwise.
Now we're going to enable snapping (in the toolbar) and use the Bezier Pen to manually draw shapes within the letters that start at the corners and come straight down vertically.
The shapes will alternate between two different shades of the same color.
For this example I used blue, but you can use whatever you'd like.
One trick for determining which color which shape should be is to identify the angle of the top of that shape.
In my example, each shape which has an angle going down and to the right at the top was colored in with light blue.
Each shape which has an angle going down and to the left is colored with dark blue.
It may seem a little tricky at first, but it's much simpler than it appears once you get the hang of it.
I would really recommend watching the video tutorial at the top of the page for this one.
It might help you grasp it better.
Once you've gone through and created shapes over each of the letters you can go ahead and delete the original green letters beneath them.
And with that, our isometric carved text is finished!
Why Inkscape Fonts Are Missing Even Though You Installed Them
Why Inkscape Fonts Are Missing Even Though You Installed Them
If you are a Windows 10 user you may run into a problem where Inkscape fonts are missing despite having installed them system-wide.
In short, the reason why the Inkscape fonts are missing is because they haven't been installed for all users.
The fix is quite simple.
Before we get started, first make sure that you do indeed have your fonts installed on your system.
I made a tutorial for this a while back that you can watch here.
Whenever you want to use a font in Inkscape, you have to install it on your operating system first, then Inkscape should catalog it next time you launch it.
Quick Fix: Inkscape Fonts are Missing
If your fonts are populating in other applications but not Inkscape, it's most likely because the font needs to be installed for all users.
This is thanks to a recent Windows update.
Step 1: Restart Inkscape
The reason why your Inkscape fonts are missing could be because you haven't restarted the Inkscape application since installing them.
In order for your newly installed font to populate in Inkscape, you have to close out of the application and reopen it.
Step 2: Install for All Users
Thanks to a tip I received from a student of my Inkscape Master Class, apparently Inkscape won't recognize a font that's only installed for one Windows user — it has to be installed for all users.
I never had this problem personally because I've always been the sole user on my Windows machines.
Instead of opening the font file and clicking the "Install" button, simply right-click the font file and select "Install for all users".
This should do the trick.
One caveat that I'd like to add, thanks to a tip from a Reddit user, is that in order to see the "Install for all users" option, you need to 1.) be using a machine that has more than one Windows user account, and 2.) the font file must be placed locally on your hard drive.
UPDATE September 2019:After a recent Windows update I started having this problem as well.
The fonts that I previously installed were all there, but new fonts now have to be installed for "all users," even though I'm the only user on this machine.
If you're like me, you've probably gotten in the habit of installing fonts directly from the zip folder they came in, but in order to install the font for all users, you'll need to drag and drop the file somewhere else, like your desktop.
Once you've installed the font for all users, go ahead and relaunch Inkscape.
Your Inkscape fonts should no longer be missing.
6 Reasons Why I Like Inkscape Better Than Illustrator
6 Reasons Why I Like Inkscape Better Than Illustrator
I've been using Inkscape on a nearly full-time basis since 2013, and I've also been using Illustrator quite regularly since 2015.
Having extensive experience with both, I can say for sure that they both have their pros and cons.
However, in this post I'm going to make a case for why Inkscape might be a better choice for you than Illustrator.
I don't necessarily think one application is objectively better than the other — there's arguments that could made for each.
What really matters is if each application has what you need to get the job done, and they both do.
And what matters even more than that is the person using them.
The person using the tool will always matter more than the tool itself.
That said, since everyone has their own individual needs and priorities, it should really be taken on a case-by-case basis.
Reasons Why Inkscape May Be Better Than Illustrator…
1. It's a lightweight program
Less demanding system requirements make for a lower barrier of entry to the graphic design world.
Casual users might be frustrated by Adobe's resource-hungry applications because they don't quite have the hardware for running them optimally.
Inkscape would be a more appealing option to these users because it's a relatively lightweight program that you can run on standard low-end machines (by today's standards) without much of a problem.
You can read more about hardware requirements for graphic design here.
While it's true that if you want to be a graphic designer, you have to have the proper tools for getting the job done (which includes computer hardware,) my point is that some people might not know that they want to be graphic designers yet, or might just be casual users.
They might just want to try it out and see if they like it, or maybe use it casually to create flyers for their kids' baseball team or something.
Investing in expensive hardware isn't practical for these people, making Inkscape a better option.
2. Working with Gradients
Let's get into some of the workflow details.
One thing I really like about Inkscape is how intuitive its system for editing gradients is.
In Inkscape, you're given nodes for each stop in the gradient.
You can move them around on the canvas however you'd like, and the stops in the gradient will follow along.
It couldn't possibly be simpler.
In Illustrator you're also given nodes, but they function in a different and more complex way.
One node changes the position of the of gradient on the canvas, and the other determines the radius and angle of the gradient.
Inkscape's method is better because both nodes are capable of both functions in the most simplistic, intuitive way possible, and it makes for more precise maneuvering.
3. Canvas Navigation
Another thing I like better about Inkscape, from a workflow perspective, is how it's marginally easier to navigate around the canvas.
In Inkscape all you have to do is press down on the mouse wheel and move the mouse, and the canvas will pan according to the movement of the mouse.
Illustrator uses a similar system, but you have to press the space bar AND left click the mouse in order to navigate the canvas.
Inkscape's method requires just one click and one hand.
Illustrator's method requires two clicks and both hands.
This may sound frivolous, but it makes a big enough difference when you're spending 8+ hours per day using the software.
With Inkscape, I can just lean back in my chair and navigate around the canvas using one hand.
I can't do that with Illustrator unless I manually change the key bindings.
4. Aligning Objects
One area where Inkscape outshines Illustrator is in handling the alignment and distribution of objects.
In Illustrator, you can align objects relative to three different points: the selection, the key object, or the artboard.
Inkscape allows you to choose the same anchor points and then some…
Inkscape also offers more alignment options and distribution methods.
5. Linux Support
While it's true that Linux users only represent a very small, niche user base, if you are a Linux user and want to get into graphic design, Adobe software is simply not an option for you.
Luckily there's software designers in this world who do care about Linux users, otherwise we wouldn't have great alternative like GIMP and Inkscape.
6. Price
Finally, the most obvious reason why Inkscape may be a better choice for you — price.
Illustrator is quite expensive.
The monthly/yearly payment for it may not seem like much, but when you consider that it's an ongoing rental that you need to pay for indefinitely, it adds up pretty quick.
In fact, I'm probably going to cancel my own subscription this summer when my plan is up.
For those of you who don't find the software-as-a-service payment model practical, great news: Inkscape is free.
Thoughts?
If you have any feedback or input of your own, leave a comment below.
I'll probably do another post outlining some of the things I like better about Illustrator in the future.
Like I said, a case can be made either way.
Wacom Intuos – The Best Drawing Tablet for Inkscape
Wacom Intuos – The Best Drawing Tablet for Inkscape
I'm not much of a freehand artist myself, but if freehand drawing and sketching is your thing, and you're an Inkscape user, you might want to check out the Wacom Intuos CTH490AK drawing tablet.
In my opinion, the Wacom Intuos is the best drawing tablet for Inkscape because of its plug and play compatibility and ease of use.
It's also a trusted brand and quality build at a great price.
Why A Drawing Tablet?
As graphic designers we're accustomed to designing with a keyboard and mouse, but sometimes a task or design requires the precision of a freehand tool, and this is where a drawing tablet comes in handy.
Here's some instances where a drawing tablet is more suitable than a keyboard and mouse…
Character illustrations
Calligraphy and lettering
Masking
Drawing tablets also come in handy any time you need to create something with a natural, whimsical look and feel.
The Best Drawing Tablet for Inkscape
Although drawing tablets are typically more useful for applications like GIMP, they do have their place in the Inkscape workspace.
The best drawing tablet for Inkscape that I recommend is the Wacom Intuos WPH.
Why I Like The Wacom Intuos CTH490AK
Compatibility: I was able to plug the Wacom Intuos tablet into a USB port on my computer and start using it immediately.
No additional software or drivers necessary (this is for Windows 10.
I can't vouch for other operating systems.)
Ease of use: One thing I really like about the Wacom Intuos drawing tablet is how easy it is to customize.
For example, I recommend programming the two buttons on the pen to perform the undo and redo functions.
This is very convenient for graphic design use.
Price: Drawing tablets vary wildly in price, and it's not really one of those things you have to spend an exorbitant amount of money on.
Since Wacom is one of the most trusted brands in drawing tablets, this Wacom Intuos tablet is the perfect mix of value and quality, and in my opinion, the best drawing tablet for Inkscape.
It gives you everything you need — nothing more, nothing less — and the price reflects it.
The tablet comes with a drawing pad, USB wire, and a battery operated pen.
How To Use with Inkscape
Drawing tablets function virtually the same way a mouse does.
The pad/tablet represents the entirety of your screen resolution, and the pen functions how a mouse would.
Simply hover the pen an inch or two away from the pad and move it around.
You will notice the cursor on your screen moving along with it.
For example, if you hover the pen to the upper right side of the tablet, the cursor will move to the upper right side of your screen.
You will notice that the tip of your pen doubles as a button, and there's also two buttons on the side of the pen.
Pressing the tip of the pen against the pad performs the same function as a left mouse click.
The two buttons on the side can be programmed however you'd like.
As previously mentioned, I recommend programming them for undo and redo.
It's perfect for when you make a bad stroke and want to quickly erase it without having to drop the pen and reach for your mouse and/or keyboard.
Personally, I find that the drawing tablet works best with the Draw Freehand Lines tool and the Calligraphy Pen, but it could also prove useful for other lesser-used tools like the Eraser.
How To Create A Comic Logo with Inkscape
How To Create A Comic Logo with Inkscape
In today's tutorial I'll be demonstrating how you can create a comic book-style logo using Inkscape.
The following is just a brief overview of the steps taken to create the design.
For complete step-by-step instructions with voice narration, watch the video tutorial at the top of the page.
Creating A Comic Logo
The first thing we are going to do is use the Create Tiled Clones feature in Inkscape to create our halftone pattern.
We're first going to create a black circle, blur it, place it over a white background, then use another much smaller black circle as the item we trace the tiled clones with.
Next we are going to use the Stars and Polygons tool to create a pink star with 8 corners, then we'll make the inner corners of that star smooth so we end up with the following shape…
Now we're going to place the star over our halftone pattern and create a slightly larger black copy to place beneath it and act as somewhat of a border/drop shadow.
Our next step is to create the text.
For this design I am using the Komika Axis font, which can be downloaded from FontSquirrel here.
As depicted above, I made the text white, added a black stroke around each letter, then layered each letter above each other in reverse order.
Then I created a duplicate copy of the entire word, made it black, and layered it beneath to create a makeshift 3D sort of effect.
The final step is to place the text over the rest of the design, and with that our comic logo is complete!
If you have any questions simply leave a comment below, and as always, thanks for watching!
How To Change The Inkscape Default Template
How To Change The Inkscape Default Template
In this tutorial I'll be demonstrating how to change the Inkscape default template, otherwise known as the startup file.
I'm making this tutorial in response to some feedback I received about my dark theme tutorial.
Many of you remarked that you'd like the work space (or canvas) to be dark as well.
There's two ways to do this.
Let's briefly go over both.
Document Properties
The first way is to manually change the background color yourself using the Document Properties menu.
Go to File -> Document Properties, then click on the white stripe in the Background Color area.
Another menu will pop up where you can manually change the background color of the document to whatever you'd like.
Inkscape Default Template
The second method is to change Inkscape's default startup file.
This would be recommended if you don't feel like manually changing the background color of your document every time you use Inkscape.
Open a folder in Windows and go to Local Disk (C:) -> Program Files -> Inkscape -> Share -> Templates and look for a file titled default.svg.
This is the Inkscape default template.
Whichever file is titled "default.svg" in this folder will be the file that Inkscape loads when you launch it.
So all we're going to do is swap out the default template with another template that has the background color already set.
Change the name of "default.svg" to "old-default.svg", then download the new default startup file here: inkscape-startup-files.zip
Grab the file titled "new-default.svg" and paste it into the Templates folder, then change its name to "default.svg".
This will now be the Inkscape default template on startup.
Here's how the old default template look…
Click to enl
And here's how it will look with the new default template…
Click to enl
I've also included a copy of the original startup file in case something goes wrong and you need to recover it.
If any of these steps were unclear then I would recommend watching the video tutorial at the top of the page.
As always, thanks for watching!
Inkscape Dark Theme for Windows | Version 0.92.4
Inkscape Dark Theme for Windows | Version 0.92.4
A few years ago I made a post outlining how you could give Inkscape a dark theme.
Inkscape has since released several updates that have rendered that old tutorial obsolete, so it's time for an update of my own.
In this post I'll be demonstrating how you can install a dark theme for Inkscape version 0.92.4 on Windows 10.
Before you proceed with this tutorial, please make sure that you're using the correct version of Inkscape, which is 0.92.4.
I cannot say for certain that this will work on any other version.
If you don't know which version you're running, go to Help > About Inkscape.
Go to Help > About
The following is a brief overview of the steps taken.
For more in-depth instructions, please refer to the video tutorial at the top of the page.
Inkscape Dark Theme
A before and after of the dark theme
The first step is to download the dark theme package here: Dark-theme-92.zip
This was originally shared on Gnome-Look by Abdullah Ragb, who was kind of enough to let me make a modified version for Windows users, using my own icon theme.
Please note that in the zipped folder there's a sub folder titled "Original Files".
Those are the default theme files that Inkscape comes with in case you'd like to revert back at any point in the future.
Step 1: Replace Theme File
Go to Local Disc (C:) > Program Files > Inkscape > Share > Themes > MS-Windows > gtk-2.0
Once you're in that folder, simply delete the file titled "gtkrc" and replace it with the gtkrc file from the "New Files" sub folder in the Dark-Theme-92 zip.
Make sure to copy and paste the folder titled "ui" into that same directory as well.
UPDATE 3/5/2019: Many of you have remarked that you'd like the work space (the white canvas) to be dark as well, so I've created another brief tutorial for how to do so here.
Step 2: Replace Icons File
Now head over to Local Disc (C:) > Program Files > Inkscape > Share > Icons
Look for a file titled icons.svg and delete it.
Now replace it with the icons.svg file from the Dark-Theme-92 zip.
If you'd like to use those icon designs for the standard theme Inkscape comes with, you can download a copy for the light theme here.
If you currently have Inkscape running, close out of it and start it up again.
Your dark theme should now be active!
Click to enl
If you have any questions or input, please leave a comment below.
As always, thanks for watching!
Inkscape VS Illustrator VS CorelDraw | 2019 Comparison
Inkscape VS Illustrator VS CorelDraw | 2019 Comparison
When it comes to vector design, the big three applications are Inkscape, Illustrator, and CorelDraw.
All three are excellent options and are completely capable of handling raw design needs, but the one that you should use depends on you and your own personal needs.
In today's post I'll be comparing Inkscape vs Illustrator vs CorelDraw — both the pros and cons of each — so you can decide for yourself.
Inkscape
Inkscape is an open source vectors graphics application available for all major operating systems, and it has been my preferred vector graphics tool since I started back in 2012.
Don't let the fact that it's free fool you into thinking of it as anything less than professional.
This isn't MS Paint.
Inkscape is capable of virtually anything any other vector design software is capable of from a design standpoint.
Pros
✅ Cost: It's hard to beat free.
Inkscape is a great option if you're just starting out and have no money to invest.
✅ Less CPU Demands: Inkscape is a very lightweight application that will run good enough on low-end computers with outdated hardware.
✅ Intuitiveness: This is just my own opinion, but Inkscape's UI and functionality seem slightly more intuitive than Illustrator's.
A good example of this would be editing gradients on the canvas.
It just functions in a more natural way in Inkscape.
✅ Versatility: Works on all operating systems, including Linux.
In fact, it runs best on Linux in my experience.
✅ Community: Inkscape is made by volunteers who are passionate about their work and put principles and values over profit.
This makes for a supportive grass roots community that feels good to be a part of.
Cons
❌ Lack of CMYK Support: No ability to output files in a CMYK color format, making Inkscape not a very good choice for designing anything needing to be printed.
❌ Instability: You'll regularly experience bugs and glitches.
❌ Cross Platform: Since Adobe is the industry standard, Adobe's proprietary formats tend to be what's most commonly used by designers and clients.
This can pose a problem when someone else wants to send you an Adobe file for you to work on.
❌ Employment: Hardly used by any design studios or agencies, meaning your Inkscape skills probably won't land you a traditional job.
Who should learn Inkscape?
An aspiring freelancer who has no immediate plans to seek traditional employment at a design studio or agency.
Online business owners (bloggers, Instagram influencers, YouTubers, Amazaon sellers, etc.) whose focus is not design, but may occasionally need simple DIY graphics to supplement their work.
Anyone using a low-end computer that would struggle with more comprehensive applications like Illustrator.
Anyone who deals primarily with digital design and will not need to design for print.
Adobe Illustrator
Illustrator is a vector graphics application by Adobe.
It is widely recognized as the industry standard tool for vector design and is used by the overwhelming majority of studios, agencies, and professional designers.
Pros
✅ Employment Opportunities: Since Illustrator is the industry standard for vector design, there's more upside to learning it over any other vector application.
It's what most employers and institutions use.
Knowing how to use the Adobe software will put you in a great position to qualify for employment as a graphic designer.
✅ Extensive Features: Although Illustrator doesn't do anything that the other vector tools can't also do, it does have some neat features that can automate some of your work and save time that would otherwise be spent doing it manually.
A good example of this would be working with multiple art boards — something I always wished Inkscape had.
✅ Development: Since Adobe is the industry leader, innovative new features and tools tend to debut on Illustrator before they eventually make their way over to the alternatives.
✅ Proprietary Formats: Adobe's proprietary formats (.ai, .psd, etc.) tend to be what's most commonly used by designers and requested by clients.
Although there's workarounds for opening and creating Illustrator files with Inkscape, it's far from perfect because things sometimes get lost in translation.
Having access to Adobe software means you'll be able to work with proprietary files other designers and clients send you without a problem.
✅ Cross Platform Usability: One thing I love about the Adobe suite is how well all of its applications communicate with each other.
Vector graphics created with Illustrator can very easily be imported into After Effects, Premiere Pro, Photoshop, etc.
and worked with further.
Cons
❌ Price: Adobe software is sold as a service, meaning it's an ongoing monthly expense.
That's a pretty big pill to swallow if design isn't a big part of your job or business and you just need occasional graphics.
❌ Hardware Requirements: Requires high performance hardware in order to run well.
As I wrote about recently, using Adobe software on a low-end machine is very frustrating.
Not only will you need to fork over some dough for the software, but you'll need to invest in a high performance machine as well.
❌ No Linux support: If you want to use the Adobe suite, you'll have to do so on Windows or Mac.
Who should learn Illustrator?
Anyone who wishes to be employed as a graphic designer at a design studio or agency.
Students (Adobe gives discounts to students.)
Aspiring freelancers who have money to invest in software and high performance hardware.
CorelDraw
CorelDraw is a vectors graphics application by the Corel Corporation.
Although I have little experience working with it, it does seem to be a nice middle-of-the-road option.
Pros
✅ Price: Although the CorelDraw suite comes with quite a substantial upfront cost (see current prices here,) it eventually becomes a better value than Adobe Creative Cloud if you use it long enough, because you only have to pay for it once and you own it for life (they do offer a subscription plan if you'd prefer that though.)
✅ CMYK Output: Unlike Inkscape, CorelDraw allows you to create print-ready files in CMYK format like Illustrator does, but without its price tag.
✅ Design at Scale: According to some print shop owners I've talked to, they tend to prefer CorelDraw because apparently it has a much larger canvas than Illustrator, meaning you can design large signs and banners at scale.
✅ Employment Opportunities: In my experience CorelDraw is the preferred application used by most sign shops, so becoming proficient with it can help land you a job at a local sign shop.
Cons
❌ Employment Opportunities: Yes, this is both a pro and a con.
Knowing how to use CorelDraw will qualify you to work at sign shops and the like, but that's about it.
Most everyone else demands proficiency with the Adobe suite.
❌ Windows Only: According to Corel's website, CorelDraw is currently not on its list of Mac-compatible applications.
This is the kiss of death for their hopes of ever taking significant market share from Adobe in my opinion because most creatives prefer Mac.
❌ Cross Platform: Much like Inkscape, you'll have trouble working with Adobe's proprietary formats.
Who should learn CorelDraw?
Anyone who will work primarily with print and/or would potentially like to work at a sign shop.
An aspiring freelancer who has some money to invest but would prefer something a little more economical than Illustrator to keep monthly expenses low.
Become A Master of Inkscape!
Want to learn more about how Inkscape works? Check out the Inkscape Master Class – a comprehensive series of over 50 videos where I go over every tool, feature and function in Inkscape and explain what it is, how it works, and why it's useful.
Create A Vector Christmas Sweater Pattern with Inkscape
Create A Vector Christmas Sweater Pattern with Inkscape
In today's tutorial I'll be demonstrating how you can create a vector Christmas sweater pattern with Inkscape, and I'll be showing you how to create it out of a single tile that can be repeated infinitely.
This was a design I originally saw created with Illustrator on another blog I follow called Spoon Graphics.
I figured it would be fun to show how it could be done with Inkscape as well. You can check out the original Illustrator tutorial here.
The following is just a brief overview of the steps taken.
For complete step-by-step instructions, please refer to the video tutorial at the top of the post.
Vector Christmas Sweater Design
The first step is to create a vertically-oriented ellipse similar in shape to a grain of rice and make it green.
Rotate it 15 degrees counter-clockwise, then snap it right next to a horizontally-flipped copy of it and unify them both together.
Next, we'll create multiple copies of the design and stack them next to and on top of each other.
We'll want to 14 rows and 6 columns, as depicted below.
Once we have that set we can start coloring in the pieces to form our pattern.
I would suggest making the canvas a different color if you plan on using white like I did.
Now all we have to do is create a new rectangle and make it the same size as the entire group of objects we previously created.
Make it a darker shade of green, layer it beneath the group of objects, then align the two together.
Make sure to group everything.
Once that's done you will have an individual tile that can be repeated infinitely.
This would work great as a background pattern for a website.
One little trick you can use to easily create lots of copies of the tile is to use the Create Tiled Clones feature in Inkscape.
To access it, simply go to Edit > Clone > Create Tiled Clones.
You can choose to clone the tile either by volume (rows, columns) or by specifying a size you'd like it to fill (width, height).
And with that, our design is complete!
How To Add Fonts To GIMP and Inkscape | 3 Simple Steps
How To Add Fonts To GIMP and Inkscape | 3 Simple Steps
This is something I'm asked about quite often and figured it would make sense to finally put together this brief instructional on how to add fonts to GIMP and Inkscape.
This method works the same regardless if you're using Windows, Linux or Mac.
How To Install Fonts In GIMP and Inkscape
You don't actually install the font into the application; you install it onto your operating system, then you'll be able to use it with all of your applications.
The process is quite simple…
Step 1: Find A Font
You'll need to pick out a font to install.
I like to use FontSquirrel.com because all of their fonts are free for both personal and commercial use.
You can also find free fonts on sites like Dafont, but you have to be careful about how you use them because most of them are only free for personal use, and if you use them commercially or for client work you could be breaking copyright law.
If you're doing work for a client, it may be a good idea to invest in some premium fonts.
I'll be installing the Grand Hotel font for use in GIMP and Inkscape
Step 2: Download & Install
Simply download the font from the font page.
It usually comes packaged in a ZIP folder.
Open the zip folder (no need to extract it if you're using Windows) and look for the font file.
It should end with either .ttf or .otf.
Double-click that file to open it, then somewhere near the top of the window you should see a button that says "Install".
Go ahead and click that button and the font will be added to your computer so you can use it with GIMP and Inkscape.
Step 3: Restart GIMP and Inkscape
If you already have GIMP and/or Inkscape open, you'll have to close out of them and reopen again in order for the new font(s) to populate in the font directory.
Once you've done that, your newly-added fonts should be ready to use.
Newly-added font populated in GIMP
And here's how it looks in Inkscape
If any part of these instructions were unclear, please refer to the video tutorial at the top of the page or leave a comment below.
Fonts Still Not Showing?
I've been getting a lot of feedback lately from some of you who claim that your fonts still aren't populating in Inkscape despite following these steps.
I found a solution after looking into it a bit which you can read about here.
Design A Vector Pumpkin with Inkscape
Design A Vector Pumpkin with Inkscape
In this week's Halloween-themed tutorial I'll be demonstrating how you can design a vector carved pumpkin using Inkscape.
The following is a brief overview of the steps taken to achieve this design.
For complete step-by-step instructions with voice narration, check out the video tutorial at the top of the page.
Vector Carved Pumpkin
We're first going to create a series of colored ellipses in order to form the shape of the pumpkin
Once that's done we'll put it aside for the time being and start creating the stem.
In order to create the stem we'll use a couple of circles strategically positioned over a rectangle, then use them as a reference point for slicing off the edges of the rectangle so that the rectangle ends ups with smooth, curved edges.
We'll now put that aside and start creating the eyes.
The first eye shape is made by taking the intersecting area between 3 circles, then simulating a beveled sort of effect so that it looks like it was carved into the pumpkin.
We'll then duplicate that eye, flip it horizontally, then use it as the other eye.
The final step is to create the mouth, which will be made of the intersecting area of a circle and a rectangle, as depicted below.
We'll then use some squares to punch holes in the upper and lower portions of the mouth so that our vector carved pumpkin will have some teeth.
Once that's done we will put all of the individual objects together to create the final vector pumpkin design.
The design seems to look best when placed on a dark background — particularly the same shade of purple used for the outline — so I would recommend doing that.
Otherwise, we are done!
If you have any questions just leave a comment below, and as always, thanks for watching!
How To Save A Transparent PNG with Inkscape
How To Save A Transparent PNG with Inkscape
In today's tutorial I'll be demonstrating how you can use Inkscape to generate a PNG file with a transparent background from a graphic you made.
At first you may assume that the best way to do this is to go to File > Save As, and choose to save it as a Cairo PNG.
However, that method does not work because it does not output the file with a transparent background.
Inkscape: Saving As Transparent PNG
Open up the Export menu by going to File > Export PNG Image (or press Shift + Control + E)
The Inkscape Export menu will open either in its own window or docked to the side of your screen.
It will look something like this…
The first thing we have to do is define the export area.
Inkscape gives us 4 options…
Page – This will export all objects within the page borders.
Everything outside of the page borders will be excluded.
Drawing – This exports the entire canvas — including objects both inside and outside of the page border.
Selection – Export whatever object you currently have selected with the Select tool (this is what I commonly use and recommend myself if you're looking to save a transparent PNG file of a logo or some other individual graphic.)
Custom – Define your own export area using the X and Y coordinates of the document.
Next, we have to set the DPI.
This should already be correct by default.
If you're using Inkscape version 0.92 or later, the default is 96 dpi.
If you're using an earlier version, the default is 90 dpi.
You can double check this yourself though by checking the size of the graphic in the Export menu and making sure it matches the actual size of the graphic on your canvas.
Finally, choose a destination to save your transparent PNG to by clicking the Export As button, name your file whatever you'd like, then click Export.
Your Transparent PNG file should now be ready to go! Check the folder where you saved it for confirmation.
A Brief Warning…
If you're exporting your PNG based on the selection option, be forewarned that everything within the bounding box of the selection will be exported with it, so make sure your graphic is moved far enough away from all other objects.
Since the red circle is intersecting with the boudning box around the logo, that intersecting area will also be exported.
Video Tutorial
For a more in-depth explanation of how to save transparent PNG files with Inkscape, watch the video tutorial at the beginning of the post where I demonstrate exactly how to do it.
How To Design A Logo with Inkscape
How To Design A Logo with Inkscape
In today's tutorial I'll be demonstrating how you can design a simple logo with Inkscape.
The font I'll be using in the tutorial is called Kirsty and can be downloaded here.
Just make sure that you install the font before opening up Inkscape, otherwise the font won't populate in the Inkscape font library.
The following is just a brief overview of the steps taken to create this design.
More experienced users can probably get the hang of it just be seeing the steps depicted, but for everyone else I would recommend watching the video tutorial at the top of the page.
It has complete step-by-step instructions with voice narration.
Inkscape Logo Design Tutorial
The first thing we're going to do is create a series of perfectly round circles that overlap with each other.
The intersection area (indicted in red in the image below) will make up the shape of the logo design.
We're going to pay special attention to the spacing between the 3 circles because if it's not equal then we'll end up with a shape that isn't symmetrical.
Next, we're going to use Strokes and the Stroke To Path function in order to create a boarder around the shape with some negative space padding within it.
Once we've done that we will add our text and center it up on the page, then delete a portion of the shape where the text will go, add some accent pieces, and finally, add a few stars to top it off.
You don't necessarily have to use stars.
You can use whatever imagery you'd like there, or you can even leave it blank.
We can now bring the opacity all the way up to 100% and color it in however you'd like, and with that, our design is complete! We have created a simple but professional-looking logo using Inkscape.
12 Professional Logos Made with Inkscape in 2018
12 Professional Logos Made with Inkscape in 2018
If you've been following my content for any period of time, it's probably no secret that Inkscape is my preferred vector graphics application, and this includes logo design.
I've been designing logos professionally with Inkscape for 7 years now, and in this post I'll be sharing 12 of my Inkscape logo examples that were designed for actual paying clients this year.
Inkscape Logo Examples From 2018
Here's some of the designs I've cooked up for my clients so far in 2018…
1. Ballers In Progress
A simple logo design that depicts a loading bar with a basketball pattern within it.
2. Capsule Smart Homes
A logo that depicts a house within a capsule.
3. A Better Deal
This Inkscape logo example was for a premium domain name for sale.
It's a simple wordmark with "deal" accentuated and placed within the negative space of a price tag.
4. I Migliori Di Fifa
A simple badge-style design for a FIFA video game which depicts a controller and a soccer ball (or football, for my non-US readers 🙂 )
5. Filmotion
This one depicts the letter F as a film reel with lines of motion.
6. Gamers' Haven
A simple and versatile design that depicts the letters GH within a castle.
Just to give some context to this Inkscape logo example, "gaming" refers to board games; not video games.
That's why we went with a castle.
7. Tub Hero
Simple logo design for a hot tub company.
Moving water and bubbles are depicted.
8. Snowbooked
A goat standing on a snowy mountain with the sun rising behind it.
9. Crown Of Tresses
A line of organic skincare and hair products.
This one uses a line art style of a woman with her arm as a branch with leaves and flowers growing off of it in order to emphasize the organic aspect.
10. Inscryb
A colorful, flat-style logo based on a stingray.
11. El Cheapo Moving Company
A logo design for a moving company in Texas.
The client wanted to go with a Tex-Mex style.
12. Righteous Rebels
A Star Wars-inspired logo for a farm.
To see more professionally-designed Inkscape logo examples, be sure to check out my portfolio!
How To Create Mazes with Inkscape
How To Create Mazes with Inkscape
In today's tutorial I'll be guiding you through the puzzling process of creating mazes with Inkscape.
The finished result will be the following isometric-style vector icon that can be stacked and repeated infinitely…
The following is a brief outline of the steps taken to achieve this result.
More experienced users of Inkscape should be able to duplicate this process quite easily without further explanation.
However, if you're a new or novice user, I would recommend skipping to the bottom of the post to watch the video tutorial.
The video tutorial has complete step-by-step instructions that even a first-time user of Inkscape could follow along with.
Creating A Vector Maze with Inkscape
First, we're going to create a perfectly symmetrical square with the Rectangle tool and generate 400 copies of it, in 20 x 20 rows, using the Clones feature in Inkscape.
Please refer to the video tutorial for further instructions on how to use the clone feature.
Next, we're going to manually delete some of those squares to create the shape of a maze.
Be sure to keep the pathways of the maze at a consistent size of 1 unit all around.
Don't worry about making it into an actual puzzle.
We're just going for an aesthetic design here.
If you'd like to put the extra time into doing so, then go right ahead.
It isn't necessary though.
Once we have our maze shape, we're going to unify all of the squares together and rotate it around so that the corners are pointing vertically and horizontally.
Then, we'll create a duplicate, make it a different color, and stack directly above the original, as depicted below…
This next part is a little tricky and requires a bit of an imaginative eye, but it's not something that can't be figured out relatively quickly.
We're going to take the Bezier Pen and use it to manually create shapes that connect the corners together of both objects and color them in so that they create the illusion of depth.
I actually missed a spot.
See if you can find it 🙂
All we have to do next is simply use the Select tool to decrease the height a little bit and we will have our finished maze icon…
If you want to increase the depth of the shape, you can simply create duplicate copies and stack them on top of each other…
You can even stack the duplicates next to each other to make the design larger, as if it were a pattern…
And with that we are finished!
Video Tutorial
Watch the following video tutorial for complete step-by-step instructions with voice narration.
If you have any questions, do not hesitate to leave a comment below.
As always, thanks for watching!
Create A Repeated Background Pattern with Inkscape
Create A Repeated Background Pattern with Inkscape
In today's tutorial I'll be demonstrating how you can create the repeated background pattern depicted above.
The finished design will be a tileable square, meaning you can create duplicate copies and stack them next to each other infinitely.
The following is a brief overview of the process.
Skip to the end of the post for the video tutorial which has step-by-step instructions and voice narration that even a first-time user of Inkscape could follow along with.
Creating A Repeated Background
The first thing we're going to do is create a series of 5 circles, each having a black stroke with a stroke size of 100 pixels.
The size of the circles should be as follows: 300 px, 700 px, 1,100 px, 1,500 px, and 1,900 px.
Make sure to center all of the circles on the vertical and horizontal axis.
Next, convert all of the strokes to paths and unify them together.
Use the Bezier Pen to slice out a quadrant of the circle design, as depicted below.
Create 4 copies and snap them next to each other, as depicted below…
Now create a 5th copy and arrange it as depicted below.
I would recommend making it a different color so that you can easily differentiate it from the other objects.
Use the intersecting black object as a reference point to slice the red object…
We can now take the red object and the [previously] intersecting black object and unify them together, then discard the other 3 shapes.
The remaining shape is your tileable background! It should be equal in both width and height, and you should be able to stack copies of it next to each other, creating a seamless pattern.
Add your own stylistic touch and you're done! Our vector repeated background pattern is complete!
Video Tutorial
For complete step-by-step instructions with voice narration, watch the following video tutorial.
If you have any questions please do not hesitate to leave a comment below.
As always, thanks for watching!
How To Use Inkscape's Built-In Clipart Library | Video Tutorial
How To Use Inkscape's Built-In Clipart Library | Video Tutorial
Today I'll be demonstrating how to use Inkscape's hidden clipart library.
If you're like me, you probably didn't even know that Inkscape has a built-in clipart library, but it does.
How To Use Clipart in Inkscape
Simply go to File > Import Clip Art.
You'll be presented with a menu that allows you to search through a massive library of vector clipart.
Watch the tutorial video at the top of the page to see how simple it is to use.
The clipart library is populated by OpenClipart.org — a collection of free vector clipart created and contributed by volunteers.
Inkscape's clipart menu links directly to the OpenClipart library so that you don't have to download and import files manually from their website.
Usage Rights
According to OpenClipart's license policy, all clipart found on their site is released into the public domain, meaning it's free for unlimited commercial use without attribution.
This means that you can use it in your own design work as well as work you may do for clients.
Here's a more comprehensive list of uses and permissions.
Also, be sure to check out some of the free design templates I offer here at Logos By Nick.
What About Logos?
Although the site claims their clipart is free to use in logos, I would highly advise against using it for logo design — especially if it's for a client.
Clients often file for trademarks using their logo, and if you used clipart in their logo, their request is going to be declined.
Not only will you have an unsatisfied client on your hands, but it'll also hurt your reputation as a designer.
Most importantly though, it just isn't professional to use clipart in logo design.
It kind of goes against the entire point of branding in the first place.
Clients hire you to create a unique representation of their brand.
There's nothing unique about clip art that's been used by thousands of other people.
I would recommend limiting your usage of this clipart library to personal projects, infographics, illustrations, and other non-branding-related design.
Create Custom Swatches in Inkscape
Create Custom Swatches in Inkscape
https://logosbynick.com/wp-content/uploads/2018/08/gradient-color-palettes-inkscape-1-1024x601.png
1024
601
In today's tutorial I'll be demonstrating two things — first, how to create a gradient color palette between two different colors where it appears as if it's a gradient, but it's really just a series of individual colors.
Then, I'll be demonstrating how to create custom swatches within Inkscape from that same series of colors.
This is something that comes in handy if you're coloring in a graphic and would like to use a specific theme, like in the following example…
Gradient Color Palettes
First, create two squares and color them in with the two different colors you'd like to create your palette from.
For this example I'm using yellow and pink, but you can use whichever colors you'd like.
Next, we're going to use the Interpolate extension (Extensions > Generate from path > Interpolate).
Set the values as depicted in the above image.
Please note that the interpolation steps input reflects how many different colors you'd like in your palette + 2.
For this example I'm creating a swatch with 10 colors, so I input 8.
The reason for this is because two of those colors are defined by the two squares you've already created.
Once applied, a series of objects reflective of your simulated gradient will be generated…
Now it's time to create our custom swatch.
Custom Swatches in Inkscape
To add a color to a swatch, simply select one of the squares, and in the Fill and Stroke panel, click the Swatch button.
You won't notice anything happen on your screen, but the color of the selected object will be added to your swatch.
Now, go through the rest of the squares and do the same thing.
To view your custom swatch, simply open the Swatches menu by going to View > Swatches.
And there's your newly-created gradient color palette! You can now use those colors to color in objects the same way you would using colors from Inkscape's stock color menu.
Video Tutorial
For step-by-step instructions with voice narration, please watch the video tutorial below.
If you have any questions, comments or concerns, simply leave a comment.
As always, thanks for watching!
Inkscape Brochure Template | Video Tutorial and Free Download
Inkscape Brochure Template | Video Tutorial and Free Download
Today I'll be sharing an Inkscape brochure template sized at 8.5″ x 11″ with full bleed and guidelines, formatted to VistaPrint's tri-fold specifications.
They're not sponsoring this post and I'm not an affiliate of theirs.
I'm just using them as an example because they are by and large the most frequently used online print service by my clients, so I find myself designing to their specifications quite often.
Inkscape Brochure Template
The template represents one side.
You'll need to create two designs — one for the outside and one for the inside.
Here's a preview…
As mentioned earlier, I included guidelines to represent the bleed and safe area.
I've also made sure that the template is divided up into thirds so that you can size each individual panel with precision when designing.
The template sits on two different layers — the Contents layer is where your design will go.
The Guides layer is locked and only there as a reference so you'll know where important contents should and shouldn't go.
Once you've finished your design and you're ready to export it, simply toggle off the visibility of that layer and you'll be good to go.
Exporting
Don't worry about adjusting for DPI.
One of the things I like about VistaPrint is that they give you specific sizes in pixels, making life very easy.
As depicted in the above screenshot, the full size of the documents should be 3,331 by 2,587 pixels, which is the exact size of the template.
Simply export it at the preset DPI setting and you should be fine.
Here's an example of a design I created for a client earlier this year…
This is the inner portion of the brochure.
And here is the design for the outside of the brochure
And here's how it would [theoretically] look once printed.
While you're creating your design make sure to note the position of each panel after its printed and folded.
This is very critical.
Free Download
The Inkscape brochure template can be downloaded for free at the following link: brochure-template.zip
If anything in this post is unclear, I would recommend watching the video tutorial below.
If you have any questions or comments please leave them below, and as always, thanks for watching!
Become A Master of Inkscape!
Want to learn more about how Inkscape works? Check out the Inkscape Master Class – a comprehensive series of over 50 videos where I go over every tool, feature and function in Inkscape and explain what it is, how it works, and why it's useful.
Create Text Portraits with Inkscape
Create Text Portraits with Inkscape
In today's tutorial I'll be demonstrating how you can create vector text portraits with Inkscape.
This will be a relatively simple masking exercise, but I'll also be introducing a new technique in flowing text into an object.
The following will be a brief written overview for how to execute this effect with Inkscape.
For complete step-by-step instructions with voice narration, skip to the end of the post for the video tutorial.
Inkscape Text Portraits
The first thing we need to do is import our desired image.
You can use whatever image you'd like.
For this tutorial, I'll be using the following photo of a dog…
Click to download full resolution i
Next, create a rectangle sized at the same width and height of your image and make it black.
You can do this by right-clicking the image, copying it, then selecting your rectangle and going to Edit > Paste Size > Paste Size.
Now we need to generate our text.
You can use whatever text you'd like, but for this tutorial I'm just going to generate some generic Lorem Ipsum text as a placeholder.
To do the same, go to Extensions > Text > Lorem Ipsum.
It will bring up the following menu…
Based on the example image, I used the values depicted in the screenshot above.
Next, flow your text into the rectangle by selecting both objects and going to Text > Flow into Frame and make your text white.
I recommend using a bold, heavyweight font with minimal spacing between letters and lines.
The final step is to align your image over your text and mask it by going to Object > Mask > Set.
Here's the final result…
Once complete, you can change the color of your text and the background if you'd like.
Video Tutorial
For step-by-step instructions with voice narration, watch the complete video tutorial with voice narration below.
If you have any questions, leave a comment below, and as always thanks for watching!
Top 3 Logo Design Software for Ubuntu | 2018 Recommendations
Top 3 Logo Design Software for Ubuntu | 2018 Recommendations
Thiago Abreu
Thiago Abreu
As Linux users, we're somewhat limited when it comes to graphic design software. Finding the best logo design software for Ubuntu was my aim when I started using the operating system.
As a graphic designer (and especially a logo designer,) I was thinking about how would I make logos without Adobe Illustrator or Corel Draw.
It was in 2016 that I discovered Inkscape through the Logos By Nick Youtube channel and started learning from the tutorials.
Today, 2 years later, I think I've tried all of the applications for creating logos with Ubuntu.
So, what is the best logo design software for Ubuntu? Let's check out some of them and choose the best (in my opinion).
Top 3: Logo Design Software for Ubuntu
#1 Inkscape
When it comes to logo design software for Ubuntu — or any kind of vector design for that matter — Inkscape is the biggest, most capable option with the most support, and it's the one most comparable to Adobe Illustrator.
All of the tools you need to create a great logo design, including pen tools for drawing, sketching, tracing, creating fluid, scalable and symmetrical shapes, are all there.
And working in a true vector environment makes Inkscape a complete alternative to Adobe Illustrator.
What matters most though is if Inkscape is capable of creating professional logo designs, and the answer is yes! Inkscape provides everything you would ever need for creating professional logos on the Ubuntu platform.
You can even open Inkscape files with Illustrator and edit them as if they were made with Illustrator.
The difference between the two applications and their capabilities is negligible.
#2 SK1
Another logo design software for Ubuntu is SK1, which is another worthy alternative. It offers some of the same tools that you would find in Inkscape, but you'll probably run into some problems because of the lack of frequent support.
The SK1 team has been working to reactivate the software though.
Personally, I really like a lot of its features.
You can output files with CMYK color profile (something we don't have in Inkscape yet.) But when it comes to creating logos, SK1 doesn't have some important functions that makes our work easier.
Smooth paths and useful extensions found in Inkscape to name a couple.
SK1 is good if you want to try something new and need to output files in CMYK.
#3 Gravit Designer
Gravit Designer is a revolution! A vector software you can use in your web browser.
That not only makes it a logo design software for Ubuntu, but a viable option for all operating systems as well, and it's free to use.
Gravit allows you to create logos and apply your design knowledge.
I've tried it a little bit myself and it's really good.
The most important tools for creating logos are there, the modern UI is refreshing, and everything we need can be accessed on their website.
Thiago's Pick…
I know that there's many other options for creating logos with Ubuntu, but these are the 3 main players for the time being.
GIMP and Krita are worthy alternatives to Photoshop when it comes to raster design, but logos should always be made in vector format.
After analyzing all 3 options, my top pick would be Inkscape.
Inkscape is the easier and more powerful logo design software for Ubuntu and Linux distributions.
Inkscape may not be the most lightweight application, but it's absolutely the software with the more intuitive interface, and most importantly, it has everything you'd need for creating great, professional-grade logos.
Create A Glitch Effect with Inkscape
Create A Glitch Effect with Inkscape
In a previous tutorial I demonstrated how you could create a glitching text effect using GIMP.
In today's tutorial, I'll be demonstrating how you can do so with Inkscape, so you can reap all of the benefits of working with vector graphics.
The following is a brief overview of the steps taken to achieve this effect.
Proceed to the end of the post for the complete video tutorial with step-by-step instructions.
8 Bit Wonder Font
For this tutorial I used a font called 8 Bit Wonder.
You can use whatever font — or vector design — you'd like though.
You don't necessarily need to use this font, but if you'd like to, it can be downloaded for free here: https://www.dafont.com/8bit-wonder.font
Inkscape Glitch Effect
To get started, we're going to generate some text, sheer it to the right a bit, and increase the spacing between the letters.
Then convert it to a path, ungroup it and unify all of the letters together.
Next, create some rectangles that vary in height going over the text sporadically.
Make sure the rectangle are wider than the text, and you might want to make them a different color than the text and lower their transparency to 50% so you can see the text beneath it as I've done.
Those rectangles will now be used as a reference point to break up the text into individual pieces using the Division function in Inkscape.
Once completed, unify each horizontal row together and randomly shift them left and right as depicted below.
Next, we'll simply create two copies of what we have so far, color them blue and pink respectively, then lower them beneath the original text.
Shift the blue copy to the left and the pink copy to the right.
Finally, we'll use the Edit Paths By Nodes tool to select everything and tighten up the letter spacing a bit.
And with that, our glitched text effect is complete!
Video Tutorial
For complete step-by-step instructions with voice narration, check out the video tutorial below.
Feel free to let me know if you have any questions, and as always, thanks for watching!
Inkscape Beginner Tutorial: Reflective Text Effect
Inkscape Beginner Tutorial: Reflective Text Effect
In today's tutorial I'll be demonstrating how you can use Inkscape to create a reflective text effect where it appears that the top half of the text is reflecting — or casting a shadow of — the bottom half.
The two main processes of note in this lesson are the division function and the perspective live path effect. This is a simple, easy-to-follow lesson that would be perfect for a beginner or first-time user of Inkscape.
The following is a brief overview of the steps that will be taken.
Proceed to the bottom of the page to watch the video tutorial with complete step-by-step instructions and voice narration.
League Gothic Font
The first thing I would recommend doing is downloading and installing the League Gothic font (it's free) before you open Inkscape.
If you install the font while Inkscape is already open, it won't be picked up in the font registry.
You'll need to restart the application.
Download the League Gothic font for free here: https://www.fontsquirrel.com/fonts/league-gothic
Reflective Text Effect with Inkscape
The first (and obvious) step is to simply generate some text.
For the sake of this tutorial, I'll be using the word "REFLECT" in all caps.
It's important that you use all caps when doing this.
Next, we're going to create a rectangle half the height of the text and use it as a reference point to perform a division path effect.
This will split the text in half horizontally, as depicted below…
Once that's done, we're going to create another rectangle that matches the size of the lower half of the text.
This rectangle will be the reference point for applying a perspective to the bottom half of the text.
Now we're going to grab the edit paths by nodes tool and use it to bring the bottom two nodes of the rectangle up further, then scale them outward to form the following shape…
Finally, we'll use the perspective live path effect to make the bottom half of the text take the shape of our rectangle.
And with that, our design is complete!
Video Tutorial
For complete step-by-step instructions with voice narration, watch the following video tutorial.
If you have any questions, comments or concerns, do not hesitate to post them below.
As always, thanks for watching!
Design A Vintage Style Logo with Inkscape
Design A Vintage Style Logo with Inkscape
In today's tutorial I'll be demonstrating how you can design a vintage style logo with a makeshift starburst effect using Inkscape version 0.92.
In this lesson we'll be focusing on working with text and applying to both the outside and inside of a circle.
The following is just a brief outline of the steps taken to construct this design.
For complete step-by-step instructions, scroll down to the bottom of the page for the video tutorial.
FreeSerif Font
The first thing we need to do is download and install the FreeSerif font.
Make sure to do so before you open Inkscape.
If you install the font while Inkscape is already open, it won't show up in the font directory until you restart the application.
Download the FreeSerif font here: http://www.fontspace.com/gnu-freefont/freeserif
Vintage Logo Design with Inkscape
The first thing we're going to do is generate a couple of lines of text.
The first line will be for the top half of the circle, and the second line will be for the bottom half of the circle.
We'll wrap each line around the inner and outer edges of the circle accordingly, then create a stroke that can be used as a circular ribbon.
After that's done, we'll be creating a circular stroke pattern for the inside area of the design.
This will be used as the starburst sort of effect.
Finally, we'll be creating a stylized star and placing it in the center of our design.
We'll use a larger copy of the star as a reference point for cutting the paths of the starburst pattern so that those lines don't intersect with the star shape.
The finished design should look something like this…
Video Tutorial
For complete step-by-step instructions with voice narration, watch the video tutorial below.
If you have any questions or run into any problems, do not hesitate to leave a comment.
Thanks for watching!
Create Line Art Logo Text with Inkscape
Create Line Art Logo Text with Inkscape
In today's video tutorial I'll demonstrating how you can create line art style typography — that can also be made into a logo — using Inkscape.
In this lesson we'll be making good use of strokes, the combine function, and the cut path function.
I'll also be implementing a new feature I haven't going over in any of my tutorials yet — how to select objects by drawing a line through them.
It should be noted that this tutorial is more on the intermediate/advanced side.
You can give it a try if you're a beginner, but don't get discouraged if it becomes overwhelming.
You're welcome to leave a comment below with any questions you may have.
Creating Line Art Text with Inkscape
The first thing we'll be doing is creating 5 circles, each with a 10 pixel stroke, ranging in size from 200 pixels to 400 pixels.
After that, we'll be splitting them in half and stacking them up next to each other, as depicted below.
After that, we'll be using each grouping of half circles to construct the letters of the word "LOGO", then manually creating the straight segments that connect the letter G and make up the straight part of the letter L.
As you see depicted in the above diagram, we'll be cutting out the intersecting areas of the letters so that they have the appearance of looping around and overlapping each other.
Finally, we'll use the cut path function to cut out random segments of each line.
The final design is as follows…
With a bit of creative thinking, this concept could be applied to any combination of letters and/or numbers you'd like to use it for.
Video Tutorial
The above is just a brief outline of the approach I took for this design.
For complete step-by-step instructions with voice narration, watch the video tutorial below.
If you have any questions, comments or concerns, leave them below, and as always, thanks for watching!
Create Vector Lego Text with Inkscape
Create Vector Lego Text with Inkscape
In today's tutorial I'll be demonstrating how you can create this isometric vector Lego text using Inkscape.
In the first part of this article I'll be briefly outlining the steps.
Feel free to skip to the end of the post if you'd just like to watch the video tutorial.
Vector Lego Text
The first thing we'll be doing is using the Stars and Polygons tool to create a 6-side polygon, then using it as a reference to create a single Lego block.
Once that's created, we'll be coloring it in using three different shades of a single color — medium, dark and light — then adding a slight lip to the bottom of the block in order to create a little separation between all of the blocks once we start stacking them on top of each other.
Next, we can simply create duplicate copies of the block and color them all in accordingly.
Now that we have our blocks created, we can enable snapping on the Inkscape toolbar and start creating duplicate copies and stacking them on top of each other to form whatever letters, numbers and characters we desire.
After following along with the tutorial, you'll have created a vector Lego text that reads "2018" in an isometric style.
Creating letters and numbers out of the blocks can be a little tricky and requires you to use your imagination a bit.
I would recommend experimenting with it a bit in order to get a feel for where each block should be placed, or you can look at similar designs for inspiration.
Video Tutorial
To learn how to create this design with Inkscape, watch the following video tutorial with step-by-step instructions and voice narration.
If you have any questions, comments or concerns, leave them in the comments below.
Enjoy, and as always, thanks for watching!
What To Do When The Inkscape Window Opens Off Screen
What To Do When The Inkscape Window Opens Off Screen
If you're trying to open an Inkscape SVG file using Windows, you may occasionally run into a problem where the Inkscape window opens off screen and out of view — particularly if you're using dual monitors like I do.
I personally experience this whenever I try opening an SVG file that was created in Illustrator, and it can be incredibly frustrating.
In today's post I'll be going over a simple and quick fix for when the Inkscape window opens off screen.
Inkscape Window Off Screen
The first step is to make sure that you have the Inkscape window selected from the Windows toolbar.
Although it may not be visible on your screen, it can still be selected.
You'll know it's selected by the appearance of the Inkscape application icon.
This is what the icon looks like when it's not selected.
This is what the icon looks like when it is selected.
With the Inkscape icon selected, pres Alt + Spacebar on your keyboard.
This should render a menu — probably in the top-left portion of your screen, as depicted below…
Once you have that menu on your screen, use your arrow keys to navigate down to the Maximize option and press Enter.
This should solve the problem.
Your Inkscape window that was previously off screen will now be maximized and in view on the monitor that you performed these steps using.
Document Properties Menu Opens Off Screen
Another common problem you may experience when using Inkscape with dual monitors is that the Document Properties menu sometimes opens off screen as well.
When this happens, simply press Ctrl + W on the keyboard.
This will close the Document Properties window.
Even though you can't see the menu on your screen, if you clicked on it or used the keyboard shortcuts to open it, it'll still be open and active.
After you've used Ctrl + W to close the window, try opening it again.
It should now be opening on your screen.
Help Needed?
If you've followed the steps outlined above and you're still having these problems, leave a comment below and I'll see what I can do to help you out.
Inkscape: The Best Open Source Logo Design Software
Inkscape: The Best Open Source Logo Design Software
When it comes to open source graphic design, we have many different options to choose from.
There's GIMP, Krita, Vectr, Karbon, and many more.
But from my own personal experience as a logo designer, Inkscape is the undisputed best open source logo design software.
By the way, I'm sure there's many other notable options when it comes to open source logo design software, so if I missed anything — or if you have any suggestions I may not have heard of yet — don't hesitate the let me know in the comments!
Why Inkscape is the Best Open Source Logo Design Software
Inkscape is an open source vector graphics application similar to Adobe Illustrator and CorelDraw.
From what I've seen, there's simply no other vector graphics program as complete and comprehensive as Inkscape.
As I've written about in the past, Inkscape is capable of virtually anything Illustrator is (with the exception of outputting files in CMYK color format.)
Vector vs Raster
To understand why Inkscape is best suited for logo design we first need to understand the difference between vector and raster graphics.
Raster Graphics
Applications like Krita and GIMP are based on raster graphics, or individual colored boxes known as pixels.
This sort of software is best suited for editing photos, drawing, sketching, or even designing flyers and brochures.
Logo design with raster graphics applications is not recommended though because a logo needs to be versatile.
It needs to be scaled up large enough to be printed on an enormous billboard, or stripped down to monotone so it can be embroidered onto a shirt or remain legible on a fax printout.
A versatile logo design example
Although this is all technically possible with raster graphics software, it's not the most practical and efficient format for logo design.
Vector graphics applications are better suited for such.
Vector Graphics
Unlike raster graphics, which are comprised of pixels, vector graphics are comprised of mathematical formulas that dictate the properties of a graphic on an X and Y axis.
This makes for a far more dynamic format because it allows you to scale a graphic up infinitely without any quality loss.
This is where Inkscape shines, and it's what makes it the best open source logo design software.
Inkscape makes it very easy to design logos that will remain completely editable so you can shrink them down, scale them up, strip them down to black and white, and so on.
Not to mention, Inkscape is simply easy to use and beginner-friendly.
Can Inkscape Be Used for Professional Logo Design?
It absolutely can.
In fact, it's my software of choice.
I like it better than Illustrator because it's a lightweight application that doesn't hog system resources, and the interface is more intuitive and makes for a more efficient workflow in my opinion.
I've used Inkscape to design thousands of logos for thousands of clients throughout my 7-year career as a freelance designer.
Anyone who tells you that Inkscape can't be used professionally is simply misinformed.
The logo examples referenced in this post were all designed with Inkscape, as is everything you'll see on my portfolio.
Open Source Logo Design Software Tutorials
Here's a few logo design tutorials for Inkscape that I've created.
These videos are complete with voice narration and step-by-step instructions so that even a first-time user can follow along and start designing their own customized logos.
1. Create simple letter logos…
2. Badge style logo design tutorial…
3. Another badge style logo…
If you have any questions or run into any problems with the tutorials, feel free to leave a comment below.
And be sure to subscribe to my Youtube channel and/or follow my Facebook page for weekly Inkscape and GIMP tutorials.
Enjoy!
Inkscape Infographic Template | Tutorial + Free Download
In today's tutorial I'll be demonstrating how you can design a colorful, circle-shaped infographic design using Inkscape.
This Inkscape infographic template will also be available for you to download for free in case you'd like to bypass the tutorial altogether.
In order to keep this post relatively brief, I'll basically be doing a swift overview of how to construct the design in images.
If you're pretty familiar with Inkscape then you should be able to follow along just fine.
If not, then I would recommend skipping to the end of the post where I will have a step-by-step video tutorial with voice narration that could walk even a first-time user through the entire process.
Inkscape Infographic Template
First, create a perfect circle, make it black, and set the opacity to 50%.
Then, create a polygon with 6 sides, make it red, set the opacity to 50% as well and center within the circle's vertical and horizontal axis.
Next, snap the Bezier Pen onto the bottom left corner of the polygon and create a shape the runs parallel to the polygon's bottom left edge.
Make it extend outside of the circle, make the color green and set the opacity to 50%, as depicted below.
Using the Bezier Pen again, create another shape from the same bottom left point, only make it cut horizontally through the green shape and use it to perform a Difference on the green shape.
Now select both the green shape and black circle and perform an Intersection function on them.
The remaining shape after the Intersection function is performed
Duplicate the remaining black shape, make it green, and rotate it clockwise until the larger flat edge runs parallel to the top left edge of the polygon, and snap it onto its corresponding corner.
Repeat this process until each of the 6 sides of the polygon have identical shapes placed on them.
You may want to use alternating colors in order to help you differentiate them.
Delete the red polygon, bring the opacity of the remaining shapes back up to 100% and color them in however you'd like.
Our Inkscape Infographic template is nearly complete
Now we need to add drop shadows to each side in order to give the design a layered sort of look.
Select all of the shapes, duplicate them, make them black, rotate them slightly clockwise, then give them a 2 point blur.
Grab one of the color sides, duplicate it, and use it as a clipping path for the black shape that precedes it.
Repeat this process with the remaining 5 shapes.
The final step is to simply fill in the design with whatever information you'd like…
And with that, our Inkscape infographic template is complete!
Free Inkscape Inforgraphic Template
To download a free copy of this design in various vector formats, use this link: infographic-template.zip
The text will be editable.
Before opening the design file with Inkscape, I would suggest downloading and installing the Lato font first because that is the font used in this design.
Without it, Inkscape will default to another font in your system.
Video Tutorial
If the written portion of the tutorial was too vague for you to understand, try watching the video tutorial instead.
It has step-by-step voice narration that even a first-time user of Inkscape could follow along with.
Become A Master of Inkscape!
Want to learn more about how Inkscape works? Check out the Inkscape Master Class – a comprehensive series of over 50 videos where I go over every tool, feature and function in Inkscape and explain what it is, how it works, and why it's useful.
Inkscape VS GIMP: Always Choose Inkscape for Logo Design
Inkscape VS GIMP: Always Choose Inkscape for Logo Design
Many times I've been asked to create tutorials demonstrating how to design a logo in GIMP.
Theoretically, a logo could be designed in GIMP, and I have demonstrated how to do so, but you should really look elsewhere for logo design.
Using GIMP to design a logo is like using a fork to cut a steak — there's better tools for the job.
And when it comes to logo design, Inkscape is the better tool.
In this post I'll be going over an Inkscape vs GIMP comparison and breaking down the main differences between the two applications and when it's appropriate to use each.
In order to understand why logos should be designed in Inkscape rather than GIMP, we first need a basic understanding of the fundamental difference between the two applications.
Inkscape vs GIMP
Comparing Inkscape vs GIMP is like comparing an apple to an orange — they both classify as a fruit, but they're different kinds of fruits.
Likewise, Inkscape and GIMP both classify as design applications, but they serve different purposes.
Raster Graphics
GIMP is a raster graphics editor, much like Adobe Photoshop.
Raster graphics are graphics that are made entirely of individual colored boxes known as pixels.
This includes photographs and the overwhelming majority of web and application-based graphics you'll see on a digital display, like a monitor or smartphone screen. Graphics that are made entirely of individual pixels are static and set as a specific size.
If you take a photo that is sized at 1,280 x 720 pixels, that would mean the photo is essentially an arrangement of 921,600 individual colored pixels, sort of like a collage.
Raster graphics applications are great for altering photos, painting and drawing.
GIMP would be the ideal program for designing posters, headers and album art.
Here's an example of what can be done with a raster graphics editor like GIMP…
Vector Graphics
Inkscape is a vector graphics application, much like Adobe Illustrator.
Vector graphics — unlike raster graphics — are not made of pixels; they're made of mathematical formulas that dictate all of the properties of the graphic on an X and Y axis, and these formulas are far more dynamic than a series of colored boxes.
They can be scaled infinitely without quality loss, and they retain far more information about the graphic, which allows you to edit it later on if need be.
Vector graphics applications are great for creating logos, icons for apps and websites, and cartoon illustrations.
Here's an example of what can be done with a vector graphics editor like Inkscape…
Why Logos Should Be Vector
Since raster graphics are stuck at a predetermined size, it's generally not a good idea to design logos in a raster format because a logo needs to be used on a variety different mediums and at different sizes.
If you design a logo to be 1,920 x 1,920 pixels in size, what happens when you want to have it printed on a billboard and the print shop informs you that they'll need a copy of the logo at 5x the size it already is? If you scale the logo up to that size, it's going to look awfully pixelated. This is why we need a more dynamic format for our logos, which is what Inkscape provides.
If we had a vector Inkscape file for our logo, we could simply open it and scale the logo up to the size that the print shop is requesting, then render it to a raster format like PNG or JPG.
Raster graphics editors like GIMP and Photoshop are best used for editing and manipulating photos as well as designing print items that call for a specific size, like business cards and brochures.
But if you were to design a logo in a raster format, you'd be placing crippling limitations on how the logo can be used.
Vector formats are limitless though.
Not only can they be scaled infinitely without quality loss, but true-vector formats also retain more information about a graphic (like node points,) meaning your logo can be edited and updated on a whim and without any loss of quality. Simply put, a logo that is designed in vector format will always be capable of being used in any imaginable way a logo could possibly be used.
But Won't I Need Raster Copies Of My Logo?
Yes, you absolutely will.
In fact, the logo you see at the top of this website is in a raster format (PNG).
However, since I designed the logo using vectors, I was able to use the vector Inkscape file to render a PNG at the precise size I needed it to be.
If I would've originally designed the logo with GIMP, I would've had to re-create it all over again in order to fit the specific size I needed it to be for this site.
Either that or I would've had to distort it to make it fit.
You will always need raster copies of your logo, but that doesn't mean that it should be created in a raster format.
Having an exclusively raster logo with no vector file for it is like having a website that you can't edit or update.
Is It Ever OK To Create Logos with Gimp?
I'm not the graphic design police.
It's not my position to tell you what you can and cannot do.
If GIMP is what you feel most comfortable with and you plan to use your logo in a very limited context — only your website, app or social media profile/posts — then go right ahead.
However, I would advise creating it at an incredibly large size, like at least 3,840 pixels high or wide (the bigger the better though!) The reason for this is so that you will always have a large copy handy in the rare occasion that you may actually need it.
It's much easier to scale a logo down than it is to scale it up.
And this probably goes without saying, but I would also recommend saving a copy of it with the XCF extension, which is the GIMP-native editable format that will allow you to go back into the design with all of the layers and elements intact in case you ever need to make some alterations.
The Takeaway
Inkscape and GIMP are both incredibly useful design tools that serve very different purposes.
Instead of viewing them them through the lens of either-or, acknowledge them as must-have assets for anyone looking to get design work done with open source software.
Like an apple and an orange, one isn't better than the other.
You don't have to choose one over the other, and you'd be disadvantage if you were to do so.
Inkscape Fix: How To Move Gradients with Objects
Inkscape Fix: How To Move Gradients with Objects
A problem many of you run into when following my Inkscape tutorials is that when you attempt to move an object that you've applied a gradient to, the gradient doesn't move with it.
It stays in place as if it were its own separate entity.
This is kind of a silly feature if you ask me, because in the 7+ years that I've been using Inkscape on a full-time basis, not once have I ever needed a move an object independently of its gradient.
In fact, the entire reason I gave it a gradient in the first place is because I wanted it to be a part of the object.
The Fix
Anyway, the solution to this is quite simple.
If your gradient is bound to its location on the canvas, it's because you have a specific setting turned off.
It's called Move gradients (in fill or stroke) along with objects.
The icon for this setting appears as the following…
To locate this icon, grab your Select tool and shift your attention to the right side of the toolbar at the top of your screen.
It should be positioned with 3 other similar-looking icons…
Click to enl
Simply select that icon so that it's turned on.
Once you've done that, your gradients will come along for the ride next time you move an object with its property.
By the way, if you're curious how you can make Inkscape appear dark (like how I have,) here's a tutorial about installing a dark theme for Inkscape.
And if you'd like to update Inkscape's icon, here's a free pack of redesigned icons that I created.
The 26 Most Important Keyboard Shortcuts to Memorize in Inkscape
The 26 Most Important Keyboard Shortcuts to Memorize in Inkscape
There's more to being a talented graphic designer than knowing the software inside out, having a keen eye for design, and knowing how to effectively communicate information using visuals.
You also have to know how to make the best use of your time, especially if you're a freelancer.
As a freelancer, the product you're selling is your time, and because of that, we as designers need to establish a workflow that makes the most efficient use of our time.
One area where you can vastly improve your workflow is by memorizing and using the keyboard shortcuts in a given piece of software.
Inkscape Keyboard Shortcuts
In my Inkscape video tutorials you'll often see me using the menus and toolbars to access different tools and execute functions.
I do this for your benefit though — to help you, as a beginner, become more familiar with the layout of the UI, and most importantly, to not overwhelm you with too much information too soon.
However, as you become more comfortable with Inkscape, you should really get into the habit of learning what the keyboard shortcuts are for each of the tools and functions you use most frequently.
Over time you will naturally memorize and use them without even thinking about it — sort of like how a musician plays an instrument — and it'll drastically cut down on the amount of time it takes you to design something.
Most Commonly Used Tools and Functions in Inkscape
Within Inkscape there's countless different functions, tools and extensions, and to memorize all of them would not just be a monumental challenge, but also unnecessary.
In the nearly 7 years that I've been using Inkscape on a full-time basis, I've found that there's 26 different tools and functions within Inkscape that I use far more frequently than anything else in the software, and these are the keyboard shortcuts you should prioritize learning…
Basic Navigation
Pan the page: spacebar + move the mouse
Zoom in: +
Zoom out: –
Zoom 100%: 1
Frequently Used Tools
Select: S
Rectangle: R
Ellipse: E
Bezier pen: B
Edit paths by nodes: N
Color picker: D
Text: T
Gradients: G
Functions
Flip object vertically: V
Flip object horizontally: H
Group selected objects: Ctrl + G
Ungroup selected objects: Shift + Ctrl + G
Lower Selection One Step: Page Down
Lower Selection to the Bottom: End
Raise Selection One Step: Page Up
Raise Selection to the Top: Home
Path Functions
Convert object to path: Ctrl + Shift + C
Convert stroke to path: Ctrl + Alt + C
Union: Ctrl + Shift + +
Break Apart: Ctrl + Shift + K
Difference: Ctrl + Shift + –
Intersection: Ctrl + Shift + 8
Cut Path: Ctrl + Alt + /
Downloadable PDF
Of course, you're not going to memorize these all at once, so instead of having to come back to this page over and over again I've put together a PDF that you can download and refer to as-needed.
Click the image below to grab a copy.
Right-click the image and click "Save Link As" to download a PDF
Become A Master of Inkscape!
Want to learn more about how Inkscape works? Check out the Inkscape Master Class – a comprehensive series of over 50 videos where I go over every tool, feature and function in Inkscape and explain what it is, how it works, and why it's useful.
Create A Geometric Collage with Inkscape and GIMP
Create A Geometric Collage with Inkscape and GIMP
Today I'm going to do something I haven't yet done, and that's create a tutorial where I use both Inkscape and GIMP together to create an end product.
Inkscape and GIMP are incredibly valuable design tools, but they serve different purposes.
Inkscape is meant for vector creation, whereas GIMP is meant for photo manipulation.
Since they're each so powerful when it comes to handling their respective purposes, using them together can produce great results.
The design we'll be creating today is a geometric photo collage, where we take 3 different (but related) photos, and slice them up into different segments of a geometric shape that we'll create with Inkscape.
Design Elements
The elements use in this tutorial are the three photographs below.
Simply click on the image to grab a copy of it…
Forest image – this will be used as the backgr
A couple hanging out in what appears to be a wintery log c
Wintery, snowy mountain
Video Tutorial
For complete step-by-step instructions with voice narration, check out the video tutorial…
Create Retro Text with Inkscape
Create Retro Text with Inkscape
In today's tutorial I'll be demonstrating how you can use Inkscape to create a retro-style text poster.
The functions we'll be focusing on in this lesson are the Extrude extension and texture masking in particular.
Design Elements
For this design I used the heavy variation of the Lato font, which can be downloaded for free here: https://www.fontsquirrel.com/fonts/lato
I suggest downloading and installing the font before opening Inkscape.
If you install it while Inkscape is running, it won't register in the font library until you restart the application.
Here's the retro color palette used:
Click the image to open it in a new tab, then copy and paste it into Inks
And the texture we'll be using to help enhance the retro appeal of this design…
Click the image for the full size ver
Video Tutorial
For complete step-by-step instructions with voice narration, check out the video tutorial…
7 Mind-Blowing Designs Made with Inkscape
7 Mind-Blowing Designs Made with Inkscape
Being a free and open source resource, people tend to wrongly disregard Inkscape as an amateur application that can't compare to the likes of Adobe Illustrator.
I've always tried to demonstrate with my own work that that simply isn't true though.
Aside from a few inconsequential bells and whistles, Inkscape is capable of virtually anything Illustrator is.
I even wrote a comparison of the two last year.
However, in this post I'm going to step aside briefly and share some really impressive Inkscape designs from other artists who I found while browsing Inkscape hashtag on Instagram.
Each designer will be credited beneath the image, and if you click the image it will take you to the native post on Instagram in case you'd like to drop them a compliment and check out their profile.
1. Deer in the Night Sky Illustration
credit: @ayman.makroo on Insta
A very nice use of colors makes the buck appear as a silhouette in the night sky, and what I think really makes this design pop is how it's all within a circular emblem, but the deer's antlers extend outside of the boundary.
Really nice work!
2. Vector Portrait
credit: @ilhampvrnm on Insta
Some things just can't be taught — like the inherent talent and artistic eye that it takes to create something like this! Everything from the lines, shading and improvised colors is absolutely stunning!
3. Fan Art Portrait
credit: @pebzferdi on Insta
I'm not sure who this is supposed to be fan art of, but whoever it is ought to be flattered because this is some really impressive work.
The background is a nice touch.
4. Flat Style Avatars
credit: @paulokoki on Insta
Sometimes less is more, particularly when it comes to flat design.
These flat characters look great! Color choice is absolutely crucial when it comes to making this style of design work, and this artist knocked it out of the park.
5. Colorful Low Poly Portrait
credit: @pebzferdi on Insta
Low poly portraits always tend to have a nice artistic appeal to them, but when you use color like this it just takes it to an entirely different level.
6. Another Vector Portrait
credit: @alifkha7 on Insta
One thing that really stands out to me about this design — aside from how fluid and smooth it is — is the simulated depth of field that was created by the use of blurring.
Really nice touch.
7. Flame Logo
credit: @riskimuliaid on Insta
As a logo designer myself, I couldn't help choosing a logo design for this post, and this design is excellent.
The artist did a great job of incorporating the flames into the letter B, and the yellow to orange gradient is a nice touch.
Submit Your Design
Tag your design with the hashtag #Inkscape on Instagram if you'd like consideration for a future post, or you can tag me directly @itslogosbynick.
Now You Can Easily Create Conical Gradients with Inkscape
Now You Can Easily Create Conical Gradients with Inkscape
In today's tutorial I'll be demonstrating how you can use Inkscape to easily create gradients that wrap in a circle going around a central point, otherwise known as conical gradients.
Skip down to the bottom of the page if you'd just like to watch the video tutorial.
Inkscape has always made it easy for us to create radial and linear gradients, but for the longest time, other gradient types — like mesh and conical — weren't possible.
Creating such elements meant using other software.
Thankfully that changed with Inkscape's most recent release.
There's now an added tool in the left-hand toolbar called Create and edit meshes, but you must be using Inkscape version 0.92 (or later, if you're reading this in the future) in order to have access to it.
If you're not sure which version on Inkscape you're using, just go to Help > About Inkscape and a menu displaying the version type shall appear.
If it turns out that you're using an older version, go ahead and upgrade to version 0.92 before continuing on with the tutorial.
Creating Conical Gradients with Inkscape
Once you have version 0.92 up and running, simply grab the Create circles and ellipses tool (F5) and create a perfectly round circle on the canvas.
It doesn't matter what color it is, just make sure the opacity is set to 100%.
After that, grab the Create and edit meshes tool from the left-hand toolbar, and a menu should appear at the top of the page similar to what is depicted below.
Set all of the values in that menu to exactly what you see on my screen.
Note that there's 8 columns and 8 rows.
If you'd like to make Inkscape appear dark like you see on my screen, be sure to check out my Inkscape dark theme tutorial.
Once those values are set, simply click and drag on the canvas going across the circle and a conical grid with nodes should appear, as depicted below.
Click and drag over all of the nodes on the left-hand row to select them, then click on the color red in your color picker.
The entire row should turn red.
Now simply repeat this process going around the entire circle, selecting each row of nodes individually and changing them to their respective shades — orange, yellow, green, etc.
Once finished, your conical gradient is complete!
Video Tutorial
For complete step-by-step instructions with voice narration, feel free to follow along with the video tutorial.
How To Easily Remove Backgrounds With Inkscape
How To Easily Remove Backgrounds With Inkscape
In today's tutorial I'll be demonstrating how you can easily remove the background from an image using Inkscape.
This technique, although quite simple, does require a modest amount of familiarity with the Bezier Pen.
You'll be shown everything you need to know about it in the video, but it may take a little bit of practice.
Why Inkscape?
Since Inkscape is primarily a vector-based graphics program, you may be wondering why I choose to use it to crop raster images instead of using something that is intended for raster images, like GIMP.
The method outlined in this tutorial will work just as well with GIMP, but I feel that Inkscape does a much better job with creating paths and allowing you to manipulate nodes and handles.
It just feels easier and more intuitive in Inkscape (although they may just be because I'm far more comfortable and familiar with it.) What it all boils down to is that it makes for a more efficient workflow.
I would still say that GIMP is the ideal application to use for doing this though since you can feather the edges and make further alterations once cropped.
How To Remove Image Background with Inkscape
Getting started, the first thing we're going to do is open a new document with Inkscape, and then click & drag photo onto the canvas in order to import it.
If you're using a Mac, you may have to go to File > Import.
Once prompted, make sure to choose the Embed option instead of Link.
If you choose link, Inkscape is just going to create a mirror reflection of the original image file, so any changes you make to it will also be reflected in the original image and vice verse.
Also, if you delete the original image, it will return a broken image error within Inkscape.
Choosing to embed the image will instead create an entirely new copy of the image that exists solely within that particular Inkscape document.
The upside with embedding is that you get a dedicated, independent image to work with.
The downside is that it requires a tad bit more CPU power from your computer while using slightly more system memory, but it's negligible at best and hardly a concern for most modern machines — even budget laptops.
Unless you're working with an enormous image on a machine from 2011, I recommend embedding for everyone.
Outlining Your Subject
Grab the Bezier Pen and begin to start creating a rudimentary shape that outlines your subject.
Make sure to position the anchor points at the peak of curves while allowing for a straight line to run directly through to the next anchor point.
It is highly advised that you watch the video at the bottom of the page for this particular step.
It's much easier for me to verbally demonstrate this than it is to type it.
Once you've outlined your subject, it should look something like the image below. Don't worry about the rudimentary shape and parts of the subject laying outside of the shape's boundaries.
We are going to straighten that out in the next step.
It may help to reduce the opacity of the image in order to add contrast between your shape and the subject.
Once your image is outlined, we're going to grab the Edit Paths by Nodes tool, click on the outline to select it, then manually click and drag any of the straight segments of the line.
This will curve the line and allow you to shape it according to your subject's boundaries.
To further match the boundaries of your shape with that of your subject's, click on one of the nodes.
This will bring up handles that you can use to change the size and length of the curve.
This is what the node handles look like
Go ahead and repeat this process for the rest of your shape until it perfectly matches the shape of your subject.
Once completed, fill it in with a solid color, remove the stroke and set the opacity to 50%.
It should look something like this…
Creating A Clipping Path
Now that we have our subject outlined, we're going to use that outline as a clipping path for the image beneath it.
A clipping path is a vector object that you use as a shape for cutting out a raster image.
Think of it like a cookie cutter being applied to a batch of cookie dough.
To use your newly drawn outline as a clipping path, simply select both the outline and the image at the same time, then go to Object > Clip > Set.
This will effectively crop your subject and remove the background.
Make sure to bring the opacity of your subject image back up to 100% before you do so.
Tip – when making Clipping Paths in Inkscape, always make sure that the shape you want to use layered above the image you want to crop.
Inkscape will always use the highest layered selected object as its clipping path.
The beautiful thing about this technique is that it is not permanent — your background (along with your drawn outline) can still be recovered if you end up needing it down the road.
Just select the object and go to Object > Clip > Release.
This will remove the object from its clipping path bring you right back to where you were before you applied it.
Video Tutorial
If the steps outlined above were a bit too vague for you to follow, I would suggest watching the video tutorial.
In the video I go over everything step-by-step and provide voice narration while doing so.
If you have any questions, comments or concerns, feel free to leave a comment below.
Become A Master of Inkscape!
Want to learn more about how Inkscape works? Check out the Inkscape Master Class – a comprehensive series of over 50 videos where I go over every tool, feature and function in Inkscape and explain what it is, how it works, and why it's useful.
Create 3D Pixel Text with Inkscape
Create 3D Pixel Text with Inkscape
Today I'll be demonstrating a very simple technique that you can use to create 3D-style pixel text using Inkscape.
This tutorial will require use of grids, the Bezier Pen, an eye for perspective and a touch of creativity.
Scroll to the bottom of the page for the video tutorial.
If you'd like to update Inkscape's appearance with a dark theme as you seen on my installation, be sure to check out my tutorial on making Inkscape dark.
You can also update Inkscape's icons to the new icon set that I designed last year.
Step 1: Setting Up The Grid
First, we'll go to File > Document Properties in order to render a grid on the canvas.
Once in the Document Properties window, go to the Grids tab and click New in order to generate a grid on the canvas.
After that, change Spacing X and Spacing Y each to 75 px.
If you're working with a monitor resolution greater than 1080p, I would recommend setting those values to 100 px instead.
This is not overly important though, it'll just make your workflow a little easier.
Once you've done that, go ahead and close of the window and you should now have a blue rectangular grid on your canvas.
Step 2: Creating The Letters
We'll be creating out letters manually by constructing them out of squares that fit each unit of the grid.
Use the Rectangles tool to create a square within the space between two grid lines, as depicted below.
Create duplicate copies of the box and use them to construct a lowercase letter T as depicted below, while making sure to snap them according to their respective grid lines.
Working in similar fashion, go ahead and create a lowercase E, but make sure to leave at least 2 grid units of space between the two letters.
You can use this same technique to go ahead and finish up creating the rest of the text…
As you probably noticed, you won't have to construct the same letter twice if you've already constructed it once.
You can simply create a duplicate copy of it and shift it over, just make sure the letter remains on the same horizontal place as the rest of the letters.
Step 3: Adding 3D Perspective
Now it's time to add a makeshift 3D perspective to each letter.
We'll be doing this manually with the Bezier Pen and it will require a touch of intuitiveness, but if you can follow my diagrams step-by-step, you should be able to catch on well enough to create any of the letters, numbers or symbols you'd like to use in your own design work.
First, make sure you have snapping to cusp nodes enabled at the top toolbar.
This will ensure that your mouse clicks land precisely on the corner of each object.
Using the Bezier Pen, manually draw a four-point shape that starts at the top-right corner of the letter T, cuts diagonally to the left, then finishes back at the starting point as depicted below.
Use this same method to create similar shapes for each edge of the letter.
After that, fill in each new shape with two different alternating shades in order to simulate a 3D appearance where light is reflecting differently off of each edge.
Go ahead and follow suit for each of the remaining letters.
Catching the hang of this may be tricky at first, so you may need to play around with it a bit in order to get it right.
You can refer to my images as a reference if it helps.
Step 4: Isometric Perspective
Once our text is created and stylized, it's time to add some finishing touches.
In order to give the text more perspective, we're going to shear it so that it appears to be sitting on an isometric plane.
Using the Select tool, select everything and group it all together.
Then, click on the object once or twice in order to bring up the rotation handles, hold Control on your keyboard and grab hold of the shearing arrow on the right side of the object and click and drag it up one step.
This will shear your text, as depicted below.
After that's done, you can go ahead and alter colors and add any finishing touches you'd like, and we're finished! Our fully vector 3D pixel-style text is complete.
Video Tutorial
If these steps were a bit too vague for you to understand and follow along with, I would advise watching the video tutorial at the top of the page.
The video contains complete step-by-step instructions and voice narration that even a first-time user of Inkscape could follow.
If you have any questions or suggestions feel free to post a comment below.
Thanks!
Inkscape Tutorial: Shield Logo Design
Inkscape Tutorial: Shield Logo Design
In today's tutorial I'll be demonstrating how you can use Inkscape to design a shield logo with a banner wrapping around it.
The following is a brief overview of how we'll go about creating this design, for those of you who may be more advanced users and would like to save some time.
Otherwise you can simply scroll to the bottom of the page to watch the step-by-step video tutorial with voice narration.
Step 1: Drawing The Shield
First, we'll be using the Bezier Pen to manually draw a freehand shape that represents one half of the shield.
Then, we'll duplicate that, flip it horizontally and unify it with the original in order to form the entirety of the shield.
The reason we're drawing it in halves is so we can ensure symmetry.
Next, we'll use strokes and convert them to paths in order to create additional shapes with added padding around them.
The converted strokes will each be broken apart and unified together to form solid shapes.
After that, the shield portion is complete.
Step 2: Creating A Banner
In this step we'll be using rectangles and ellipses to create a couple of shapes going over the shield.
These shapes will represent the banner, and the foremost layered shape will be shorter in width than the other.
Next, we'll add indentations to the larger banner, lower it beneath the entire design, then create copies of each and use strokes to add some padding around them.
Step 3: Custom Text and Finishing Touches
Now we're going to create some text for our logo and use the Envelope extension within Inkscape to place it along curvature of the banner.
After that we'll color everything in and add some additional minor details to wrap up the design.
Video Tutorial
If the process outlined above was a bit too vague for you then you can watch the following video tutorial.
In this video I go over each and every individual step in order to make learning Inkscape easy and understandable for even a first-time user.
The font that I used for this design is called League Gothic.
It's a free font (for both personal and commercial use) and it can be downloaded here: https://www.fontsquirrel.com/fonts/league-gothic
League Gothic is one of my favorite fonts to use when designing logos.
I hope it serves you as well as it has served me!
Finally, if you'd like to know how you can make Inkscape appear dark, as it does on my screen, feel free to check out my post about making Inkscape dark.
Enjoy!
If you have any questions, comments or concerns, just leave a comment below and I'll be glad to help you out.
If you'd like me to design a customized logo for you business, brand, produce or service, feel free to reach out via my contact page and I'll be in touch to discuss your design needs shortly!
How To Open And Create AI Files With Inkscape
How To Open And Create AI Files With Inkscape
As a graphic designer who primarily uses open source software for the majority of his work, it's not uncommon for me to run into cross-platform compatibility issues when it comes to transferring source files between myself and clients, particularly when it comes to opening and saving AI files with Inkscape.
Seeing as how Adobe Illustrator is the industry standard when it comes to vector design, clients sometimes send over AI files (Adobe Illustrator extension ending in .ai) which poses a problem for Inkscape users because we typically don't have a copy of Illustrator readily available to use.
Proprietary Software
Since .ai is a proprietary format of Adobe, our options for cross-platform use as Inkscape users are quite limited.
For a while I was using online file conversion sites.
This method was unreliable and unsafe though, and paying a monthly subscription for Illustrator CC solely for the purpose of occasionally opening and creating AI files isn't a practical use of funds.
Fortunately, both Inkscape and Illustrator have evolved over the years, and there are now very simple and effective ways to both create and open AI files with Inkscape, which I'll be covering in this post.
Opening AI Files With Inkscape
There are various different types of Illustrator formats, and if you're having problems opening an AI file with Inkscape, the first step is to determine what version AI file you're working with.
Just because the file ends with the .ai extension, it doesn't mean it's actually structured in the same format as other AI files. Older releases of Illustrator used different file structures ranging from the more recent Illustrator CC all the way down to version 3.0.
Illustrator allows you to save files in legacy formats.
Adobe Illustrator 8.0 Format and Below
AI files rendered with Illustrator 8.0 and below are created using the older PostScript format.
This includes Illustrator versions 8.0, 3.0, and anything else that existed before then.
Unfortunately, Inkscape isn't capable of opening PostScript formats when you're running the application on Windows or Mac because the installation packages for those environments do not have Ghostscript included.
Ghostscript is what's needed for Inkscape to open those older AI files, and you'll need to install it if you'd like to do so.
Before you install Ghostscript, be sure to change the extension of the AI file you're trying to open from .ai to .eps by renaming it.
Once you've done that, watch the following video for step-by-step instructions on how to install Ghostscript and configure it to work with Inkscape.
A special thanks to Open Source Bug on Youtube for making this helpful video.
Most newer AI formats open just fine with Inkscape.
That's because newer versions of Illustrator have abandoned the outdated PostScript format and instead use PDF (even though the file still ends with the .ai extension.) These formats include versions 9, 10, and CS through CS6.
As we all know by now, Inkscape handles PDF files without a hitch, therefore newer AI files should work just as well.
In most cases, you can simply open up a new document and click and drag the AI file directly onto the canvas and it will import the same way a traditional PDF file would.
If for whatever reason that doesn't work, simply change the file's extension from .ai to .pdf by renaming it, then try it again.
Check out my post on making Inkscape's interface dark if you'd like to do so yourself.
Potential Problems
Regardless of what kind of AI format you're working with, it's possible that you simply won't be able to open the file because it contains the proprietary code for Adobe Illustrator. In this instance you won't be able to open the file with anything other than Illustrator, whether it's modeled after the PostScript or the PDF format.
Another thing to take into consideration is that whenever you open a file with an application other than that in which it was created, there's likely going to be properties that get lost in translation.
This is the unfortunate nature of working cross-platform, and it extends far beyond Inkscape and Illustrator.
For example, text objects that weren't converted to curves before saving the AI file likely won't translate well once you open them with Inkscape.
The same can be said for other features and extensions within Illustrator that aren't present in Inkscape.
Sometimes AI files just don't translate the way they're supposed to when opened with Inkscape, and unfortunately there isn't much that can be done about it.
In an ideal world, you would open the AI file with Illustrator first, then save it as an SVG before opening it with Inkscape.
Save As AI With Inkscape
If you've encountered a client or colleague who needs a copy of whatever you've been working on in Inkscape, but they're requesting it in AI format, you're in luck.
This is actually quite simple.
Although Inkscape doesn't allow you to directly save files in AI format, you can simply save it in PDF format, then change the extension from .pdf to .ai by renaming it.
This will transform it into a makeshift Illustrator file and the person on the receiving end won't know the difference.
Of course SVG, EPS and PDF files will open with Illustrator just as well, but sometimes it's easier to just give someone what they asked for than it is to explain that there's virtually no difference.
The only downside to doing this is that you need to be careful about properties getting lost in translation once the file is opened with Illustrator.
It is highly advised that you make sure your design does not contain any clips, masks, filters, blurs, have any objects with opacity less than 100%, and all text objects are converted to paths before you save your PDF file with Inkscape. These are all elements that will not be recognized by Illustrator once opened.
Using Inkscape to Convert PNG to SVG Format
Using Inkscape to Convert PNG to SVG Format
A question commonly asked by newcomers is how they can use Inkscape to convert PNG to SVG format.
This is sort of like trying to turn an omelette back into an egg though — the order of operations is backwards.
SVG files are what's used to generate PNG images.
Trying to accomplish the inverse of that would be futile, but there are solutions to this problem that I will be going over in this post.
Why It's Easier Said Than Done
File formats ending in .png are raster graphics, meaning they're made entirely of individual colored boxes known as pixels.
Graphics made of pixels are static and set at a specific size.
The more you zoom in on them or try to enlarge them, the more visible the individual pixels become.
Example of a raster graphic
Vector graphics (unlike raster graphics) are not made of pixels; they're made of mathematical formulas that dictate all of the properties of a graphic on an X and Y axis.
Since these formulas are far more dynamic than a series of static boxes, vector formats (like SVG) offer many more benefits, like being fully editable with vector graphics software, and having the ability to enlarge them infinitely without quality loss.
Example of a vector graphic
I assume that the reason you're trying to use Inkscape to convert PNG to SVG format is because you'd like to take advantage of these benefits. Unfortunately, it simply isn't possible.
As I mentioned earlier, SVG files are what's used to generate PNG files.
The SVG is used as a reference to generate a series of static pixels that form the PNG file, and once that file is generated, the rest of the information from the SVG file (the mathematical formulas) is absent from it.
The PNG format in and of itself is not capable of retaining such information.
Because of this, there's simply no way to take an already rasterized, flattened image and transform it into a series of dynamic mathematical formulas.
Converting PNG To SVG: What Your Options Are
As mentioned previously, just because you can't directly make the format conversion, that doesn't mean there aren't solutions to your problem.
In order to create a true vector SVG file from a PNG, you'll have to create an entirely new SVG file by tracing over your PNG. There's two ways to go about tracing a PNG with Inkscape, and luckily neither of them require you to be an expert with the software.
Method 1: Auto-Tracing
The first way you can trace your PNG file is by using the Trace Bitmap function in Inkscape.
The Trace Bitmap extension scans your image and uses it as a reference to automatically generate a vector rendering of it.
To use the Trace Bitmap function, simply select the object you'd like to trace, then go to Path > Trace Bitmap.
This will bring up the interface menu depicted above (check out my Inkscape dark theme tutorial if you'd like a dark interface like mine.)
Assuming you'd like to create a complete retrace of the image and not just a monotone silhouette, choose Color from the Multiple Scans menu.
After that it's time to set the Scans.
Scans are basically the number of colors that will be used in the tracing.
If you're working with a really simple PNG that only uses 2 or 3 colors, set the Scans to 2 or 3.
If it has more, use more.
It may be worth it to experiment with different numbers of scans to see what works out best.
You can click the Update button to generate a preview in the preview window before finalizing your selection.
The Trace Bitmap function handles simple graphics quite well
After you've finalized your tracing and clicked OK to generate it, make sure to Ungroup it (CTRL + SHIFT + G) several times to unlock all of the individual elements of the design.
Potential Problems With Auto-Tracing
This method is far from perfect.
As can be expected, there's no way for the software to understand all of the nuances of a raster image and render them with flawless precision.
If the PNG you're looking to trace is a very simple graphic at a high resolution and only uses a handful of colors, this method may be a viable option for you.
However, if you're using a more complex, detailed image (or a really small image) it's likely not going to give you acceptable results.
Click to enl
As you can see, the Trace Bitmap function produces results that are quite rudimentary when applying it to a more detailed image.
The gradient background of the original image resulted in lots of color banding in the tracing, and the finer details — like the lettering and shading of the character — were completely lost in translation.
The same will also happen if you use an image that's too small…
Click to enl
There's simply not enough information for the software to process when working with such a small image, which results in a blurry image with lots of color banding.
If after experimenting with the extension you are unable to produce the result you want, it may be time to consider other options.
Method 2: Manual Tracing
As the title suggests, this is a method in which you manually trace over your image using various different shapes and the Bezier Pen.
This may seem daunting upon first impression — especially if you're new to the software — but it's not something a first-time user couldn't get the hang of within a relatively short period of time.
Why This Is My Preferred Method
As a professional designer I prefer the manual method because it simply produces the most professional results.
A manually-traced SVG will always be the best option
When you're manually tracing an image, you're in the driver's seat — you are in complete control of the outcome.
You get to dictate boundaries, lines, curves, shapes, colors, and every other aspect. The human element allows you to determine how to best handle those nuances that simply cannot be interpreted by automated software.
The auto-tracing method may get the job done, but if you want it done right and you want your tracing to have a professional appeal, I recommend tracing it manually.
Video Tutorial
Explaining this method through written text would take far longer than you'd care to read, so I put together a step-by-step video tutorial with voice narration that should set you off on the right path and have you manually tracing your PNG images in no time.
Potential Problems With Manual Tracing
As you would assume, one of the downsides to manual tracing is that it does include — albeit to a small degree — somewhat of a learning curve.
You're probably not going to knock it out of the park on your first try.
It'll take a bit of practice.
Another downside is that it can be quite time-consuming, depending on the image.
Inkscape Tutorial: Mountain Logo Design
Inkscape Tutorial: Mountain Logo Design
In this tutorial I'll be demonstrating how to design a vector mountain range logo using Inkscape.
This tutorial makes effective use of the Bezier Pen in regards to freehand drawing.
It's still a pretty simple task though, so don't let the freehand aspect intimidate you.
The font I used for this tutorial is called League Gothic and it can be downloaded here: League Gothic
Scroll down to the bottom of the page for a step-by-step video tutorial with voice narration.
Step 1: Creating The Mountains
The first step is to create a red triangle and bring the opacity down to 50%, then insert some additional nodes into it as depicted below.
Next, we'll use the Jitter Nodes extension to shift some of those nodes around, giving it a whimsical, rugged appearance.
Select the shape and then used the Linked Offset function to create another shape behind it with a slightly more padding around the edges.
Convert that shape to a path and then make it green.
Next, use the Bezier Pen to create a freehand rugged shape going through the center of the red object and wrapping around the outside of the right-hand side of the entire graphic.
Perform an Intersection on the newly drawn shape and the red object.
Execute a Difference between the red shape and the green shape, resulting in a single mountain icon with makeshift shading on it.
Duplicate the mountain icon, make it red, shift it over to the right then use the Edit Paths by Nodes tool to manually shift some of those nodes around.
This ensures that this mountain won't be too similar to the other mountain, which helps in maintaining a natural appeal.
Repeat the previous step, only make this new mountain blue, bring it to the far right side of the red mountain and make it bigger than the red mountain, but smaller than the green mountain.
Again, use the Edit Paths by Nodes tool to manually shift some of the nodes around.
Next, use the Bezier Pen to create a shape going through the red mountain where the green and blue mountains intersect with it, then Duplicate that shape and use each copy to perform a Difference on both the green and blue mountains.
Finally, Unify the three mountains and make them black.
The mountains are now complete.
Step 2: Creating The Emblem
Next, we're going to create a red circle going over the mountains, as depicted below.
Duplicate the red circle twice and use each copy to create a couple of red strokes, then convert them to paths.
Make sure the inner stroke is somewhat smaller in size than the outer stroke. After that's done, unify the three red shapes together.
Use the Star tool to create a multi-pronged star, align it in the center of the red circle then perform a Difference between it and the red circle.
Select the mountains icon and raise it to the top of the page, then use the Linked Offset function to create a slightly larger copy of the mountains.
After that, convert it to a path and perform a Difference between it and the red circle.
Use the Bezier Pen to create a freehand shape going through the mountains icon and around the bottom portion of the red circle, then use it to perform a Difference on the red circle.
This will eliminate the lower area of the red shape, leaving us with our completed emblem.
After that you can unify the leftover shape with the mountains and turn it black.
Step 3: Completing The Logo & Adding Text
Create a red rectangle that is wider than the entire emblem and has a height similar to the thickness of the outer band around the emblem.
Place it over the lower portion of the mountains, then use the rectangle as a reference point to trim off the bottom portion of the mountains.
Duplicate the red rectangle, make it a similar thickness as the inner band of the emblem, then place it slightly below the original rectangle.
Add your text beneath it, ensuring that it is the same width as the entire design, then Duplicate the red rectangles, flip them vertically and place them beneath your text.
At this point, your logo is completed! You can bring the opacity of everything back up to 100%, color it as you please, and add some subtext beneath it.
Inkscape 92: New Features
Live Perspective & Envelope Editing
The perspective and envelope extensions are tools that I often use throughout the course of my work day, and as useful as they are, the only criticism I have of them is that they can be a bit time-consuming.
As it currently stands, using these tools requires you to manually draw a 4 point object in the shape of the perspective you'd like the object to take, then wait for the extension to render before you can see how it looks.
I often find myself not liking the end result on the first try and having to undo, alter the defining shape, then waiting for it to render again for another try.
In Inkscape 92 though, you'll have the ability to alter these key nodes in real time, which will save us lots of waiting and undoing.
This is great as these features already exist in the likes of Adobe Illustrator, so adding them to Inkscape will narrow the gap between the two applications even more.
Source: Inkscape Release Notes Wiki
Lattice Deformation
Source: Inkscape Release Notes Wiki
Just by looking at this GIF I already know that I'm going to have a lot of fun experimenting with the lattice deformation feature and seeing what I can create with it.
It looks similar in concept to the bend tool in the Path Effects Editor, only we're working with multiple nodes on both the vertical and horizontal axis.
I'm assuming that we'll also be able to edit the individual nodes – make them round, smooth, sharp, delete nodes, insert new nodes, etc.
When I originally saw this new feature the first thing that came to mind was text.
This could be an excellent way to make text take the form of a sphere.
CMYK Support!
I've saved my favorite for last.
If you read my post about Inkscape VS Illustrator, you know that the only true shortcoming I feel Inkscape has is its inability to output documents with a CMYK color profile, which makes designing for print a hassle.
Apparently the Inkscape team has been working towards a solution for this though.
According to the New Features Focus section of the Inkscape Wiki Roadmap, there has been a focus on improving support for CMYK/spot colors.
As the Wiki page states, the current goals are…
Change the CMYK tab to allow selecting the CMYK colors directly
Allow setting the document to CMYK, which sets a global CMYK profile
Stores RGB colors as RGB, CMYK colors as CMYK
Needless to say, I'm very excited about this.
If the Inkscape team can successfully pull this off, Inkscape will officially be a legitimate contender to Adobe's Illustrator, which will make Inkscape more suitable for professional graphic designers and not just creative professionals who occasionally need to create vector work.
*EDIT – As some of you have informed me, CMYK is slated for the version 0.94 release and not the next release of Inkscape, which upon double-checking I now realize is indeed the case.
My mistake!
Additional Upgrades
I've only outlined some of the bigger updates that I think will have the largest impact in this post, but there's many more that have caught my attention and have me excited for the new release.
Here's some more features that I think will be very useful…
Checkerboard backgrounds to better gauge an object's transparency
Default resolution will change from 90 DPI to 96 DPI to accommodate the CSS standard (although I'd personally like to see it match Illustrator's 72 to make for a smoother transition when opening files cross platform)
New Roughen extension, which will be nice as I currently accomplish this by manually adding new nodes then running the Jitter Nodes extension
Guides can be locked to the canvas in order to avoid accidentally moving them
New blend modes could be interesting to play around with
Colorblindness simulation
I'm just scratching this surface as far as all of the new features and improvements go.
To see the full list, be sure to check out the Inkscape 0.92 Release Notes Wiki page.
Have a look through it and let me know in the comments if there's anything in particular you're excited about.
As far as a release date goes, we don't know yet.
Version 0.91 was released recently, so I assume it'll be a while until 0.92 in ready for launch.
It offers a lot to look forward to though, and I'll be keeping my eyes open for it.
Top 10 Inkscape Tutorials of 2016
Top 10 Inkscape Tutorials of 2016
If you want to learn how to use Inkscape, there's no better way to do so than with video tutorials.
In fact, this is precisely how I learned.
Written step-by-step lessons are great, but there's nothing like being aided by visuals and audio. In the spirit of reflecting back on the year 2016 and the impact my channel had on the Inkscape learning community, I've compiled a list of 10 Inkscape tutorials from 2016 that performed the best on Youtube.
Ranking factors were determined by views, engagement, and the ratio of likes to dislikes the video received by viewers.
#10: Hockey Team Logo
Learn how to create a hockey team logo that emphasizes the Perspective tool within Inkscape.
#9: Bicycle
This tutorial is an exercise in using strokes to create a sleek line art style of a bicycle graphic.
#8: Eyeball
Become a master of gradients with this lesson, which demonstrates how to design a 3D style eyeball.
#7: Simple Flame Icon
Perfect for beginners, this lesson highlights what is capable with the freehand tool, showing how to create simple, fluid curved shapes to create a flame icon.
#6: Vintage Style Logo
Always a crowd favorite, this vintage style logo tutorial uses the masking tool as an introduction to using raster images as textures.
#5: Mountain Logo
Learn how to use Inkscape's bezier pen to draw freehand iconography, as taught in this mountain logo tutorial.
#4: Cardboard Box with Bar Code
Get a feel for isometric design and using gradients to create the illusion of added dimensions in this lesson, which demonstrates how to create a vector cardboard box with a bar code on it.
If you didn't already know, Inkscape is absolutely wonderful for generating bar codes.
#3: Custom Text Treatment
Inkscape tutorials aren't just for beginners.
This one may be better suited for intermediate to advanced users, but this lesson offers an exercise in using raster images to create vector textures in order to create some pretty cool looking customized text.
#2: Logo Design Inkscape Tutorials
This one has gone semi-viral since being uploaded in July — learn to design an emblem style logo using Inkscape.
This tutorial emphasizes the use of strokes to strategically create padding and borders.
#1: Donut
The undisputed viewer's choice of 2016 has been, without question, this simple, flat style-doughnut graphic with a bite taken out of it.
This makes for the perfect beginner's tutorial because it's a nice design, but isn't too complicated to produce.
Tutorials to Come…
Inkscape tutorials for beginners are posted twice per week on my Youtube channel, so be sure to subscribe on Youtube if you'd like to stay updated.
If you don't have a Youtube account, you can also keep up-to-date with new tutorials as they're posted on my Facebook page.
There's more to come in 2017, so let me know in the comments if there's anything in particular you'd like to see a tutorial made of.
I'd like to start featuring work from other Youtubers as well, so if you know of anyone that's made some killer video tutorials, drop me a link in the comments section.
As it currently stands, there aren't many Inkscape Youtubers that upload on a regular basis.
I've been very vocal about the benefits of being on Youtube as a graphic designer, so hopefully we start to see the community grow!
Inkscape Vs Illustrator: Can Inkscape Replace Illustrator?
Inkscape Vs Illustrator: Can Inkscape Replace Illustrator?
Inkscape vs Illustrator: I've noticed a rise in popularity of the open source design software ever since Adobe started requiring their users to rent their software instead of letting them own it.
For professional graphic designers, the price tag is something they may have no choice but to swallow, but for casual users of the software — people who occasionally need to whip up some graphics on their own, like bloggers, web designers, photographers, content creators, social media managers, and so on — there are other solutions that may prove to be more practical for their situation.
You could always use GIMP instead of Photoshop for raster image manipulation, but when it comes to vector graphics, Inkscape is a more cost-friendly alternative to Illustrator, and considering that Inkscape doesn't cost anything, it clearly wins the price debate.
But can Inkscape really replace Illustrator? As someone who has used both programs, I'd like to weigh in with my opinion.
Don't Lose Sight of The Big Picture
One mistake a lot of newcomers to design often make (and I was guilty of this myself) is placing too much importance on the things that don't really matter in the grand scheme of things, like which operating system is best or which software is best.
The best operating system or the best software is the one that you feel most comfortable using and will help you get the job done to the best of your ability.
Never confuse a designer with their tools.
A talented and experienced designer can create a better logo with crayons and a napkin than an inexperienced, first-time user can with the latest, greatest, up-to-date software and operating system running on the world's most powerful system.
Much like how an experienced chef can make a much better meal with cheap ingredients and shoddy kitchen utensils than I could with state-of-the-art cookware and the finest ingredients.
There's no way to look at a poster on the subway and determine which software was used to design it, which operating system that software was running on, or which manufacturer built the hardware that was used, so these things really aren't all that important in the grand scheme of things.
It's not the tools that matter; it's the person using the tools that matters.
And when it comes down to the question of Inkscape vs Illustrator, the only real question is whether or not Inkscape is equipped with everything you will need for your vector design work.
My answer to that question: almost! It's really, really close though.
There's only one true shortcoming that Inkscape has, in my opinion.
CMYK
Unfortunately, Inkscape doesn't have the ability to output files in CMYK color profiles, which will make designing anything for print a real challenge.
However, there is a workaround that I went over in one of my Youtube videos.
There's also a few other solutions that are a little more elaborate, here and here.
So as long as you're not designing leaflets or postcards or anything else that will be sent off to the printers, Inkscape is fully-equipped and completely capable of handling any kind of vector design work you may need it for, and you can even use it for print work too if you're willing to use the workarounds.
When it comes to things like website icons, channel art, Facebook cover photos, mobile application GUI, and so on, Inkscape truly is a viable alternative to Illustrator.
Anything that was designed in Illustrator can, theoretically, be designed in Inkscape as well.
Inkscape is a fully-featured, complete and professional vector graphics application.
And as print media continues to die off while digital becomes more and more the standard, the gap between the two applications will shorten.
But for now, I have to give Illustrator a slight edge, and that is in no way an indictment of Inkscape.
It's a pretty damn impressive application when you consider that it was created by a team of volunteers and is given away for free.
The Bells & Whistles
Another advantage Illustrator has is a variety of additional tools and features that will make your workflow a little more efficient.
For example, the pathfinder tool is great, as is the 3D tool, and having more options for warping text is also really neat, along with some other features.
But these things can all be accomplished manually in Inkscape, so I don't really consider them necessities.
I look at them more as luxuries — an added bonus for all the money you're paying Adobe every month, and whether or not those luxuries are worth the price tag is up to you to decide.
These minor advantages are to be expected though when comparing a free product to that of which was created by the industry standard in creative software.
All things considered, I think the volunteers over at Inkscape have done nothing short of a phenomenal job in creating something that rivals the product of a corporate juggernaut, and lord have mercy on Adobe if the Inkscape team ever figures out a CMYK solution.
I think a lot of people (myself included) will be cancelling their Creative Cloud subscriptions, and the Inkscape vs Illustrator match-up will be a near draw.
Designing Print-Ready Business Cards in Inkscape
Designing Print-Ready Business Cards in Inkscape
When designing something for print, we have to go about it differently than we would if we were designing something to be displayed digitally.
There's certain measures that need to be taken when designing for print in order to have a successful outcome.
Color Management
In the context of graphic design, color management is the process of ensuring that your design will appear the same once printed as it does on a digital display.
Since colors are generated differently on a digital display than they are on inked paper, it makes sense to create a working environment that simulates the end result printing produces as closely as possible.
Digital displays render color by emitting light, whereas paper uses ink.
Monitors, tablets, smart phones, etc.
use an additive color model known as RGB for this.
Print materials require a subtractive color model known as CMYK.
A printer will use some combination of all four of these colors (cyan, magenta, yellow, black) to render every other color.
The RGB spectrum is far wider than CMYK, so it's very important to make sure that you're designing within the CMYK gamut.
If you send a file with an RGB color profile to a print shop, they will either 1.) refuse it and request a CMYK file, or 2.) convert the file to CMYK themselves, which can be a little risky because some RGB colors don't translate very nicely to CMYK…
Notice how RGB colors tend to appear muddy once converted to CMYK and pri
Unfortunately, this is an area where Inkscape falls short, because it only supports RGB and doesn't allow us to restrict our design work to the CMYK gamut for the time being.
To work around this, we're going to create our design in Inkscape, and later on we'll make the color correction and output a CMYK document using Scribus.
Monitor Calibration
Before you start designing anything for print, you should make sure your monitor is displaying everything correctly, otherwise there can be inconsistencies between how your design looks on screen versus how it looks once printed.
To do this, you'll need external hardware known as a colorimeter.
If you already have a colorimeter, then you probably know how it works and why you need it.
If you don't, I would suggest reading up on it and finding a device that best fits your needs.
If you don't currently have a colorimeter, and acquiring one in the near future isn't an option, you can adjust your monitor by eye using a series of test images and patterns.
The Lagom LCD monitor test pages are an excellent resource for calibrating your monitor manually.
The process isn't as in-depth and precise as using a colorimeter would be, but in my opinion the results are acceptable.
This will require that you have a monitor that allows you to manually adjust contrast, brightness, RGB values, clock and phase, etc.
Before taking the test, make sure that your monitor has been on for at least 30 minutes and that it is running at its native resolution, which would be the highest resolution it provides.
Preparing Your Document for Print
Once your monitor is calibrated, it's time to open up Inkscape and prepare your document for print.
We're going to use the US standard business card size for this example, which is 3.5″ by 2″ with a .25″ bleed.
Bleed & Safe Area
Bleed lines are what a printer uses as a guide to trim documents.
The bleed area is an extension of each of the design's dimensions (width & height) to be trimmed off during printing.
This ensures that the final product will have no unprinted edges.
In my experience, most print shops call for a .25″ bleed when it comes to business cards, so how we go about applying this is to add .25″ to each dimension (both width & height), which would mean our document size should be 3.75″ by 2.25″.
Our design should extend into the bleed, all the way to the edge of the document.
The 3.5″ x 2″ portion of the document will be how the design looks once printed and trimmed.
All important contents (logos, icons, text) should not extend past the safe area, which will ensure that nothing important will be trimmed off after print.
To generate the portion of our graphic that will represent the safe area, we're going to simply subtract .25″ from each dimension of the intended document size, which would be 3.25″ by 1.75″.
Once set up, your document should look like this…
To set this up, I like to use layers for each individual element, then lock the bleed and safe area layers until I'm finished with the design.
Since this is a lot to explain by typing, I put together a brief screencast tutorial demonstrating how to prepare the document in Inkscape…
Here's the document formatted & prepared for print, which you can keep on file as a template if you'd like: USBusinessCardQuarterInchBleed.svg
Finishing Up the Design
Once you're finished with your design, make sure to delete the bleed and safe area layers as those lines and guides are only there for our reference and should not be included in the final design that you send to the printer.
Make sure you've converted all text objects to paths and that you haven't used any blurs, clips, masks or filters.
These effects will not transfer well to our intended output format.
We're going to save the file as a PDF document, so go to File -> Save As and choose PDF.
A window will then pop up asking what DPI you'd like the save the document in.
DPI stands for dots per inch.
Smaller products like business cards and post cards require a higher DPI since they'll typically be viewed up close and fine details will need to be present.
Larger products like billboards and trade show banners require a far lower DPI since the product will be viewed from afar, meaning you can get away with using less dots per inch.
Think of a collage where a bunch of small images are used to make up a larger image.
If you view the collage from a distance, you won't be able to notice the individual little images that make up the main images, but if you view it up close, the small images become noticeable.
This is a similar concept.
For business cards, most print shops I've worked with require the graphic to be at 350 DPI, so make sure to set the DPI to 350 before saving your PDF document.
Color Separation
So we now have an almost print-ready document to send off to the printer.
The last and final step is to render the document with a CMYK color profile.
To do this, we're going to use another open source program known as Scribus.
Since this is far too lengthy of a process to type out, you can reference the screencast tutorial I made about the subject here…
Once you've generated your CMYK PDF file using Scribus, you will have a print-ready file to send off to the printer.
Every print shop I've ever worked with (including VistaPrint and GotPrint) accept PDF documents for print, so this should not be an issue.
Why I Don't Like Inkscape 0.91: An Honest Review
Why I Don't Like Inkscape 0.91: An Honest Review
UPDATE: As some of you have pointed out, a lot of these points do not seem to be an issue on Windows or other Linux distros, so take everything I say with a grain of salt.
The problems I'm having may not apply to you, but they still apply to me, so I'm just sharing my own personal experience.
I still think Inkscape is an awesome program, and I really like version 0.48 so I'll be sticking with that for now.
I love Inkscape.
I use it for 99% of my design work.
What I particularly love about it is how lightweight (as far as CPU resources go) a program it is, and I personally think the interface makes for a more efficient workflow than Illustrator.
Unless I have to work in CMYK, I'm going to choose Inkscape over Illustrator every time.
Each and every new installment of Inkscape has been better than the previous.
However, I'm not too crazy about version 0.91, though, and after using it for a couple of months, I went back to version 0.48.
There's not one particular reason I dislike version 0.91, but rather many different little reasons that piled up and were more than I was willing to deal with.
Allow me to explain.
It's Slower
For some reason, this latest release seems to drag compared to any other version I've used.
Version 0.91 has a tendency to lock up briefly whenever I'm editing gradients, browsing through fonts in the text editor, and the bezier pen lags to the point where it's almost unusable.
One of Inkscape's major benefits [for me] has always been how lightweight, fast and efficient it is.
I could probably overlook these issues for my day-to-day freelance work, but when I'm recording screencast tutorials for Youtube, as you would imagine, it only gets worse.
I don't think this is a problem with my computer.
I'm running 16GB of memory.
Editing large video files in Blender gives me less hiccups than using the bezier pen in Inkscape 0.91.
Editing Gradients
Editing gradients in previous versions of Inkscape was a breeze.
You'd simply click the edit icon, then a floating window would pop up with a dropdown menu of the stops listed, each of which you could select and change.
Adding and removing stops was simple too, and it actually worked.
In version 0.91, not only does that almost cause my machine to lock up, but the feature doesn't even function properly.
When you click the "add stop" icon at the top toolbar, nothing happens.
You have to select the 2nd stop first, then go back to the first stop, then go back to the second stop, then it'll work.
This is obviously some kind of glitch, and the ritual of back-and-forth clicking is the only way to get around it.
In addition, sometimes the color menu doesn't even appear when you select a stop.
I'll have to close and reopen Inkscape in order to get it back.
Not sure if this is some kind of glitch, or something else that I'm overlooking.
New Text Editor
The new text editor isn't very fluid.
In previous versions of Inkscape, if I wanted to see how a word looked in a variety of fonts, I could open up the text editor, apply the font, duplicate the word and shift it over, then open the text editor back up and pick up right where I left off browsing through the fonts list by using the arrow keys.
In version 0.91, they've introduced some kind of recently-used-fonts area at the very top of the list, so if I want to continue browsing to the next font, I have to either scroll all the way down from the top of the list, or manually start typing in the font name I just used, then press down on the keyboard to get out of that recently-used-fonts area.
I don't understand why this feature needs to exist.
It hasn't proven useful [to me] yet, and has only deteriorated the efficiency of my workflow by costing me unecessary clicks.
I know that sounds like a trivial thing to complain about, but when you're spending a minimum of 8 hours using the software every day, those extra clicks add up.
Selecting Text Objects on The Canvas
You can usually select any object on the canvas by clicking near it.
Even if you happen to miss the object by a few millimeters, Inkacpe will grab it.
For some reason, though, selecting text objects on the canvas is a real nuissance in version 0.91.
You must click precisely on the text object, which is a pain because letters tend to lack any kind of substance to grab.
There's a lot of negative space.
So, if you click between the bottom two legs of the letter A, it won't select the object.
This proves to be a hassle because you often have to click (and sometimes deselect if you're trying to grab multiple objects) 3 or 4 times – and sometimes even have to zoom in on the object – just to select it.
What happened? This was never an issue in previous versions of Inkscape.
Grabbing a text object was always as easy as grabbing an ellipse or a rectangle.
Blur & Opacity Inputs
In the fill and stroke dialog box, the blur and opacity features have been unnecessarily complicated.
There used to be numeric input boxes for each that were separate from the sliding handles.
In 0.91, the numeric inputs have been combined with the sliding handles.
So now, when you go to click on the numbers to change them, Inkscape first recognizes that action as changing the sliding handle, which is rather annoying when you want to give something a precise numeric blur, only to click on the digits and first end up with a 98% blur.
I liked it much better before.
Where Is The Undo/Redo Dialog?
I'm not talking about the undo/redo history menu.
That's something entirely different.
I'm talking about when you click "Edit" on the toolbar.
In previous versions of Inkscape, the Undo text in that menu had the most recent action written out next to it.
For example, Edit > Undo: Remove Stroke, or Edit > Redo: Change Opacity.
Now, for some reason, it's gone.
It just reads Undo without letting me know what I'm undoing.
This is disappointing.
I frequently used that menu as a shortcut to see what action I most recently executed, because sometimes I can't tell if I actually executed something or not.
Having to open the undo history menu for this is a step backwards when you previously had a shortcut for it.
The beauty of that dialog was the streamlining of that process.
PNG files export without a file extension
When you export a graphic as a bitmap, for some reason, it renders without the .png file extension, meaning all software (including Inkscape) will not recognize it as a graphic.
You have to manually type in the extension after the name.
For example, instead of simply typing in output and clicking export, you now have to type in output.png.
Again, this sounds like a trivial thing to complain about, but having to manually type ".png" after the title of every file I export, when I never had to do that in previous versions, is a new habit to adapt to (that very often slips my mind) and somewhat of a step backwards for the software.
I don't know if this is a Linux issue or not (it could very well be,) but I didn't have this problem [on Linux] with any of the previous versions.
Out with The New, In with The Old
There are some new features in 0.91 that I really like, like panning the canvas with the spacebar (I've really fallen in love with that function and will miss it,) and apparently they've experimented with mesh gradients (which I haven't tested out yet.)
Overall, this entire version feels like a step backwards, whereas all of the previous releases felt like gradual improvements.
This isn't meant to be a jab at the Inkscape team.
I understand this is a labor of love for them, and I'm eternally grateful and indebted to them for this wonderful software they've created, but I just wanted to share my feedback as a power user (I like to consider myself a power user, anyway.)
scripting example
for r in range(7, 0, -1): circle((100, 100), 10*r, fill=['white','red'][r%2])
is all it takes to draw a bullseye.
for i in range(100):
x, y = uniform(0, width), uniform(0, height)
rect((-5, -5), (5, 5),
transform='translate(%g, %g) scale(0.75, 1) rotate(45)' % (x, y),
fill='#%02x%02x%02x' % (randrange(256), randrange(256), randrange(256)))
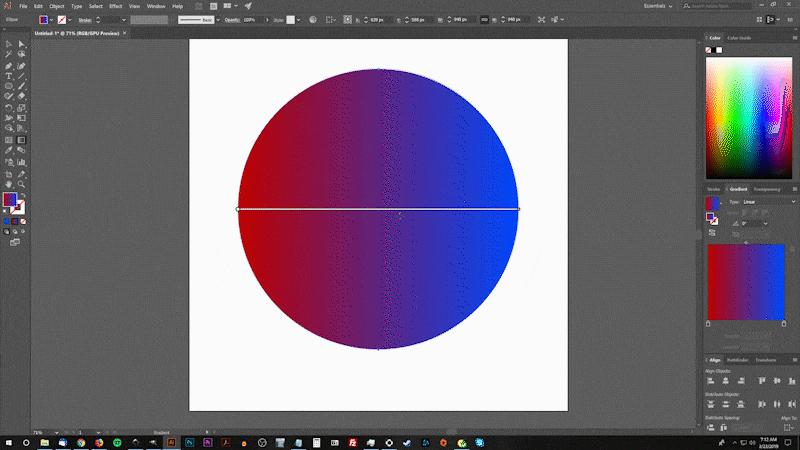
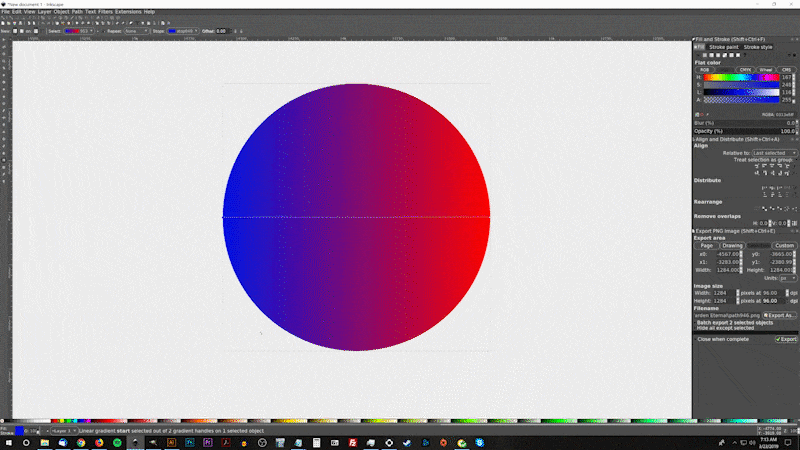

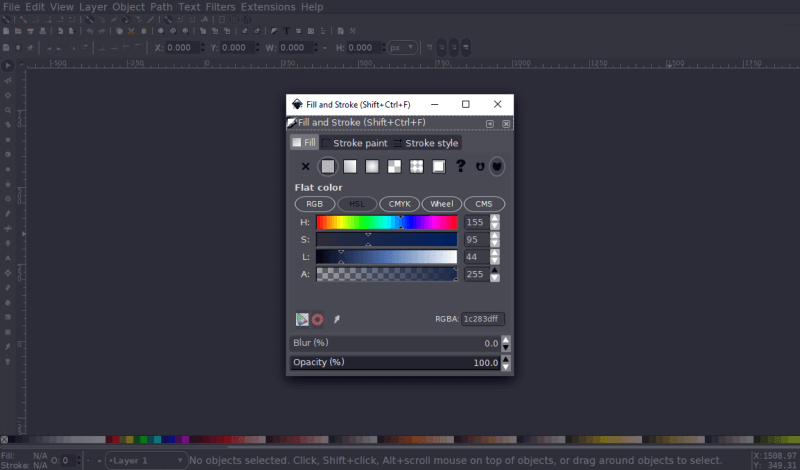
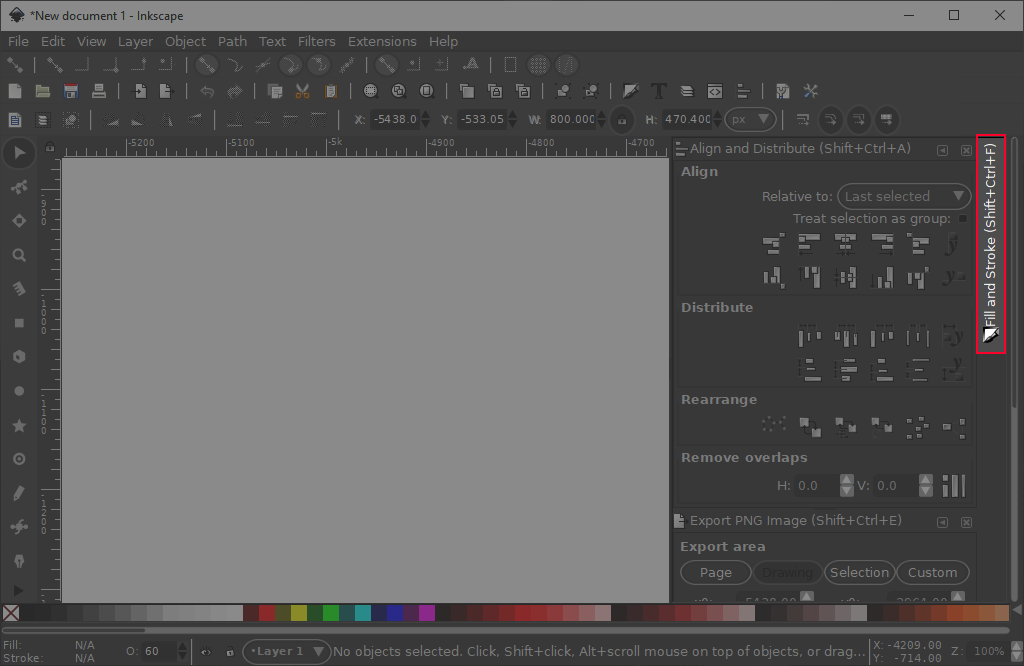
 You can also minimize the tab again by clicking the arrow icon in the upper-right corner of the menu.
Another reason why your fill and stroke menu may not be showing is because it's minimized within another menu, as depicted below…
You can also minimize the tab again by clicking the arrow icon in the upper-right corner of the menu.
Another reason why your fill and stroke menu may not be showing is because it's minimized within another menu, as depicted below…
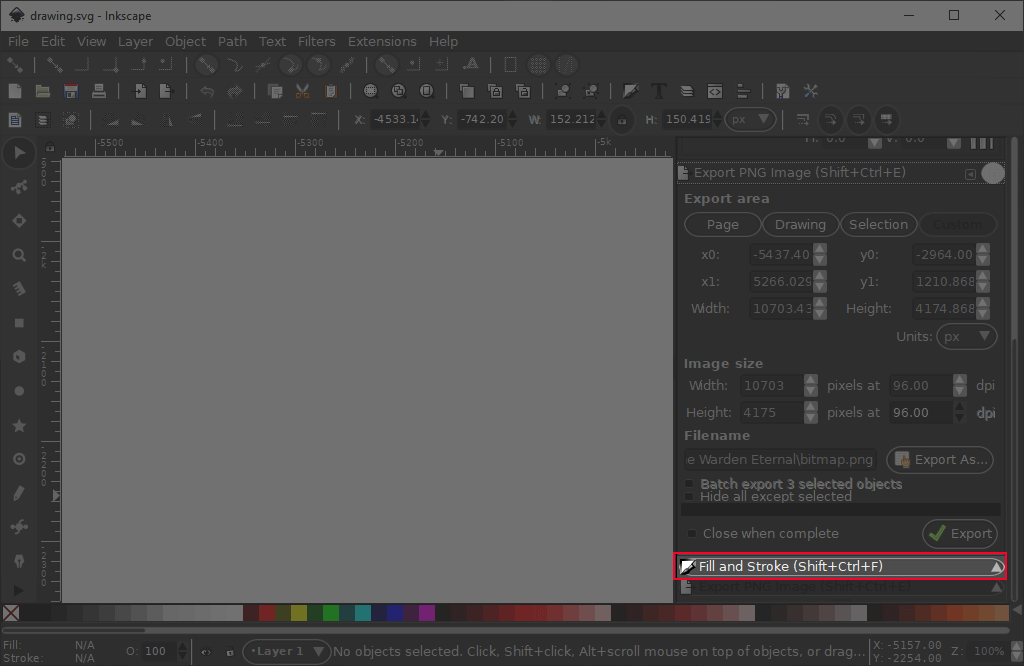
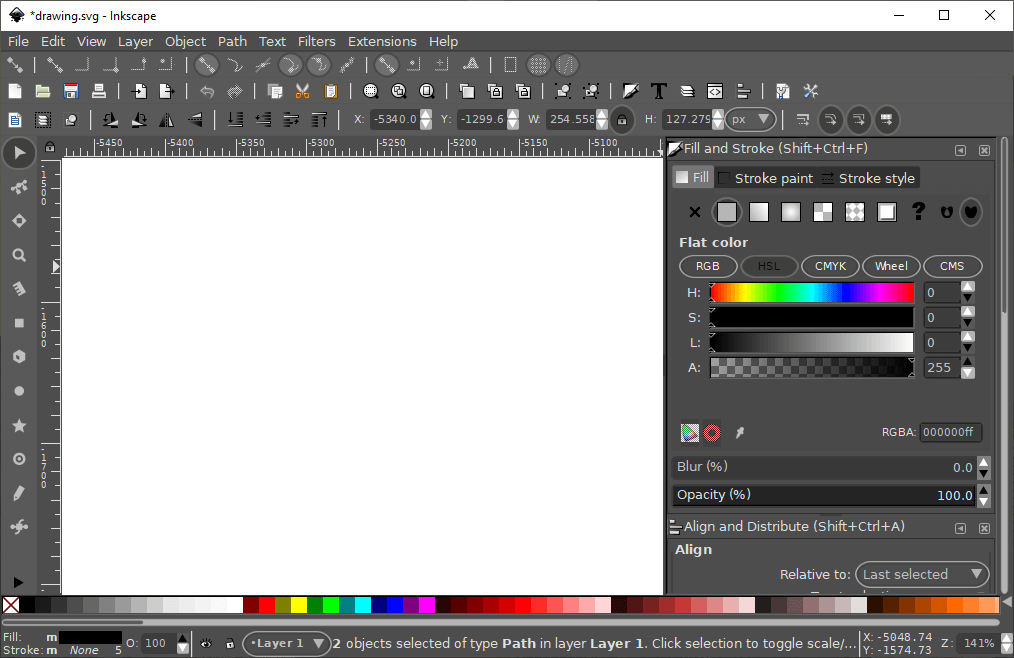
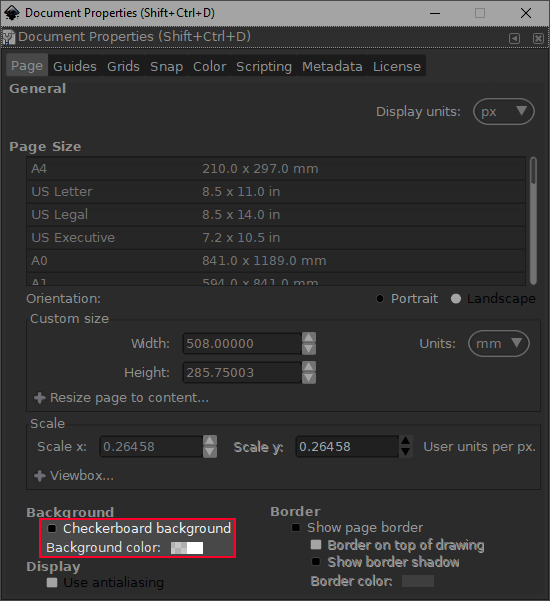 Once ticked, your checkerboard background should render in Inkscape in real time…
 If the icon is grayed out and you're unable to click on it then that means you're rectangle already has sharp corners.
If your rectangle still appears to have rounded corners then it's probably because your rectangle has a stroke with a rounded join.
In that instance you can correct that by opening the Fill & Stroke menu (control + shift + F), select the Stroke Style tab, and where it says Join click on Miter join to the right.
If the make corners sharp tag is still grayed out, your rectangle doesn't have a stroke, yet it still has rounded corners, then it's probably because your rectangle has been converted to a path and is no longer recognized as a rectangle object by Inkscape.
In that instance you'll either have to re-create the rectangle altogether or manually add sharp corners using other tools like the Edit Nodes tool, or the Bezier Pen.
If the icon is grayed out and you're unable to click on it then that means you're rectangle already has sharp corners.
If your rectangle still appears to have rounded corners then it's probably because your rectangle has a stroke with a rounded join.
In that instance you can correct that by opening the Fill & Stroke menu (control + shift + F), select the Stroke Style tab, and where it says Join click on Miter join to the right.
If the make corners sharp tag is still grayed out, your rectangle doesn't have a stroke, yet it still has rounded corners, then it's probably because your rectangle has been converted to a path and is no longer recognized as a rectangle object by Inkscape.
In that instance you'll either have to re-create the rectangle altogether or manually add sharp corners using other tools like the Edit Nodes tool, or the Bezier Pen.

 Now we're going to use the Draw freehand lines tool to draw some wavy lines going over the square.
You can learn more about Inkscape's tools and uses in my overview tutorial.
In the tool settings menu make sure to select Spiro and set the smoothing to 46 (or somewhere thereabouts.)
Now we're going to use the Draw freehand lines tool to draw some wavy lines going over the square.
You can learn more about Inkscape's tools and uses in my overview tutorial.
In the tool settings menu make sure to select Spiro and set the smoothing to 46 (or somewhere thereabouts.)
 This will allow us to create curved lines with smooth edges.
 Next, select all of the lines and combine them together by going to Path -> Combine.
Then, select the combined lines along with the square and navigate to Path -> Division.
This will divide the square into separate pieces based on the spiro lines we previously created.
Bring the opacity of everything back up to 100% and color them using the palette (or any other colors of your choosing.)
Next, select all of the lines and combine them together by going to Path -> Combine.
Then, select the combined lines along with the square and navigate to Path -> Division.
This will divide the square into separate pieces based on the spiro lines we previously created.
Bring the opacity of everything back up to 100% and color them using the palette (or any other colors of your choosing.)
 The final step is to duplicate each piece individually, make it black, lower it, and give it a slight blur.
This will create the appearance that each wave is made of material and layered above the other waves.
The final step is to duplicate each piece individually, make it black, lower it, and give it a slight blur.
This will create the appearance that each wave is made of material and layered above the other waves.
 Now we can group everything together and use another object as a clipping path.
For this tutorial I used the Inkscape logo as an example, but you can use any object you'd like.
Now we can group everything together and use another object as a clipping path.
For this tutorial I used the Inkscape logo as an example, but you can use any object you'd like.
 And with that our material design pattern is complete! If you have any questions simply leave a comment below.
As always, thanks for watching!
And with that our material design pattern is complete! If you have any questions simply leave a comment below.
As always, thanks for watching!

 If you look closely, you'll see that the black areas from the texture were subtracted from the Inkscape logo.
White areas of the texture had no effect on the logo.
If you look closely, you'll see that the black areas from the texture were subtracted from the Inkscape logo.
White areas of the texture had no effect on the logo.


 Before we subtract the green area, we'll use the Dynamic Offset feature to give the subject some padding.
This is because we don't want the text to run all the way to the edge of the subject; we'd like there to be a little bit of space.
Before we subtract the green area, we'll use the Dynamic Offset feature to give the subject some padding.
This is because we don't want the text to run all the way to the edge of the subject; we'd like there to be a little bit of space.
 Now we can subtract the green area by selecting both the blue and green objects and performing Path > Difference.
Then take the remaining shape and perform Path > Simplify to ensure that the object isn't too complex for the text function to work.
Once you've done that, go ahead and generate some text using the Text tool.
Then, select both the text object and the blue shape and go to Text > Flow Into Frame.
This will flow the text into the blue object.
Now we can subtract the green area by selecting both the blue and green objects and performing Path > Difference.
Then take the remaining shape and perform Path > Simplify to ensure that the object isn't too complex for the text function to work.
Once you've done that, go ahead and generate some text using the Text tool.
Then, select both the text object and the blue shape and go to Text > Flow Into Frame.
This will flow the text into the blue object.
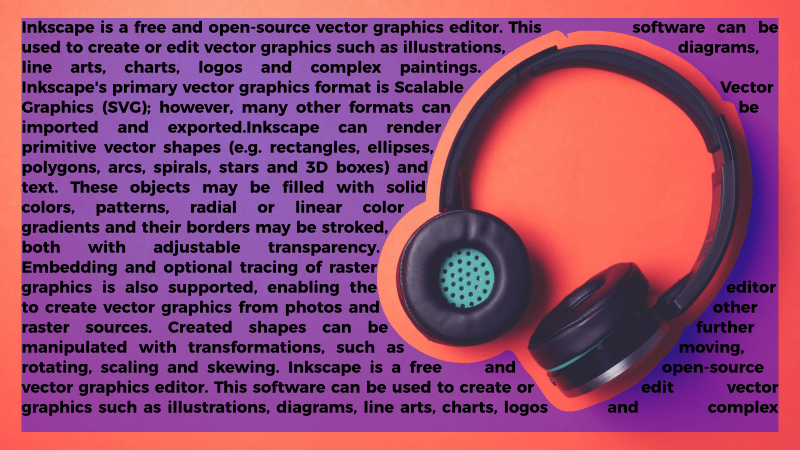
 And with that we are finished! That is how you can flow text around an object with Inkscape.
If you have any questions just leave a comment below, and as always, thanks for watching!
And with that we are finished! That is how you can flow text around an object with Inkscape.
If you have any questions just leave a comment below, and as always, thanks for watching!

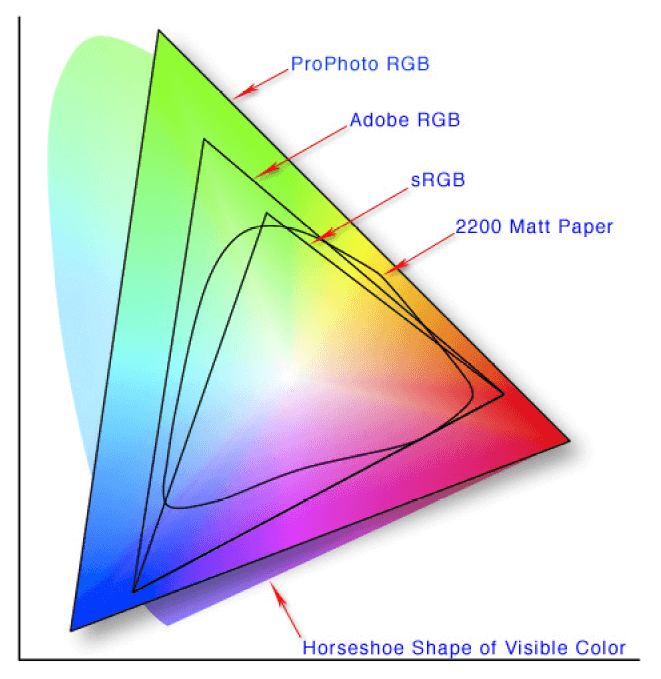
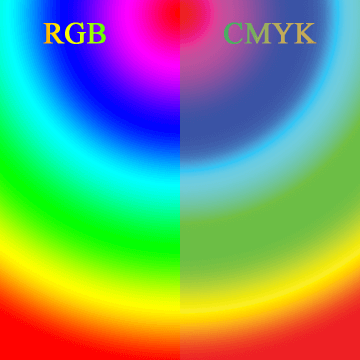

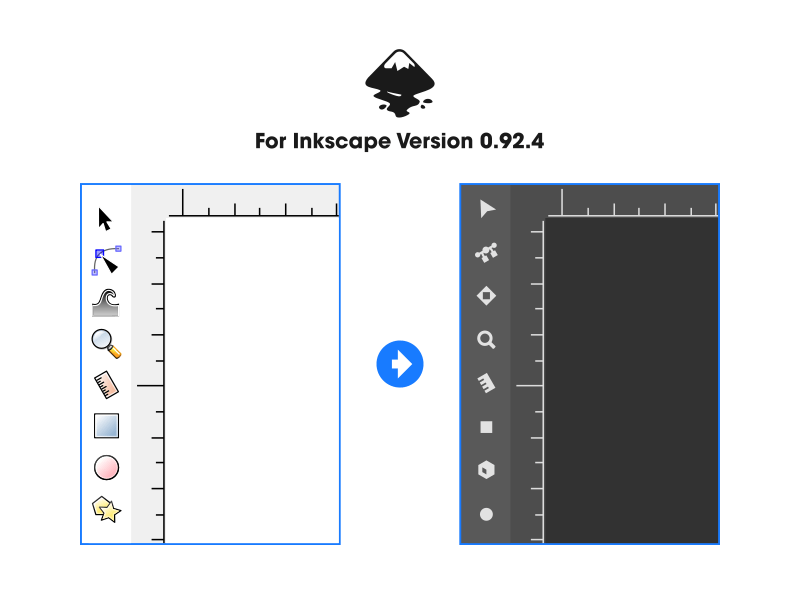


 If you want to increase the depth of the shape, you can simply create duplicate copies and stack them on top of each other…
 You can even stack the duplicates next to each other to make the design larger, as if it were a pattern…
 And with that we are finished!

 While you're creating your design make sure to note the position of each panel after its printed and folded.
This is very critical.
While you're creating your design make sure to note the position of each panel after its printed and folded.
This is very critical.

 It will bring up the following menu…
 Based on the example image, I used the values depicted in the screenshot above.
Next, flow your text into the rectangle by selecting both objects and going to Text > Flow into Frame and make your text white.
Based on the example image, I used the values depicted in the screenshot above.
Next, flow your text into the rectangle by selecting both objects and going to Text > Flow into Frame and make your text white.
 Once complete, you can change the color of your text and the background if you'd like.


 Once you have that menu on your screen, use your arrow keys to navigate down to the Maximize option and press Enter.
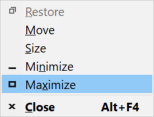 This should solve the problem.
Your Inkscape window that was previously off screen will now be maximized and in view on the monitor that you performed these steps using.
This should solve the problem.
Your Inkscape window that was previously off screen will now be maximized and in view on the monitor that you performed these steps using.

 Repeat this process until each of the 6 sides of the polygon have identical shapes placed on them.
You may want to use alternating colors in order to help you differentiate them.
Repeat this process until each of the 6 sides of the polygon have identical shapes placed on them.
You may want to use alternating colors in order to help you differentiate them.
 Delete the red polygon, bring the opacity of the remaining shapes back up to 100% and color them in however you'd like.

 Grab one of the color sides, duplicate it, and use it as a clipping path for the black shape that precedes it.
 Repeat this process with the remaining 5 shapes.
 The final step is to simply fill in the design with whatever information you'd like…
 And with that, our Inkscape infographic template is complete!
 Inkscape is a vector graphics application, much like Adobe Illustrator.
Vector graphics — unlike raster graphics — are not made of pixels; they're made of mathematical formulas that dictate all of the properties of the graphic on an X and Y axis, and these formulas are far more dynamic than a series of colored boxes.
They can be scaled infinitely without quality loss, and they retain far more information about the graphic, which allows you to edit it later on if need be.
Vector graphics applications are great for creating logos, icons for apps and websites, and cartoon illustrations.
Here's an example of what can be done with a vector graphics editor like Inkscape…
Inkscape is a vector graphics application, much like Adobe Illustrator.
Vector graphics — unlike raster graphics — are not made of pixels; they're made of mathematical formulas that dictate all of the properties of the graphic on an X and Y axis, and these formulas are far more dynamic than a series of colored boxes.
They can be scaled infinitely without quality loss, and they retain far more information about the graphic, which allows you to edit it later on if need be.
Vector graphics applications are great for creating logos, icons for apps and websites, and cartoon illustrations.
Here's an example of what can be done with a vector graphics editor like Inkscape…


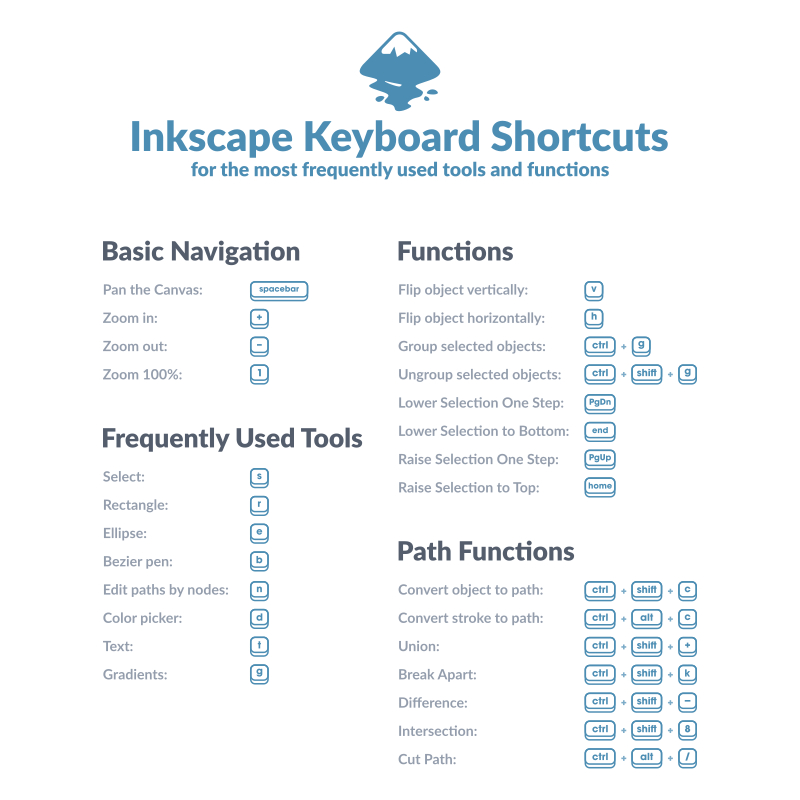


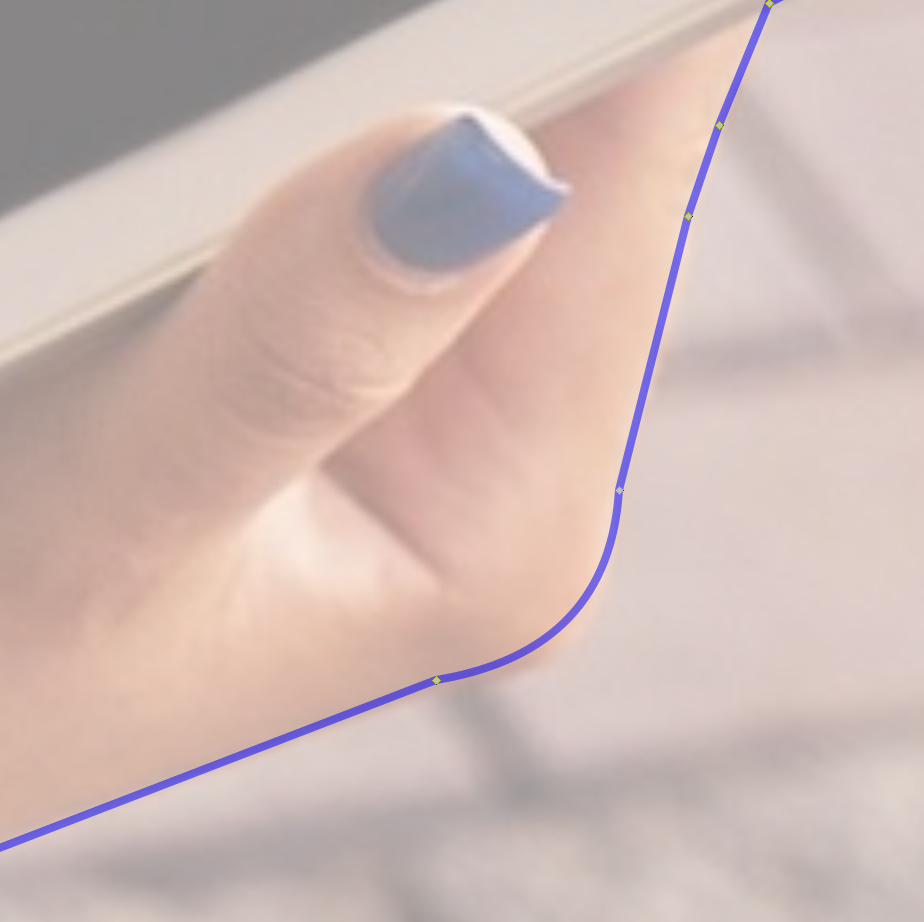 To further match the boundaries of your shape with that of your subject's, click on one of the nodes.
This will bring up handles that you can use to change the size and length of the curve.
To further match the boundaries of your shape with that of your subject's, click on one of the nodes.
This will bring up handles that you can use to change the size and length of the curve.
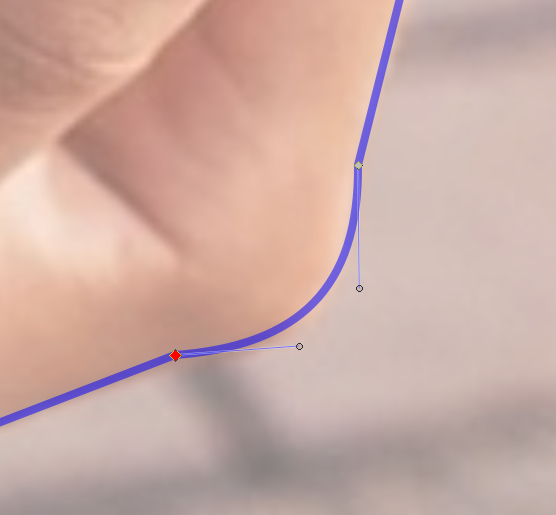


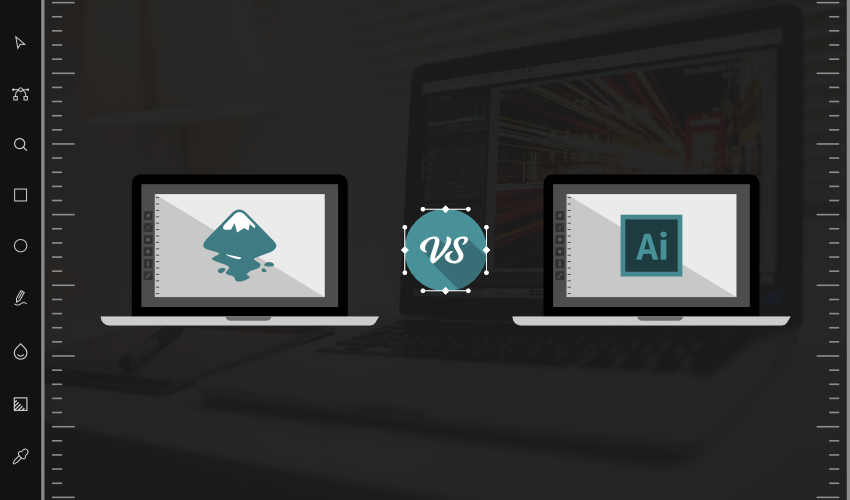


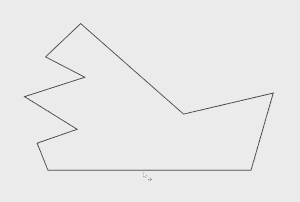 To do so, select multiple nodes with the Edit Paths By Nodes tool and navigate to the Align & Distribute menu.
You'll see a dedicated panel titled "Nodes" that allows you to align your nodes the same way you would align objects.
To do so, select multiple nodes with the Edit Paths By Nodes tool and navigate to the Align & Distribute menu.
You'll see a dedicated panel titled "Nodes" that allows you to align your nodes the same way you would align objects.
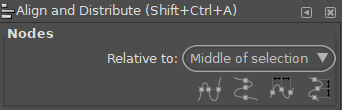 This can come in handy if you're trying to alter your objects so that they have some degree of symmetry.
 This is very useful because it allows you to select multiple objects with more precision than if you were to simply create a bounding box around them.
With a bounding box you have no choice but to select every object within the boundaries, even if they're objects you don't want to select.
Alt-clicking allows you to exclude those objects.
This is very useful because it allows you to select multiple objects with more precision than if you were to simply create a bounding box around them.
With a bounding box you have no choice but to select every object within the boundaries, even if they're objects you don't want to select.
Alt-clicking allows you to exclude those objects.
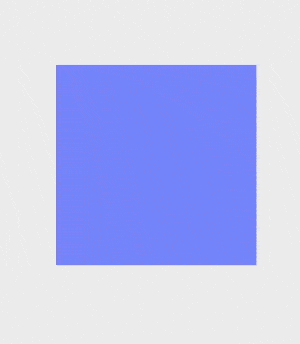 This is particularly useful for creating custom shapes with symmetry.
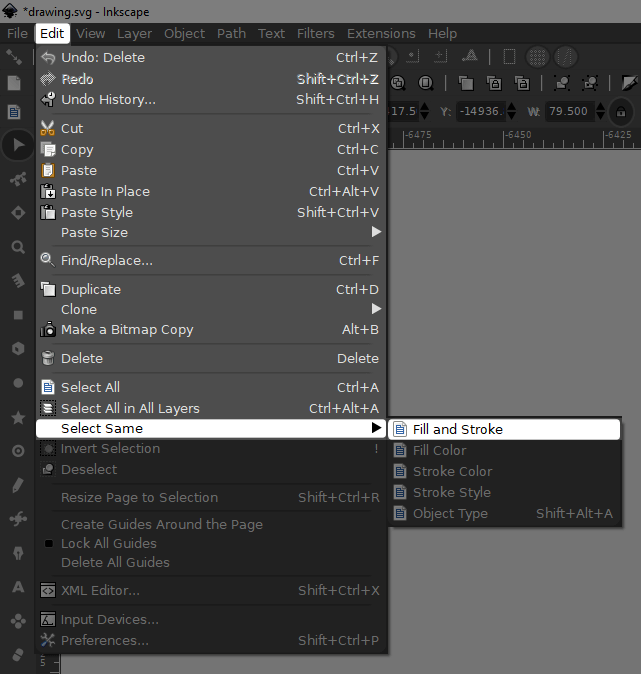 Inkscape will then select every other object on the canvas with the same fill and stroke color.
 You can also select objects by…
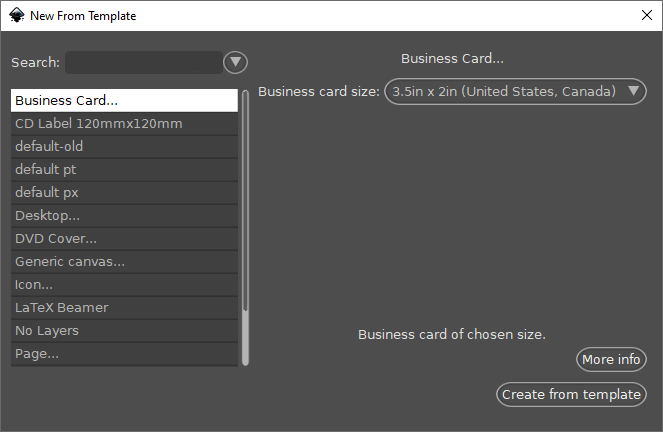 What you may not know is that you can manually create your own templates in SVG format and add them to this list by navigating to (C:) > Program Files > Inkscape > Share > Templates and pasting them in there.
And the next time you restart Inkscape your custom templates will populate in that list.
What you may not know is that you can manually create your own templates in SVG format and add them to this list by navigating to (C:) > Program Files > Inkscape > Share > Templates and pasting them in there.
And the next time you restart Inkscape your custom templates will populate in that list.
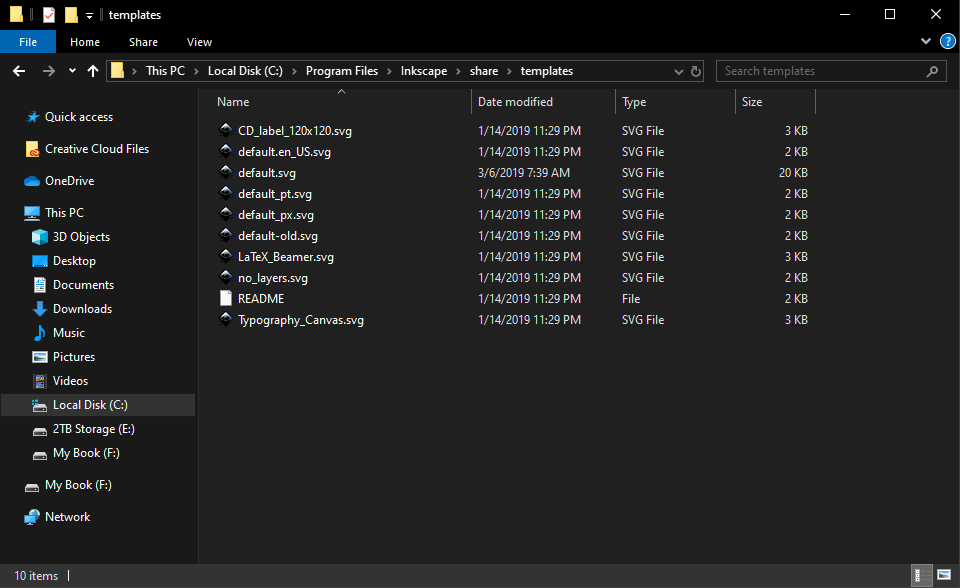 I've personally found this to be useful for creating templates for certain types of designs that I create frequently, like YouTube thumbnails and cover graphics for social media.
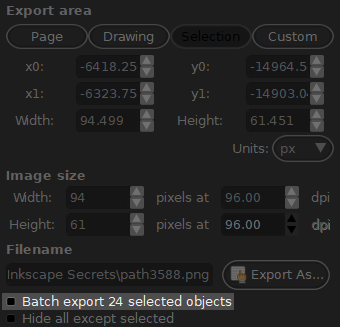 This is particularly useful for designing something like an app icon, where you need to generate the same design in many different sizes.
 Inkscape will then treat the Illustrator file like a PDF file when you go to open it.
This also works in reverse.
If someone requests an Illustrator file specifically, just save your work as a PDF document and change the name so that it ends in .ai.
Inkscape will then treat the Illustrator file like a PDF file when you go to open it.
This also works in reverse.
If someone requests an Illustrator file specifically, just save your work as a PDF document and change the name so that it ends in .ai.
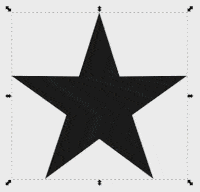
 Not only will Inkscape generate a raster copy of your selected design, but it will save a copy of it in whatever folder you currently have your work saved in.
 This is useful because vector graphics tend to retain more data than raster graphics, and they take up more disk space because of it.
This means that if you're working on a large, complex design with lots of vector objects, you may run into performance issues with your computer.
Converting your designs to bitmap can help mitigate that by freeing up system resources.
This is useful because vector graphics tend to retain more data than raster graphics, and they take up more disk space because of it.
This means that if you're working on a large, complex design with lots of vector objects, you may run into performance issues with your computer.
Converting your designs to bitmap can help mitigate that by freeing up system resources.
 What you may not know though, is that you can manually adjust the angle of the guide by double-clicking it, which will bring up a settings menu.
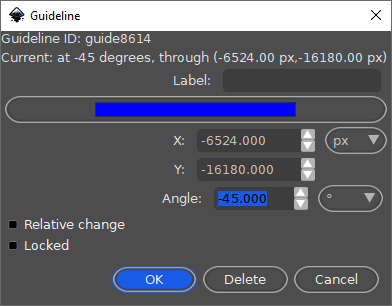 This will allow you to adjust some of the properties of that guide, like its color, position on the canvas, and its angle.
This can prove useful when designing geometric shapes that need to be drawn at specific angles.
This will allow you to adjust some of the properties of that guide, like its color, position on the canvas, and its angle.
This can prove useful when designing geometric shapes that need to be drawn at specific angles.
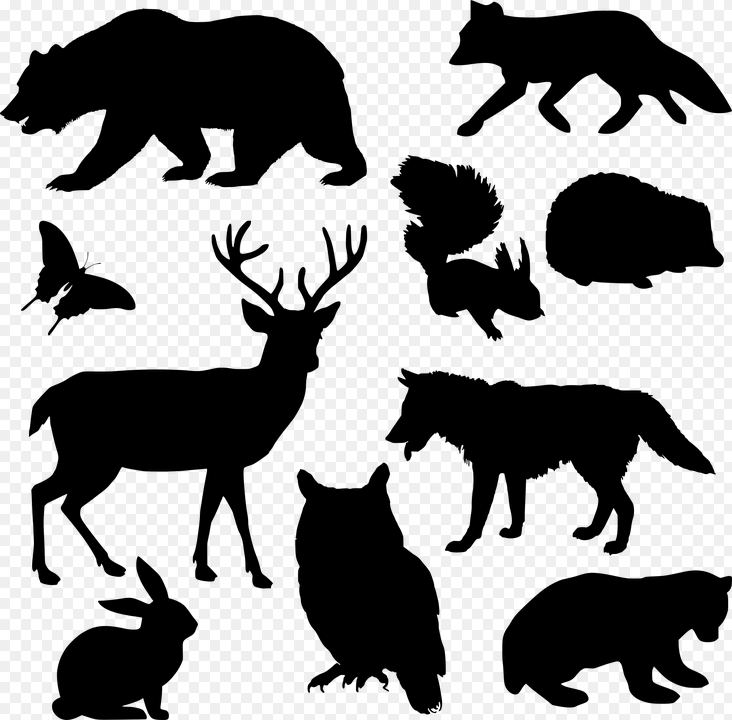
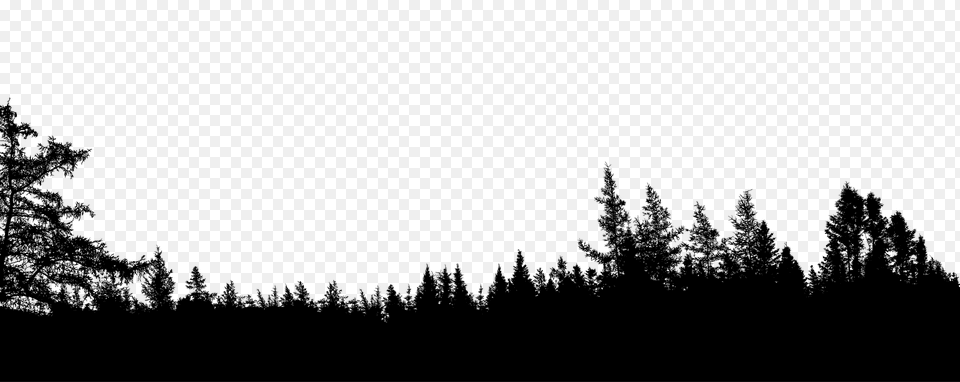 Make sure to download the SVG file when you're on the download page, otherwise the techniques will be using in this tutorial won't work.
Once you've downloaded the two graphics, import them into Inkscape, give them each different colors, bring their opacity down roughly in half, then place them over each other as depicted below.
Make sure to download the SVG file when you're on the download page, otherwise the techniques will be using in this tutorial won't work.
Once you've downloaded the two graphics, import them into Inkscape, give them each different colors, bring their opacity down roughly in half, then place them over each other as depicted below.
 We'll be taking an intersecting sample of these two objects, so make sure to position them wherever you'd like that sample to be taken.
In order to generate an intersecting sample we'll be using the Intersection path function.
However, if you execute this function with the graphic as it you will end up with the tops of the trees being excluded from the design.
We want those trees to be included, so we're going to manually draw an object going around them and through the bear.
We'll be taking an intersecting sample of these two objects, so make sure to position them wherever you'd like that sample to be taken.
In order to generate an intersecting sample we'll be using the Intersection path function.
However, if you execute this function with the graphic as it you will end up with the tops of the trees being excluded from the design.
We want those trees to be included, so we're going to manually draw an object going around them and through the bear.
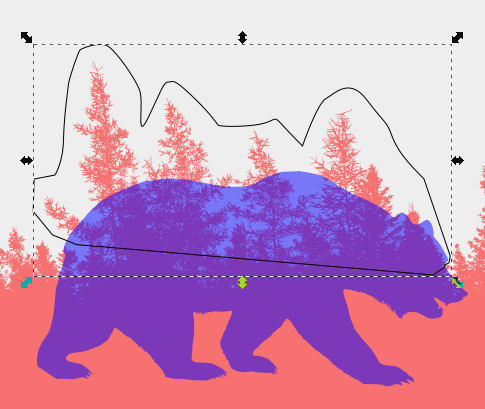 Now we need to unify that newly-created shape with the bear, so select both of them and navigate to Path > Union.
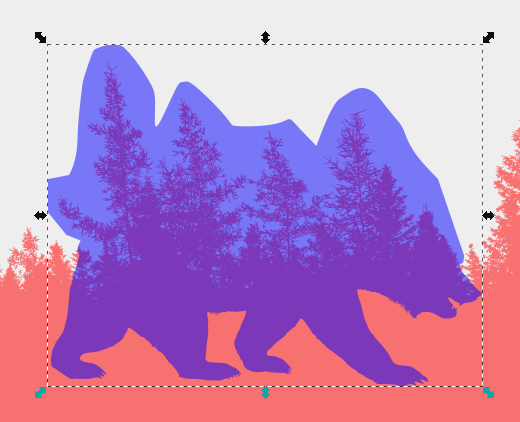 Now we can generate our intersection sample.
To do this, select both the bear and the trees, then navigate to Path > Intersection.
Now we can generate our intersection sample.
To do this, select both the bear and the trees, then navigate to Path > Intersection.
 At this point the design is pretty much finished.
We just have to bring the opacity back up to 100%, fill it with whatever color you'd like, then add some text.
At this point the design is pretty much finished.
We just have to bring the opacity back up to 100%, fill it with whatever color you'd like, then add some text.
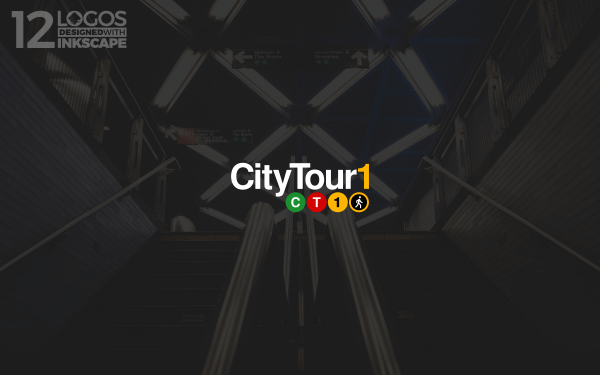 This logo is for a guided walking tour in New York City.
The design was inspired by the lettering and style of the signs on the subways.
The walking figure in the bottom-right of the icon was inspired by the stop/walk street signals, which is a perfect fit since this is a walking tour.
This logo is for a guided walking tour in New York City.
The design was inspired by the lettering and style of the signs on the subways.
The walking figure in the bottom-right of the icon was inspired by the stop/walk street signals, which is a perfect fit since this is a walking tour.
 This logo is for a medieval-themed board game.
I took medieval-style font and added some character to it with perspective and an arch.
And if you look closely, you'll see that the F in "Of" is a sword.
This sword icon was later on used as a standalone icon variation of the logo.
This logo is for a medieval-themed board game.
I took medieval-style font and added some character to it with perspective and an arch.
And if you look closely, you'll see that the F in "Of" is a sword.
This sword icon was later on used as a standalone icon variation of the logo.
 This design was for a healthy cafe that didn't have a particular theme or type of food they serve.
It's just a general cafe, so it was challenging to come up with a fitting design for it.
In the end I went with a simple depiction of a wordmark design over a cutting board, and with the I in "Simply" represented by a knife.
I think it has a modern, simple, and casual look that is fitting for a healthy cafe.
This design was for a healthy cafe that didn't have a particular theme or type of food they serve.
It's just a general cafe, so it was challenging to come up with a fitting design for it.
In the end I went with a simple depiction of a wordmark design over a cutting board, and with the I in "Simply" represented by a knife.
I think it has a modern, simple, and casual look that is fitting for a healthy cafe.
 Sticky Site Content is a writing service.
The overarching theme of this writing service is that they specialize in writing content for the web that prevents users from bouncing (or leaving the site without clicking on anything else,) so they essentially "stick" around.
My approach for this logo was to place a subtle thumbtack (for "sticking") within the negative space of the letter S and use that as an icon.
For the fonts I used a pairing of Acre and Dynalight — one of my favorite duos that I listed in an article about logo font pairings I wrote last year.
I was so happy with how this design came out that I featured it on my portfolio.
Sticky Site Content is a writing service.
The overarching theme of this writing service is that they specialize in writing content for the web that prevents users from bouncing (or leaving the site without clicking on anything else,) so they essentially "stick" around.
My approach for this logo was to place a subtle thumbtack (for "sticking") within the negative space of the letter S and use that as an icon.
For the fonts I used a pairing of Acre and Dynalight — one of my favorite duos that I listed in an article about logo font pairings I wrote last year.
I was so happy with how this design came out that I featured it on my portfolio.
 The goal for this logo was to create a retro look, but not just any retro look.
It had to be specific to the 60's.
The client wanted it to look like something you would see before an old television show.
In the end I went with an iconic mark that combines the K and 5 and extends into a surrounding emblem to make it look unique and distinguished.
I had to look at a lot of examples of design from this era to really know how to approach this one.
The goal for this logo was to create a retro look, but not just any retro look.
It had to be specific to the 60's.
The client wanted it to look like something you would see before an old television show.
In the end I went with an iconic mark that combines the K and 5 and extends into a surrounding emblem to make it look unique and distinguished.
I had to look at a lot of examples of design from this era to really know how to approach this one.
 This logo was for a local client who wanted something Philadelphia-related.
I created an emblem-style design with a text banner going over it and the Philadelphia skyline in the background.
The client ended up not using this design, so it's available for sale if interested.
This logo was for a local client who wanted something Philadelphia-related.
I created an emblem-style design with a text banner going over it and the Philadelphia skyline in the background.
The client ended up not using this design, so it's available for sale if interested.
 This design was meant for a SAAS business.
The name is pretty straightforward in suggesting what should be depicted in the logo — a panda and a beehive, so that's what I designed.
This is a simple panda holding a beehive.
I gave it a casual, whimsical style.
This design was meant for a SAAS business.
The name is pretty straightforward in suggesting what should be depicted in the logo — a panda and a beehive, so that's what I designed.
This is a simple panda holding a beehive.
I gave it a casual, whimsical style.
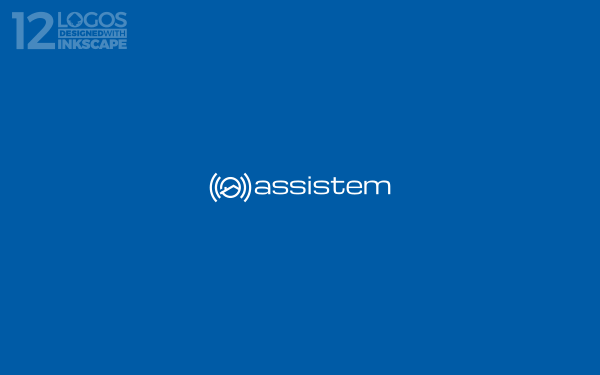 This logo is for an S.O.S.
device for the elderly.
It's a single button that when pressed it connects you with a relative or loved one.
The name is a play on "assistance" and "stem", which means voice in Dutch.
The sentiment this client wanted me to communicate with his logo is "the voice that leads you back home," so I designed an icon that depicts a simple house with sound waves coming from it.
I paired it with Michroma — a really nice technological-style font.
I added this one to my portfolio as well.
This logo is for an S.O.S.
device for the elderly.
It's a single button that when pressed it connects you with a relative or loved one.
The name is a play on "assistance" and "stem", which means voice in Dutch.
The sentiment this client wanted me to communicate with his logo is "the voice that leads you back home," so I designed an icon that depicts a simple house with sound waves coming from it.
I paired it with Michroma — a really nice technological-style font.
I added this one to my portfolio as well.
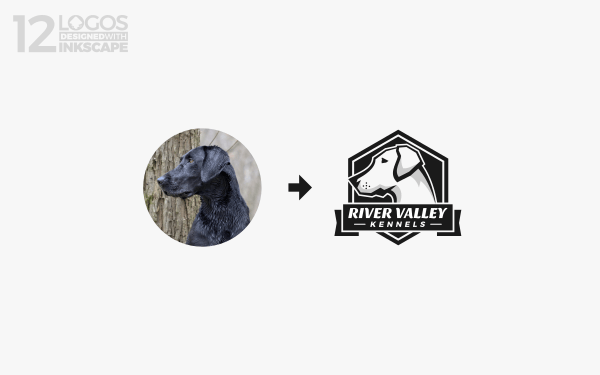 Logos can sometimes start off as a photograph.
This client wanted me to use a picture of his dog as inspiration for his logo, which is exactly what I did.
I've actually gotten a lot of clients wanting me to create logos for them using their photographs ever since I made a tutorial about doing so with GIMP last year.
Logos can sometimes start off as a photograph.
This client wanted me to use a picture of his dog as inspiration for his logo, which is exactly what I did.
I've actually gotten a lot of clients wanting me to create logos for them using their photographs ever since I made a tutorial about doing so with GIMP last year.
 GDQuest is an educational platform for learning about game design with Open Source software.
They have a pretty big YouTube channel as well (some of you may be subscribers yourselves!) Last year I had the honor of redesigning their logo.
My approach was to depict G and D as gears to represent creating something.
I made the typography and colors have a fun, playful style suitable for gaming.
GDQuest is an educational platform for learning about game design with Open Source software.
They have a pretty big YouTube channel as well (some of you may be subscribers yourselves!) Last year I had the honor of redesigning their logo.
My approach was to depict G and D as gears to represent creating something.
I made the typography and colors have a fun, playful style suitable for gaming.
 This is one of my favorite professional logos designed with Inkscape because of its use of negative space.
I've always been a big fan of using negative space within logos, and there was a perfect opportunity for it here.
The goal for this logo was to depict something relating to both farming and science, so I went with a microscope that has a chicken sitting in some grass within the negative space.
The client ended up selecting a different design, so this one is available for sale if interested.
This is one of my favorite professional logos designed with Inkscape because of its use of negative space.
I've always been a big fan of using negative space within logos, and there was a perfect opportunity for it here.
The goal for this logo was to depict something relating to both farming and science, so I went with a microscope that has a chicken sitting in some grass within the negative space.
The client ended up selecting a different design, so this one is available for sale if interested.
 The goal for this design was to depict something industrial and vintage with a super hero-like theme.
I ended up creating a simple letter A with a superhero mask overlaying it to represent the arm of the A.
Pretty straightforward.
The client ended up not using this design, so it's available if you're interested.
That should do it for this year's edition of professional logos designed with Inkscape.
Don't let anyone tell you that open source software can't produce professional results!
The goal for this design was to depict something industrial and vintage with a super hero-like theme.
I ended up creating a simple letter A with a superhero mask overlaying it to represent the arm of the A.
Pretty straightforward.
The client ended up not using this design, so it's available if you're interested.
That should do it for this year's edition of professional logos designed with Inkscape.
Don't let anyone tell you that open source software can't produce professional results!
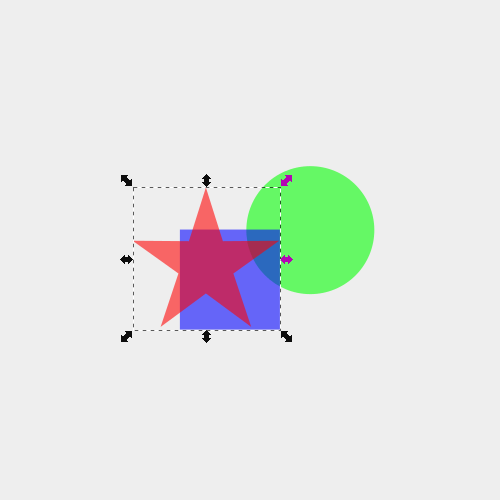 Path functions (like union) only work on individual objects that are paths.
They will not work on objects that are grouped together, so make sure to ungroup your objects by pressing control + shift + g (you may have to do this a few times to completely ungroup everything) then try again.
Path functions (like union) only work on individual objects that are paths.
They will not work on objects that are grouped together, so make sure to ungroup your objects by pressing control + shift + g (you may have to do this a few times to completely ungroup everything) then try again.
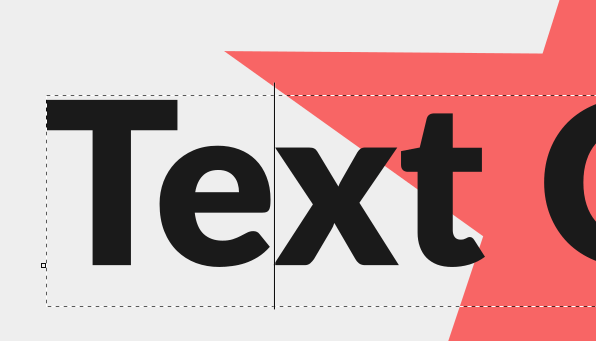 However, if you have converted your text object to a path then the path functions will not work.
The reason for this is because when you convert a text object to a path, the result is a grouping of individual letters, and as I've outlined above, path functions do not work on groups of objects.
So the fix for this is to simply ungroup your text object.
However, if you have converted your text object to a path then the path functions will not work.
The reason for this is because when you convert a text object to a path, the result is a grouping of individual letters, and as I've outlined above, path functions do not work on groups of objects.
So the fix for this is to simply ungroup your text object.
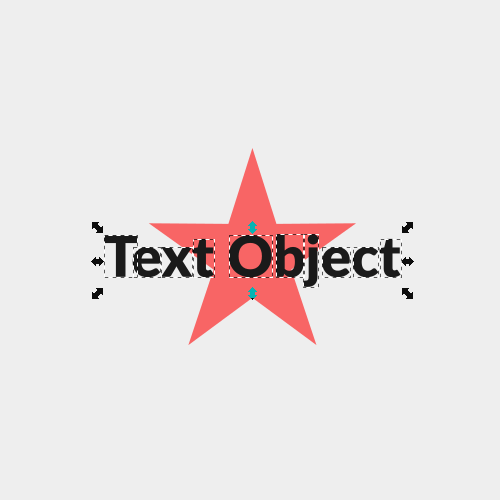
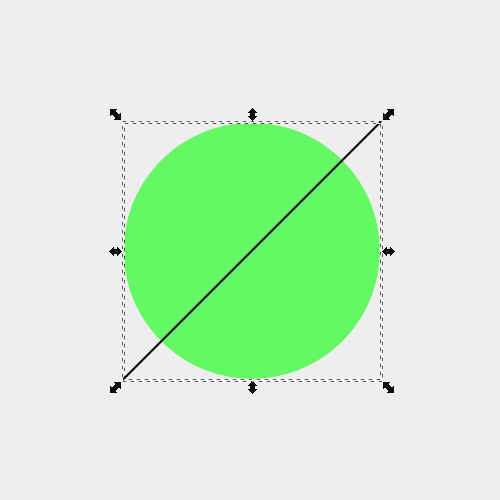 Since there's no fill area of the black line, there's nothing there to merge with the green circle as far as Inkscape is concerned.
If you unify these two objects together, you're just going to end up with a green circle.
If you want to unify the line and the circle together, you'll first have to convert the stroke to a path by selecting it and navigating to Path > Stroke to Path.
When you do this, the black line essentially becomes the fill area and you should be able to unify them now.
Since there's no fill area of the black line, there's nothing there to merge with the green circle as far as Inkscape is concerned.
If you unify these two objects together, you're just going to end up with a green circle.
If you want to unify the line and the circle together, you'll first have to convert the stroke to a path by selecting it and navigating to Path > Stroke to Path.
When you do this, the black line essentially becomes the fill area and you should be able to unify them now.
 A clipped object is not a path, so if you try performing path functions on a clipped object it is not going to work the way you expect it to work.
As you can see in the example above, the result of unifying the clipped blue star with the green circle is that Inkscape referenced the blue square, even though it wasn't visible any longer.
You simply cannot unify clipped objects in Inkscape.
A clipped object is not a path, so if you try performing path functions on a clipped object it is not going to work the way you expect it to work.
As you can see in the example above, the result of unifying the clipped blue star with the green circle is that Inkscape referenced the blue square, even though it wasn't visible any longer.
You simply cannot unify clipped objects in Inkscape.
 In the example above I applied a raster image to a star to give it a grunge texture (I have a tutorial on that here if you want to check that out.)
If I were to unify these objects together, the result would be a green combination of both shapes, but without the texture.
This is because you cannot perform path functions on masked objects.
If I wanted to apply this texture to a combination of the two shapes, I'd need to unify then together first then apply the text.
In the example above I applied a raster image to a star to give it a grunge texture (I have a tutorial on that here if you want to check that out.)
If I were to unify these objects together, the result would be a green combination of both shapes, but without the texture.
This is because you cannot perform path functions on masked objects.
If I wanted to apply this texture to a combination of the two shapes, I'd need to unify then together first then apply the text.
 You theoretically can unify objects that have filters so long as they're paths.
However, the union function may not work as you expected.
This is because takes the properties of the lowest object and applies it to the new unified object.
So if I were to unify the two objects depicted above, the result would be a green combination of the circle and the square.
If I wanted the result to be a combination of the circle and the square with the filter applied, I would need to position the square beneath the circle.
You theoretically can unify objects that have filters so long as they're paths.
However, the union function may not work as you expected.
This is because takes the properties of the lowest object and applies it to the new unified object.
So if I were to unify the two objects depicted above, the result would be a green combination of the circle and the square.
If I wanted the result to be a combination of the circle and the square with the filter applied, I would need to position the square beneath the circle.
 My goal is to cut a hole in the red square using the blue star so that there's a star-shaped hole in the square with transparency/negative space showing through.
I placed both objects on a checkerboard pattern to help illustrate where the negative space (the "hole") will be.
My goal is to cut a hole in the red square using the blue star so that there's a star-shaped hole in the square with transparency/negative space showing through.
I placed both objects on a checkerboard pattern to help illustrate where the negative space (the "hole") will be.
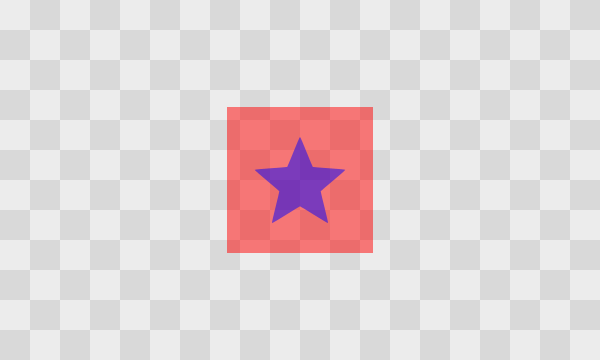 Now, select both objects.
You can select both objects with the Select tool by holding Shift and clicking on each.
You can also select them by clicking and dragging to create a bounding box that encapsulates them both.
With both objects selected, navigate to Path > Difference.
Now, select both objects.
You can select both objects with the Select tool by holding Shift and clicking on each.
You can also select them by clicking and dragging to create a bounding box that encapsulates them both.
With both objects selected, navigate to Path > Difference.
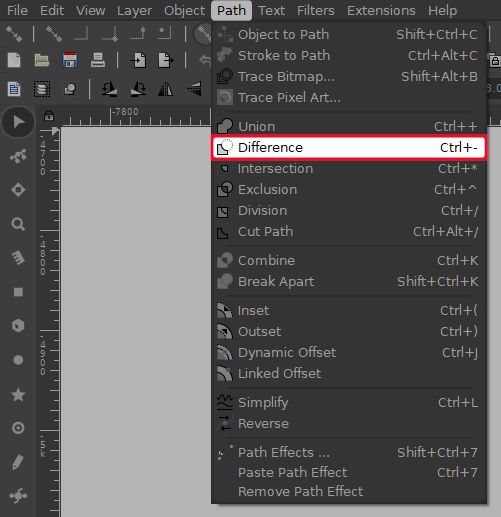 If done correctly, you should have successfully cut a hole in your object, as indicated by my example below.


 Now we must subtract those areas from the overall outline we originally created.
To do that, select all of the objects representing the negative space areas by holding Shift and clicking them, then unify them together by going Path -> Union.
Now select both the unified negative space objects and the main outline by holding Shift and clicking them, then navigate to Path -> Difference.
This will subtract the negative space areas from the main outline, although nothing will visibly change on your screen just yet.
Now we must subtract those areas from the overall outline we originally created.
To do that, select all of the objects representing the negative space areas by holding Shift and clicking them, then unify them together by going Path -> Union.
Now select both the unified negative space objects and the main outline by holding Shift and clicking them, then navigate to Path -> Difference.
This will subtract the negative space areas from the main outline, although nothing will visibly change on your screen just yet.
 Select both the outline and your photo, then navigate to Object -> Clip -> Set.
This will tell Inkscape to only display areas of the photo where the outline exists, and all other areas will be excluded and become transparent.
Select both the outline and your photo, then navigate to Object -> Clip -> Set.
This will tell Inkscape to only display areas of the photo where the outline exists, and all other areas will be excluded and become transparent.
 I added a checkerboard pattern to the background of my photo to demonstrate that we have successfully cropped our subject.
And that is how to crop a photo with Inkscape!
If you have any questions please leave a comment below.
As always, thanks for watching!
I added a checkerboard pattern to the background of my photo to demonstrate that we have successfully cropped our subject.
And that is how to crop a photo with Inkscape!
If you have any questions please leave a comment below.
As always, thanks for watching!
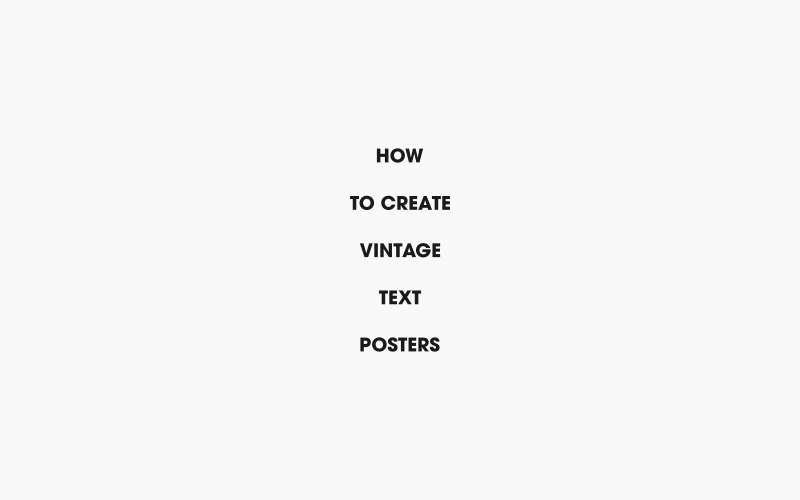 Then we will apply the fonts listed in the resources section above.
I'll be using League Gothic for all of the text objects except the middle text object ("VINTAGE") which we will use Zabatana for.
Then we will apply the fonts listed in the resources section above.
I'll be using League Gothic for all of the text objects except the middle text object ("VINTAGE") which we will use Zabatana for.
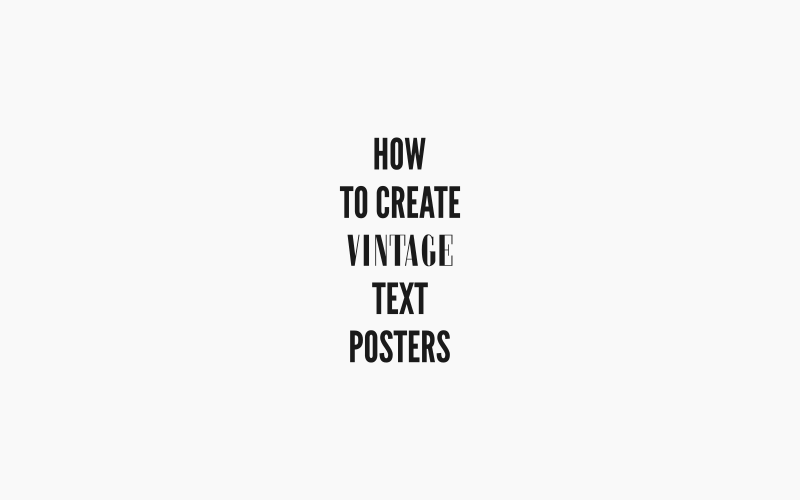 Next we're going to size up all of the text objects so that they're all equal in width, except for the middle text which will be fairly larger.
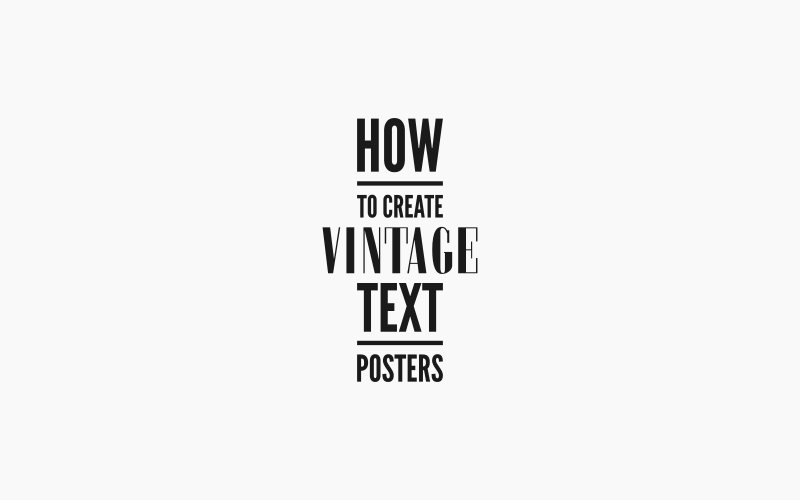 Now we're going to create a rectangle over the middle text object that will represent a banner.
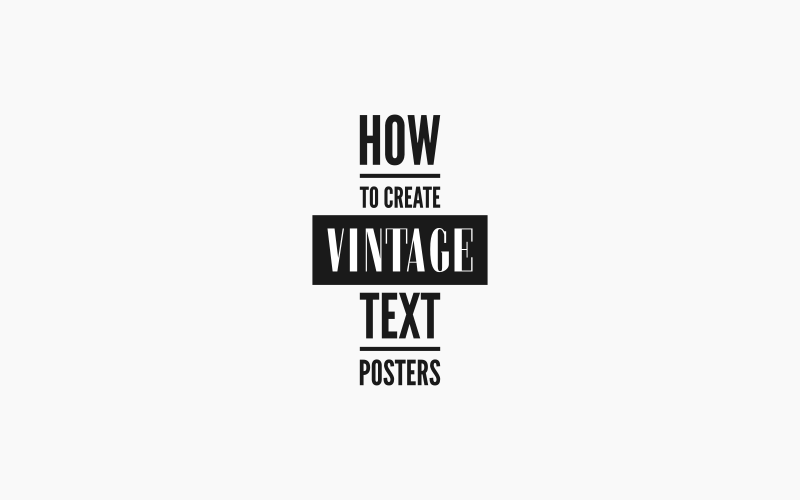 We'll add some fish tails to the banner and create a slightly larger red offset.
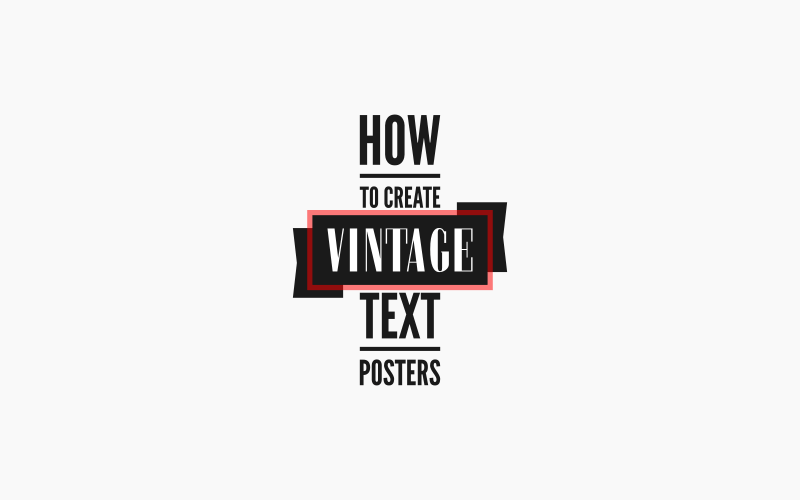 Now we'll use that red offset to subtract from the fish tails of the ribbon.
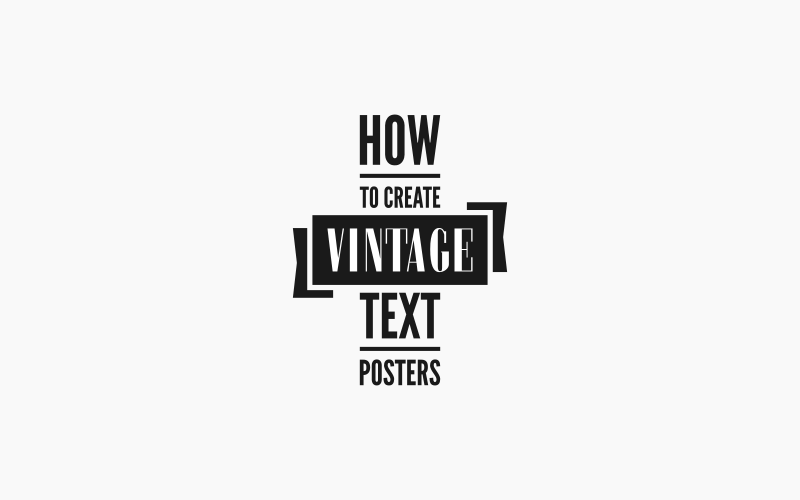 Next we're going to shear the text up slightly.
 Then we'll create a border going around the outside of the stacked text.
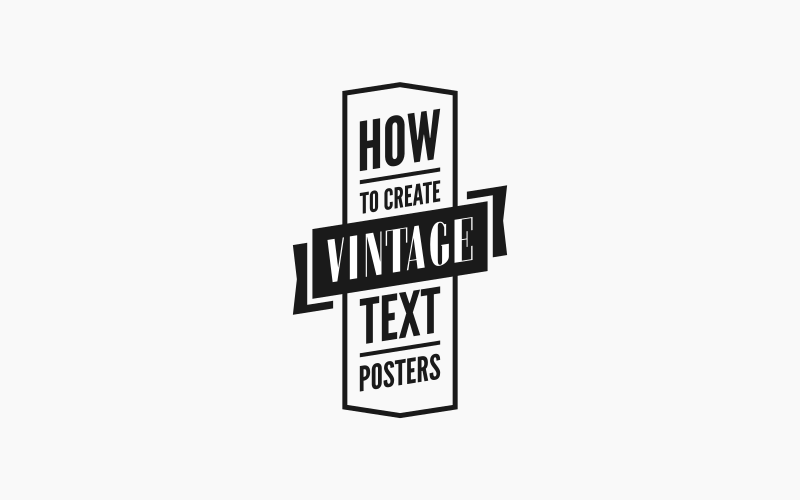 We'll add another slightly smaller outer border as well.
 And then we'll add little accent pieces to the top and bottom corners of the border.
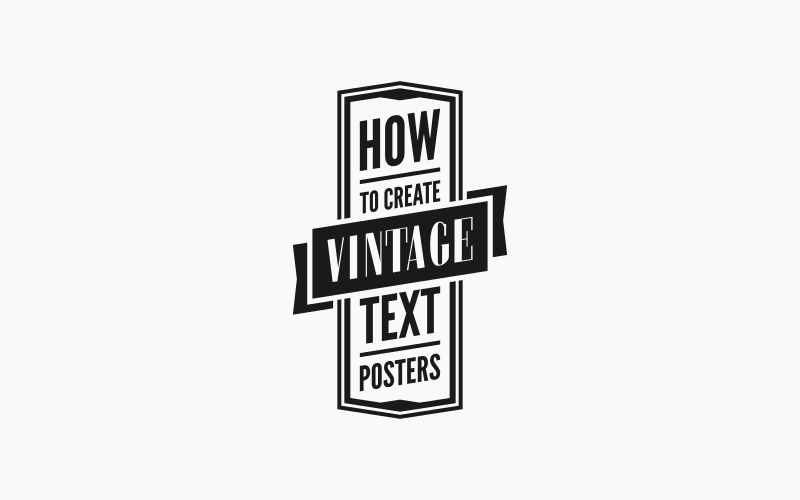 Now we can go ahead and add some color.
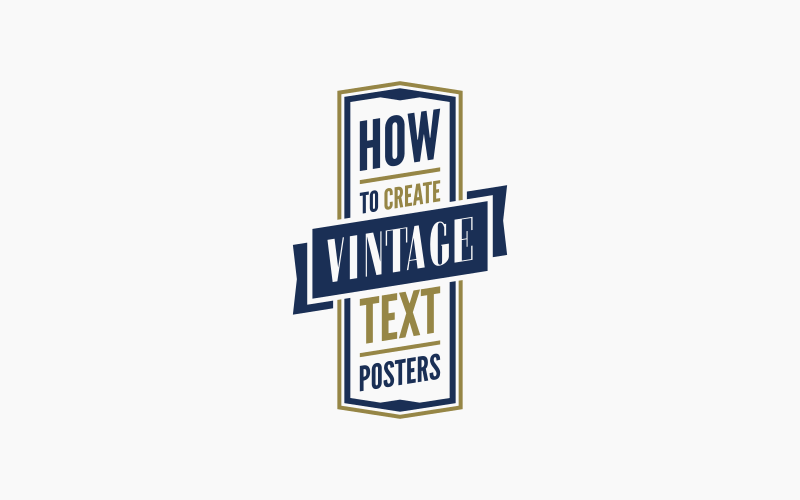 And the final step will be to apply our grunge texture as a mask.
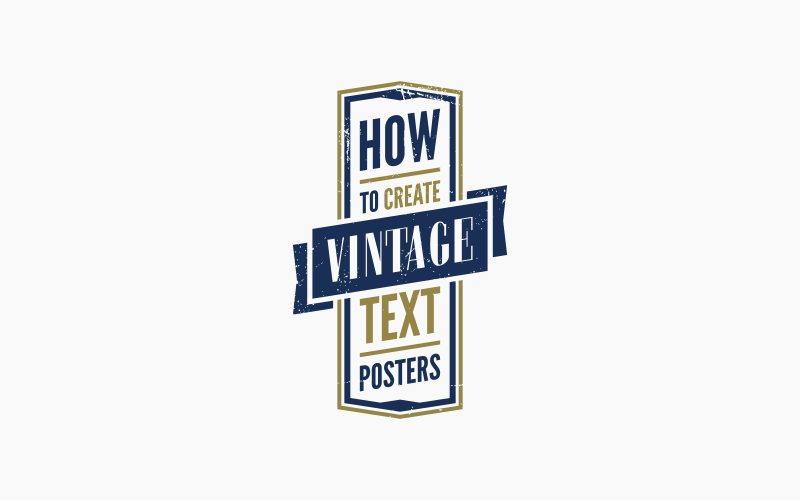 And that should do it for our design.
That is is how you can create vintage text posters with Inkscape.
If you have any questions simply leave a comment below.
As always, thanks for watching!
And that should do it for our design.
That is is how you can create vintage text posters with Inkscape.
If you have any questions simply leave a comment below.
As always, thanks for watching!
 You'll notice that it's nearly impossible to select this invisible object.
The only way to do so is to press control + a on the keyboard, which selects every object on the canvas (including the invisible object.) Or you can also click and drag a large selection over the general area where the circle was drawn, which should select it.
You'll notice that it's nearly impossible to select this invisible object.
The only way to do so is to press control + a on the keyboard, which selects every object on the canvas (including the invisible object.) Or you can also click and drag a large selection over the general area where the circle was drawn, which should select it.
 If your fill and stroke indicators read "None" for both, then that's probably why your objects aren't visible.
Simply click on any color you'd like in the color selector and your object will become visible.
If not, read on.
If your fill and stroke indicators read "None" for both, then that's probably why your objects aren't visible.
Simply click on any color you'd like in the color selector and your object will become visible.
If not, read on.
 If that's the case then you'll have to open the Fill & Stroke Menu by pressing control + shift + f on your keyboard.
Click on the Fill tab, then click on the HSL tab and have look at the last row that reads A: (shorthand for alpha channel.)
If that's the case then you'll have to open the Fill & Stroke Menu by pressing control + shift + f on your keyboard.
Click on the Fill tab, then click on the HSL tab and have look at the last row that reads A: (shorthand for alpha channel.)
 If that alpha channel is set to 0 then that would explain why your objects aren't visible.
Click and drag it to the right to bring up the visibility, or simply type 255 into the box where it currently reads 0.
If that alpha channel is set to 0 then that would explain why your objects aren't visible.
Click and drag it to the right to bring up the visibility, or simply type 255 into the box where it currently reads 0.
 If your object's opacity is set to 0% like mine is in the screenshot above, simply click and drag to bring the opacity up to 100% and your object should become visible.
If these written instructions aren't clear enough then I would suggest watching the video at the top of the page.
It's only a few minutes.
If you've checked all 3 of these steps and your objects aren't visible in Inkscape still then leave a comment below and I'll see if I can help.
As always, thanks for watching!
If your object's opacity is set to 0% like mine is in the screenshot above, simply click and drag to bring the opacity up to 100% and your object should become visible.
If these written instructions aren't clear enough then I would suggest watching the video at the top of the page.
It's only a few minutes.
If you've checked all 3 of these steps and your objects aren't visible in Inkscape still then leave a comment below and I'll see if I can help.
As always, thanks for watching!
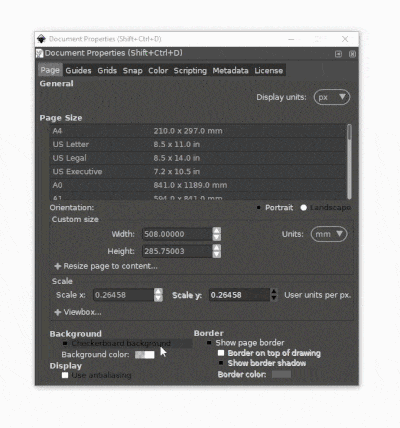 It's important to note that your SVG background will continue to be transparent despite the color fill as long as the A column (which represents the transparency of the color) remains at 0.
If you'd like the document to actually have that background color (even on exports) then you can bring that column up from 0 to 100.
And that should do it for working with backgrounds in Inkscape.
If you have any questions that weren't addressed in this post just leave a comment below and I'll write back if I can help.
It's important to note that your SVG background will continue to be transparent despite the color fill as long as the A column (which represents the transparency of the color) remains at 0.
If you'd like the document to actually have that background color (even on exports) then you can bring that column up from 0 to 100.
And that should do it for working with backgrounds in Inkscape.
If you have any questions that weren't addressed in this post just leave a comment below and I'll write back if I can help.
 To wrap the text around a circle we will be using the put on path feature.
Simply select both the text and the circle, either by shift-clicking them or clicking and dragging a selection over both (using the Select tool,) then navigate to Text > Put on Path in the menu.
This will place your text around the outside edge of the circle…
To wrap the text around a circle we will be using the put on path feature.
Simply select both the text and the circle, either by shift-clicking them or clicking and dragging a selection over both (using the Select tool,) then navigate to Text > Put on Path in the menu.
This will place your text around the outside edge of the circle…
 You can change the position of the text on the circle by rotating just the circle.
Make sure you only rotate the circle though! If you try to rotate the text itself it will remove it from its position on the path.
You can change the position of the text on the circle by rotating just the circle.
Make sure you only rotate the circle though! If you try to rotate the text itself it will remove it from its position on the path.
 If you'd like to alter how much of the circle's circumference the text occupies, you can scale the circle up or down accordingly.
 And that is how you can wrap text around a circle with Inkscape! Once you are finished, simply click on the text and convert it to a path by going to Path > Object To Path.
This will finalize the text around the circle so that it doesn't get lost later on when designing further.
And that is how you can wrap text around a circle with Inkscape! Once you are finished, simply click on the text and convert it to a path by going to Path > Object To Path.
This will finalize the text around the circle so that it doesn't get lost later on when designing further.
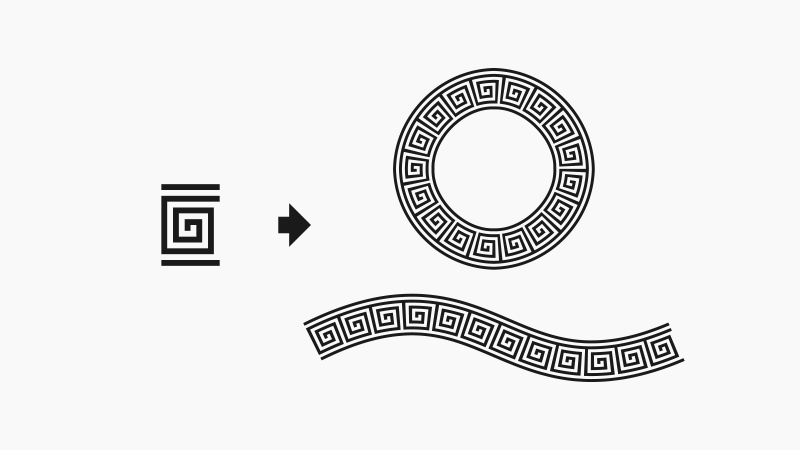 The first thing we need to do is start out with an object.
It can be any object you want — a circle, a square, stars, letters, etc.
For this tutorial I'll be using the following design because I think it makes for a neat pattern when repeated.
The first thing we need to do is start out with an object.
It can be any object you want — a circle, a square, stars, letters, etc.
For this tutorial I'll be using the following design because I think it makes for a neat pattern when repeated.
 Copy the object to your clipboard by selecting it and pressing control + c on your keyboard.
Then, create the path that you'd like to repeat it along.
For this example I'll be using a circle.
Copy the object to your clipboard by selecting it and pressing control + c on your keyboard.
Then, create the path that you'd like to repeat it along.
For this example I'll be using a circle.
 Select the circle then navigate to Path -> Path Effects and choose Pattern Along Path from the drop down menu and click Add.
Nothing will happen to your design just yet, but the Pattern Along Path menu should populate.
In the menu, select "Repeated, stretched" from the drop down menu, then click the lock icon on the right hand side that reads "link" when you hover your cursor over it.
Select the circle then navigate to Path -> Path Effects and choose Pattern Along Path from the drop down menu and click Add.
Nothing will happen to your design just yet, but the Pattern Along Path menu should populate.
In the menu, select "Repeated, stretched" from the drop down menu, then click the lock icon on the right hand side that reads "link" when you hover your cursor over it.
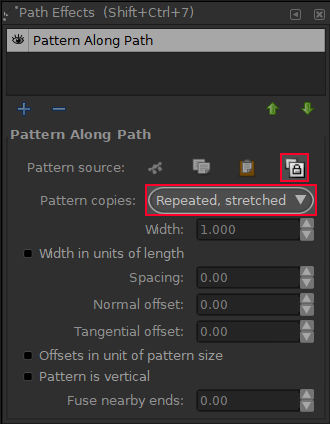 Once you click the link button, it will tell Inkscape to take whatever you have copied to your clipboard and wrap copies of it around your selected path…
 This can work with any path you'd like! Here's how it looks applied to a wavy line…
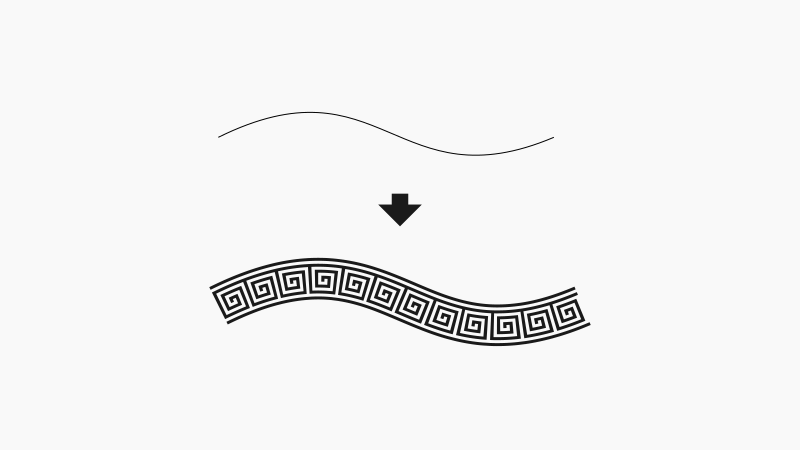 And there's a lot more that the pattern along path feature can do, like add spaces between each object, stretch out a single object rather than repeat it, etc.
I would recommend you play around with it a bit and let your creativity run wild!
And there's a lot more that the pattern along path feature can do, like add spaces between each object, stretch out a single object rather than repeat it, etc.
I would recommend you play around with it a bit and let your creativity run wild!
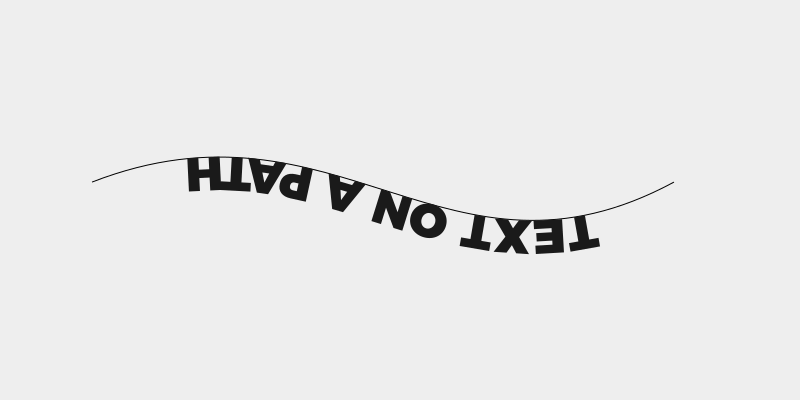 We want the text to be on top of the path rather than underneath it, correct? The reason Inkscape is displaying the text upside down is based on the direction of the path that it's placed on.
Every path in Inkscape has a direction, even though it isn't visually evident.
It has a starting point and an end point.
You can read more about paths here.
When placing text on a path, Inkscape references the start point of the path to determine where to place the text.
So if your text on a path is upside down, the solution is to reverse the direction of the path using the Reverse function.
Select the path that the text is on and navigate to Path -> Reverse.
Make sure that you have the path selected; not the text.
This is a common mistake I see a lot of newbies make.
We want the text to be on top of the path rather than underneath it, correct? The reason Inkscape is displaying the text upside down is based on the direction of the path that it's placed on.
Every path in Inkscape has a direction, even though it isn't visually evident.
It has a starting point and an end point.
You can read more about paths here.
When placing text on a path, Inkscape references the start point of the path to determine where to place the text.
So if your text on a path is upside down, the solution is to reverse the direction of the path using the Reverse function.
Select the path that the text is on and navigate to Path -> Reverse.
Make sure that you have the path selected; not the text.
This is a common mistake I see a lot of newbies make.
 Reversing the path will flip the start and end points of your path, which should also flip your text from upside down to right side up…
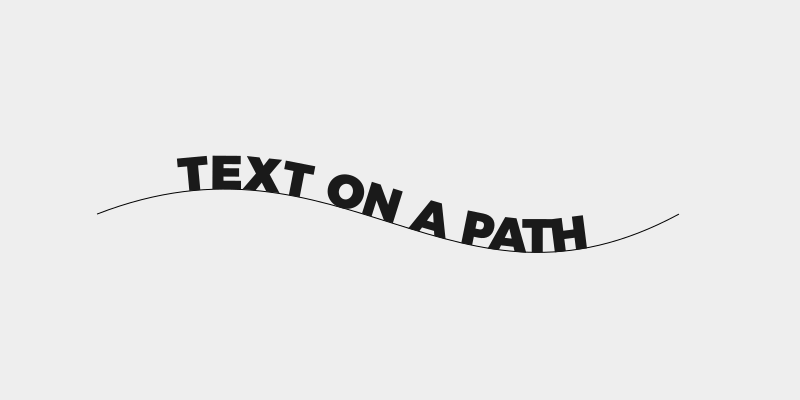 The same effect can also be achieved by flipping the object itself vertically or horizontally, but this is only a viable option if the object you're working with is symmetrical on the axis in which you're flipping it.
If you were to apply that to a path like the example depicted above, you would end up reversing the appearance of the curve, which I have to assume is an undesirable result.
Either way, that's how you can correct your upside down text in Inkscape! If you have any questions simple leave a comment below.
The same effect can also be achieved by flipping the object itself vertically or horizontally, but this is only a viable option if the object you're working with is symmetrical on the axis in which you're flipping it.
If you were to apply that to a path like the example depicted above, you would end up reversing the appearance of the curve, which I have to assume is an undesirable result.
Either way, that's how you can correct your upside down text in Inkscape! If you have any questions simple leave a comment below.
 Then we'll center them up and use the cut path feature to slice off the pieces that need to be removed.
 Next we'll create some individual lines to be used at the foreground — in this instance, a lake or some body of water.
 Once again we'll use the cut path feature to slice off the ends of the lines that stick out from the circle, as well as the circle itself where it intersects with the lines.
 Now we'll create some random rectangles to place over segments of the lines.
We'll be using those to break up the lines a bit.
Now we'll create some random rectangles to place over segments of the lines.
We'll be using those to break up the lines a bit.
 Once broken up, the lines will give the appearance of moving water.
 Now we'll create a couple of simple pine trees to complement the design.
 The pine trees will be placed at both side of the design.
They make for a nice accent piece that adds a bit more depth to the overall design.
The pine trees will be placed at both side of the design.
They make for a nice accent piece that adds a bit more depth to the overall design.
 Now we'll wrap some text around the top of the circle as a finishing touch.
 And with that the design is complete! You can color it in however you'd like.
Just make sure to convert the strokes to paths once you're finished, as I did in the video tutorial.
And with that the design is complete! You can color it in however you'd like.
Just make sure to convert the strokes to paths once you're finished, as I did in the video tutorial.
 If you have any questions simply leave a comment below.
As always, thanks for watching!
If you have any questions simply leave a comment below.
As always, thanks for watching!
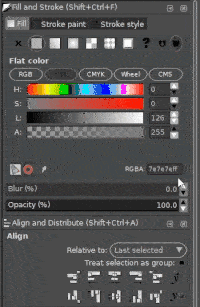 This will clear the clipboard within Inkscape, and then you'll be able to copy and paste your vector object as an actual vector object, like you should be able to.
I understand that this is quite a wonky fix, but it's the best we can do until the Inkscape team addresses this problem.
I've seen posts for it on Launchpad, but no official acknowledgement of it yet.
Let's hope Inkscape 1.0 rectifies this problem once and for all.
This will clear the clipboard within Inkscape, and then you'll be able to copy and paste your vector object as an actual vector object, like you should be able to.
I understand that this is quite a wonky fix, but it's the best we can do until the Inkscape team addresses this problem.
I've seen posts for it on Launchpad, but no official acknowledgement of it yet.
Let's hope Inkscape 1.0 rectifies this problem once and for all.
 The goal is to make the text occupy all of the colored area without it overlapping with the headphones.
To accomplish this we are going to manually create a vector tracing of whatever object(s) we'd like the text to avoid.
Grab the Bezier Pen and manually create a green tracing of the object(s) you'd like the text to avoid.
It doesn't have to be green, I just chose green because it contrasts with the image so that I could see it better.
The goal is to make the text occupy all of the colored area without it overlapping with the headphones.
To accomplish this we are going to manually create a vector tracing of whatever object(s) we'd like the text to avoid.
Grab the Bezier Pen and manually create a green tracing of the object(s) you'd like the text to avoid.
It doesn't have to be green, I just chose green because it contrasts with the image so that I could see it better.
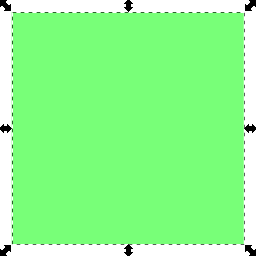 Once you have your object selected, simply click on it again to bring up the rotation handles.
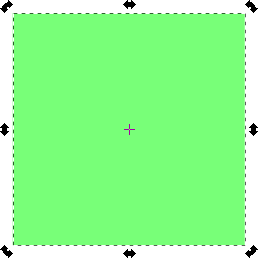 You can now click and drag on those handles to rotate your object.
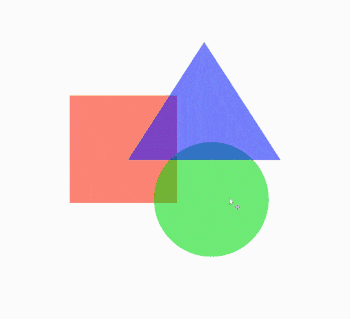
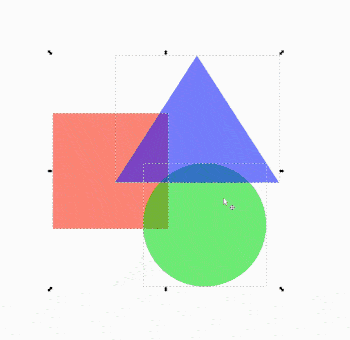
 If you'd like to change the incremental units, you can do so by going to Preferences (control + shift + p), then navigating to Behavior -> Steps and changing the value from 15 to whatever you'd like.
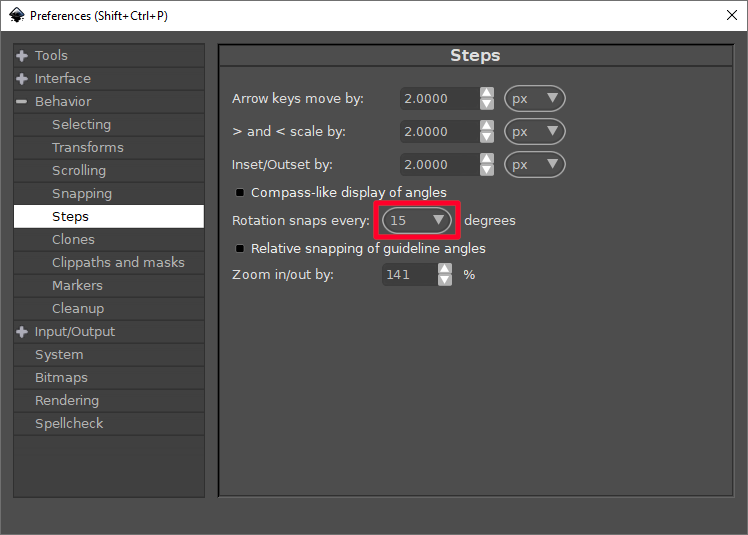 And that should do it for this lesson.
If you have any questions simply leave a comment below.
And that should do it for this lesson.
If you have any questions simply leave a comment below.
 This is what I currently use and would recommend to anyone using the Windows operating system.
PDFsam is a desktop application that allows you to edit PDF documents in a variety of different ways.
You can merge multiple documents, split them up into different pages, rotate the pages, etc.
There's a free version and a premium version.
I don't know exactly what the premium version does, but if you only need to merge PDF documents then the free version is all you'll need.
The software is pretty easy to use and self-explanatory for the most part.
This is what I currently use and would recommend to anyone using the Windows operating system.
PDFsam is a desktop application that allows you to edit PDF documents in a variety of different ways.
You can merge multiple documents, split them up into different pages, rotate the pages, etc.
There's a free version and a premium version.
I don't know exactly what the premium version does, but if you only need to merge PDF documents then the free version is all you'll need.
The software is pretty easy to use and self-explanatory for the most part.
 Finally, there's PDF Merge — a free web-based application that allows you to merge PDF documents.
This would be the ideal option for those of you who may be Mac users and can't find a free alternative to the aforementioned applications, or maybe if you simply don't want to download additional software just to create a multi page PDF with Inkscape.
PDF Merge also allows you to split, rotate, compress, etc.
PDF documents directly through your web browser.
Check them out for a full list of what exactly it can do.
Finally, there's PDF Merge — a free web-based application that allows you to merge PDF documents.
This would be the ideal option for those of you who may be Mac users and can't find a free alternative to the aforementioned applications, or maybe if you simply don't want to download additional software just to create a multi page PDF with Inkscape.
PDF Merge also allows you to split, rotate, compress, etc.
PDF documents directly through your web browser.
Check them out for a full list of what exactly it can do.
 I would recommend checking out Pixabay for free texture images.
Go ahead and paste your texture image into Inkscape, select it with the Select tool, then go to Path > Trace Bitmap.
The Trace Bitmap menu should appear.
I would recommend checking out Pixabay for free texture images.
Go ahead and paste your texture image into Inkscape, select it with the Select tool, then go to Path > Trace Bitmap.
The Trace Bitmap menu should appear.
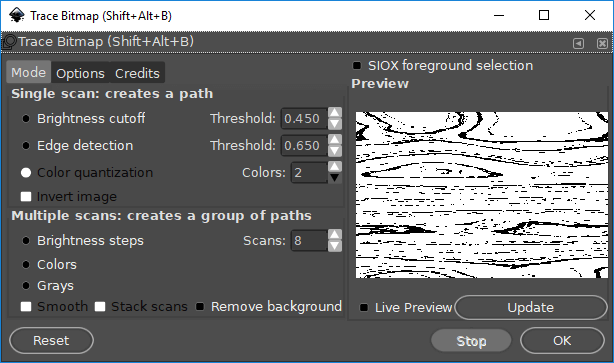 In the Trace Bitmap menu we'll be focusing our attention to the Single Scan area.
You'll notice there's three different tracing methods: brightness cutoff, edge detection, and color quantization.
You'll also notice an invert option in case you'd like to create an inverted tracing of your photo.
On the right side of the menu you'll see a preview of what will be generated.
The white areas represent transparency, or negative space, and the black areas represent the vector tracing that will be created.
Go ahead and cycle through each of the the three tracing methods and click Update to preview the tracing that will be created.
The best option to use will be determined by the composition of whatever photo you're using, so the only way to know is to try it out yourself and see how it looks.
Once you're happy with the preview, go ahead and click OK to generate your tracing.
In the Trace Bitmap menu we'll be focusing our attention to the Single Scan area.
You'll notice there's three different tracing methods: brightness cutoff, edge detection, and color quantization.
You'll also notice an invert option in case you'd like to create an inverted tracing of your photo.
On the right side of the menu you'll see a preview of what will be generated.
The white areas represent transparency, or negative space, and the black areas represent the vector tracing that will be created.
Go ahead and cycle through each of the the three tracing methods and click Update to preview the tracing that will be created.
The best option to use will be determined by the composition of whatever photo you're using, so the only way to know is to try it out yourself and see how it looks.
Once you're happy with the preview, go ahead and click OK to generate your tracing.
 The result will be a true vector graphic that you can use in all of the ways that you'd use any other vector graphic.
You can change the colors, apply path function, and even alter the individual nodes with the Nodes tool.
The result will be a true vector graphic that you can use in all of the ways that you'd use any other vector graphic.
You can change the colors, apply path function, and even alter the individual nodes with the Nodes tool.
 One way that I always love to use vector textures is applying them to text using the Path > Difference path function.
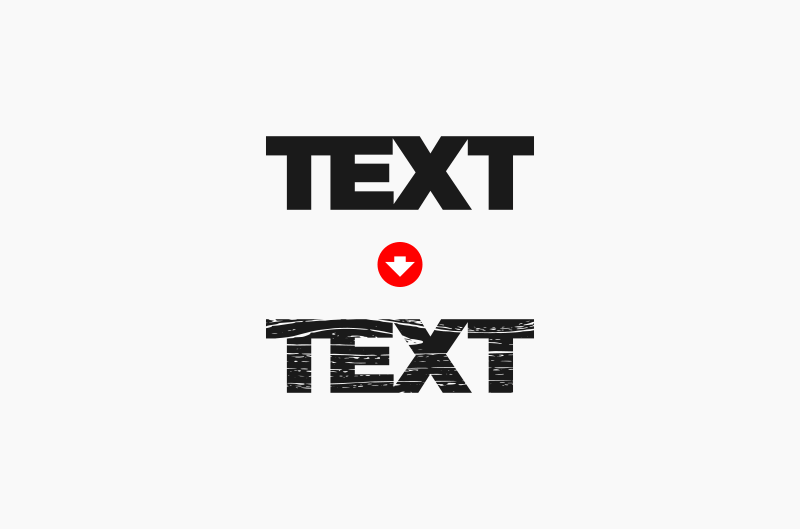 If you want to learn more about path functions and how Trace Bitmap works in Inkscape, be sure to check out The Inkscape Master Class — a collection of over 50 videos where I go over every single tool and feature in Inkscape and explain what it is and demonstrate how it works!
If you have any questions simply leave a comment below.
As always, thanks for watching!
If you want to learn more about path functions and how Trace Bitmap works in Inkscape, be sure to check out The Inkscape Master Class — a collection of over 50 videos where I go over every single tool and feature in Inkscape and explain what it is and demonstrate how it works!
If you have any questions simply leave a comment below.
As always, thanks for watching!
 Next we will create a series of duplicate copies of the line and space them out evenly.
We will accomplish this with the Duplicate function (control + D) and with the Distribute function in the Align & Distribute menu.
Finally, we will combine the lines into a single unit with the Combine function (control + k).
Again, if any part of this explanation sounds ambiguous to you, I would advise watching the video tutorial.
It covers everything in detail.
Next we will create a series of duplicate copies of the line and space them out evenly.
We will accomplish this with the Duplicate function (control + D) and with the Distribute function in the Align & Distribute menu.
Finally, we will combine the lines into a single unit with the Combine function (control + k).
Again, if any part of this explanation sounds ambiguous to you, I would advise watching the video tutorial.
It covers everything in detail.
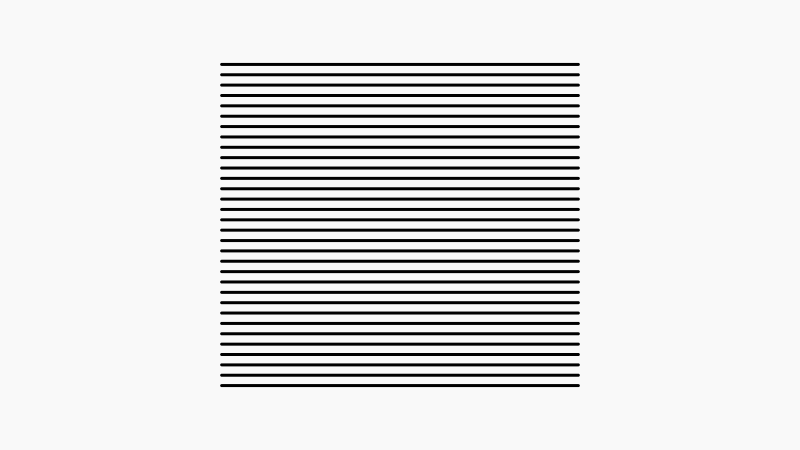 Now we will apply the Lattice Deformation path effect to the design.
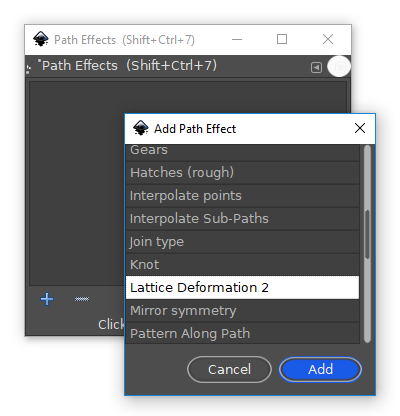 Now if you grab the Nodes tool, a grid will appear over your lines with a series of individual nodes that you can click and drag.
As you move them, you'll notice the design warping according to wherever you move the cursor.
Now if you grab the Nodes tool, a grid will appear over your lines with a series of individual nodes that you can click and drag.
As you move them, you'll notice the design warping according to wherever you move the cursor.
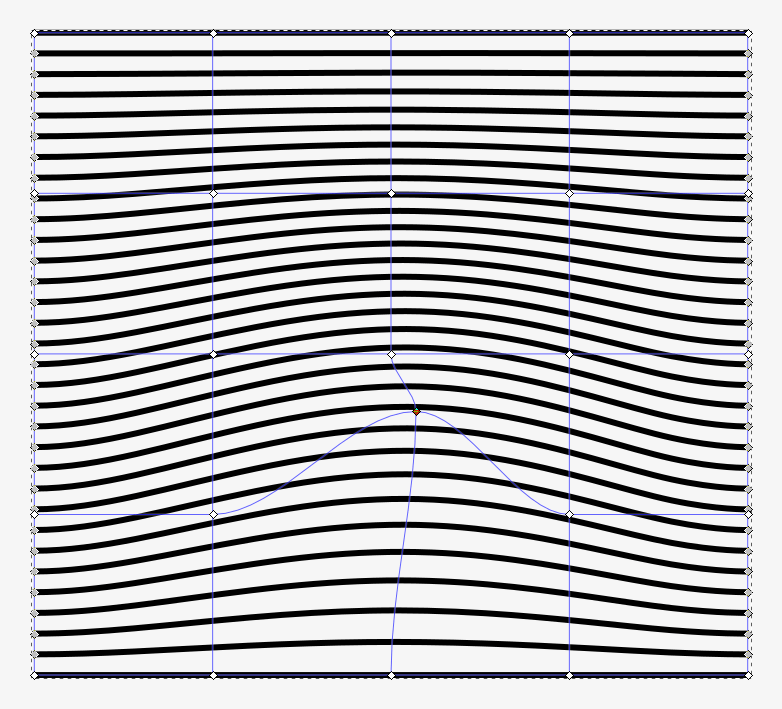 Go ahead and move the nodes around whimsically until your lines have a nice wavy flow to them.
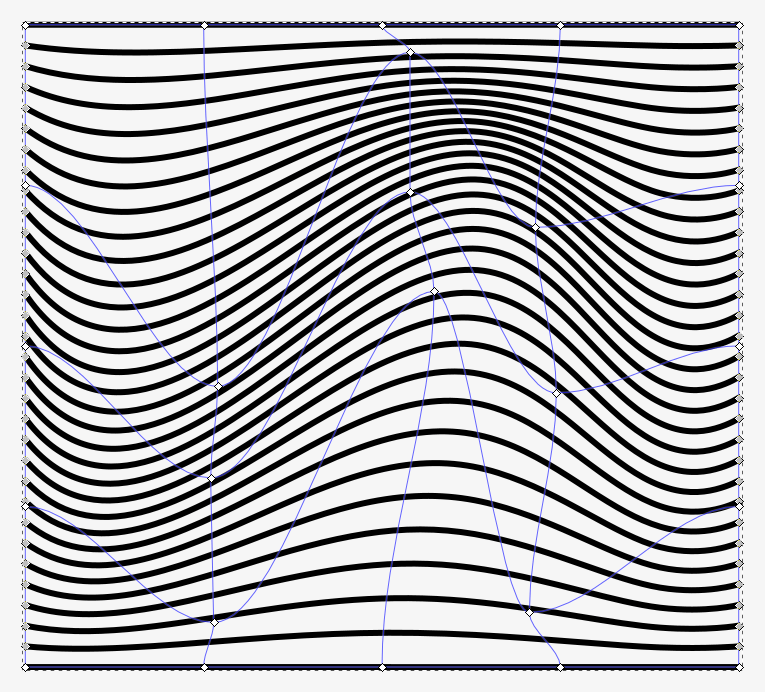 Once you've altered your design to your liking, you can finalize it by going to Path > Object to Path.
Then you can convert the strokes to paths by going to Path > Stroke to Path.
You can now color in and stylize your wavy lines however you'd like.
Once you've altered your design to your liking, you can finalize it by going to Path > Object to Path.
Then you can convert the strokes to paths by going to Path > Stroke to Path.
You can now color in and stylize your wavy lines however you'd like.
 That should do it for today's tutorial.
If you have any questions just let me know, and as always, thanks for watching!
That should do it for today's tutorial.
If you have any questions just let me know, and as always, thanks for watching!
 Next we will grab the Mesh Gradients tool and make sure your presets match mine depicted in the screenshot below…
 Now select your rectangle and apply a mesh gradient by clicking on the Mesh Gradient button in the Fill & Stroke window.
 Your rectangle should now look something like this…
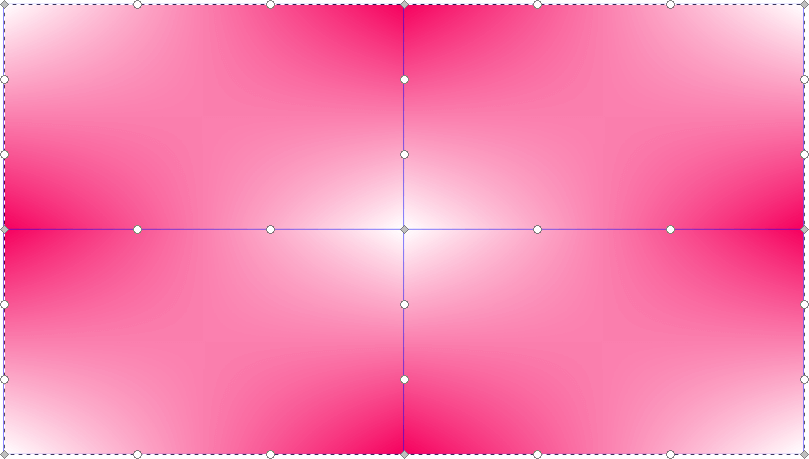 With the Gradients tool selected, click on each individual node and click on a color from the color bar at the bottom of your screen in order to fill that area of the mesh with your chosen color.
Do this for all of the nodes until you have a nice balance of your desired colors.
With the Gradients tool selected, click on each individual node and click on a color from the color bar at the bottom of your screen in order to fill that area of the mesh with your chosen color.
Do this for all of the nodes until you have a nice balance of your desired colors.
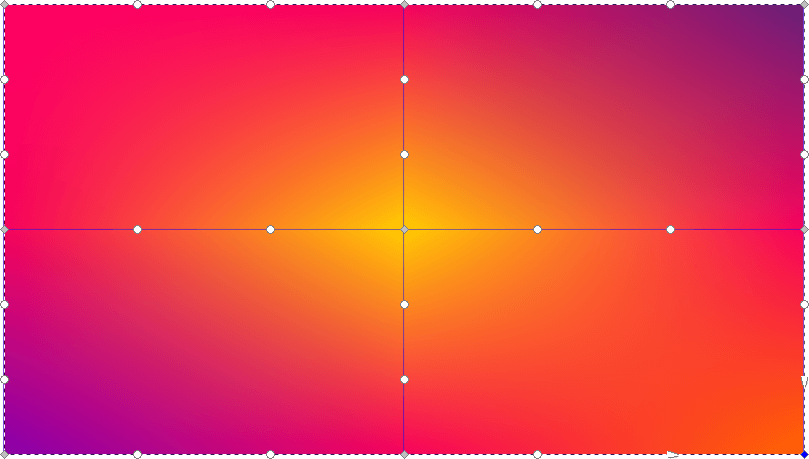 You can now click and drag each of the individual nodes in order to give the design a whimsical, swirling sort of look.
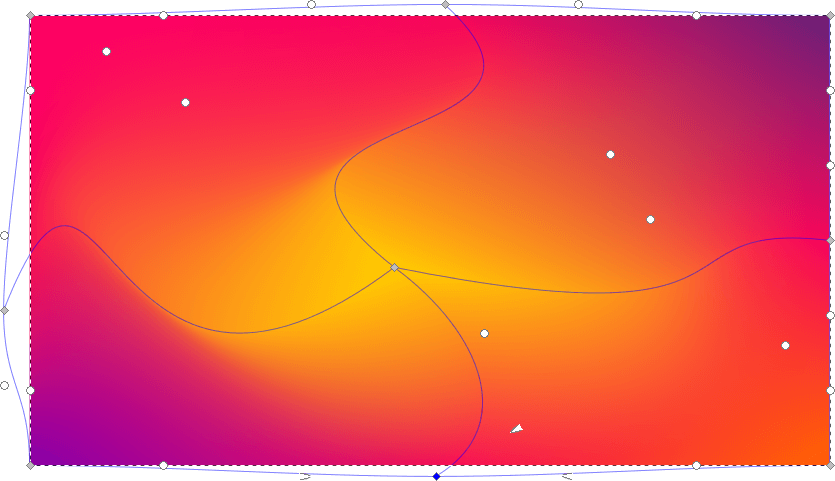 The gradient portion of the design is complete.
Now we will move on to applying a polygonal overlay.
Create a perfectly symmetrical square and divide it into two separate objects diagonally.
The gradient portion of the design is complete.
Now we will move on to applying a polygonal overlay.
Create a perfectly symmetrical square and divide it into two separate objects diagonally.
 Now simply create a bunch of copies of the two pieces and overlay them onto the rectangle containing your mesh gradient in order to form a triangle pattern.
 Next, cycle through each individual triangle and remove the fill color.
Use the Dropper tool to fill it with the color of the gradient beneath it.
You should end up with something like this…
Next, cycle through each individual triangle and remove the fill color.
Use the Dropper tool to fill it with the color of the gradient beneath it.
You should end up with something like this…
 If you want, you can go through and darken and/or lighten individual triangles manually as I've done.
This can give your design a more personalized touch.
Now go ahead and export your design, and that should do it! Our mesh gradient background is complete.
If you have any questions or run into any problems, simply leave a comment below.
As always, thanks for watching!
If you want, you can go through and darken and/or lighten individual triangles manually as I've done.
This can give your design a more personalized touch.
Now go ahead and export your design, and that should do it! Our mesh gradient background is complete.
If you have any questions or run into any problems, simply leave a comment below.
As always, thanks for watching!
 Next we'll rotate them so that the corners run vertically and horizontally, bring the opacity down to 50%, then center our letter/text on top.
Make sure you've converted your text object to paths first.
For this sort of design I recommend using a heavy weight font.
I went with Montserrat Heavy.
Next we'll rotate them so that the corners run vertically and horizontally, bring the opacity down to 50%, then center our letter/text on top.
Make sure you've converted your text object to paths first.
For this sort of design I recommend using a heavy weight font.
I went with Montserrat Heavy.
 Now we'll select the lines and the text and go to Path > Cut Path.
This will result in the lines being broken apart in the shape of the letter.
Simply delete all of the lines outside of the letter area.
Now we'll select the lines and the text and go to Path > Cut Path.
This will result in the lines being broken apart in the shape of the letter.
Simply delete all of the lines outside of the letter area.
 Select the remaining lines and convert them to paths by going to Path > Stroke to Path.
Next, grab the Nodes tool and select the two nodes at the end of one of the lines.
Select the remaining lines and convert them to paths by going to Path > Stroke to Path.
Next, grab the Nodes tool and select the two nodes at the end of one of the lines.
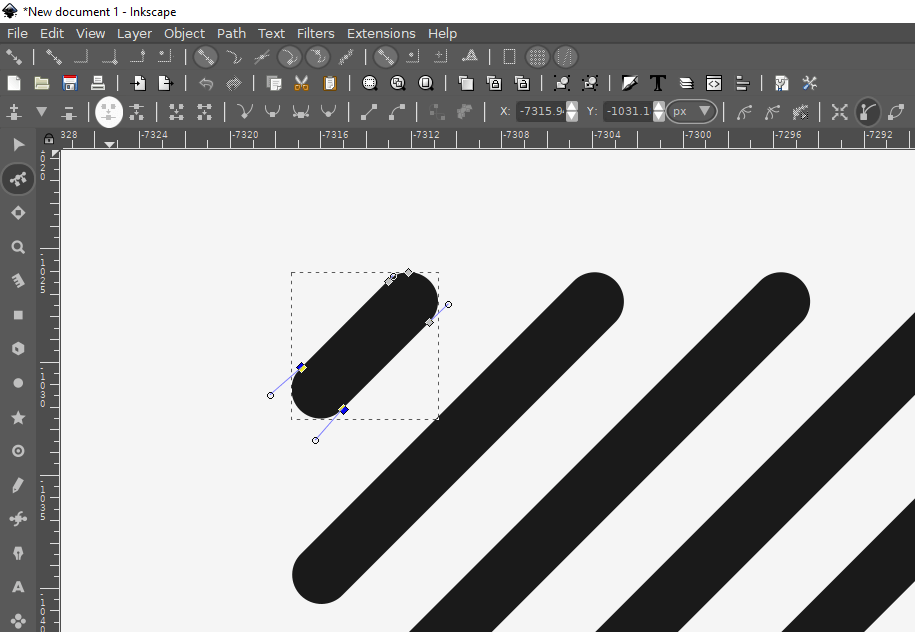 With the two nodes selected, click on the button that says Combine Selected Nodes in the top toolbar.
This will combine the two nodes together so that they form a point.
With the two nodes selected, click on the button that says Combine Selected Nodes in the top toolbar.
This will combine the two nodes together so that they form a point.
 Go through and repeat this process on the rest of the design.
 Once completed, you can bring the opacity of the design back up to 100% and you're finished!
 If you have any questions simply leave a comment below, and as always, thanks for watching!
 Since RGB uses light to generate colors, it provides for a more vibrant and diverse spectrum than CMYK does.
This makes the RGB format ideal for use on screens and digital displays because they can produce a wider variety of colors.
RGB format is not ideal for print though because there's a pretty good chance that some of the colors you're using are outside of the range of what can be produced with ink.
I've found this to be particularly true with neon shades of green, blue, orange, pink, etc.
Since RGB uses light to generate colors, it provides for a more vibrant and diverse spectrum than CMYK does.
This makes the RGB format ideal for use on screens and digital displays because they can produce a wider variety of colors.
RGB format is not ideal for print though because there's a pretty good chance that some of the colors you're using are outside of the range of what can be produced with ink.
I've found this to be particularly true with neon shades of green, blue, orange, pink, etc.
 Although it provides for less vibrant color options, working within the CMYK color space ensures that none of the colors you're working with will be outside of the range (or "gamut" as it's called) of what can be produced in ink.
 Much like GIMP, Krita is also an open source image editing and photo manipulation application.
Unlike GIMP though, Krita comes with the ability to generate CMYK files built-in.
To generate a CMYK PNG or JPG file with Krita, simply open your document and go to Image > Properties, click on the Image Color Space tab, and choose CMYK/Alpha from the Modes drop down.
Much like GIMP, Krita is also an open source image editing and photo manipulation application.
Unlike GIMP though, Krita comes with the ability to generate CMYK files built-in.
To generate a CMYK PNG or JPG file with Krita, simply open your document and go to Image > Properties, click on the Image Color Space tab, and choose CMYK/Alpha from the Modes drop down.
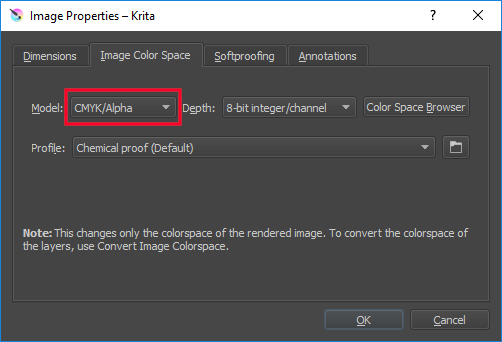 Go ahead and click OK to finalize.
All you have to do now is simply go to File > Export and choose the format you'd like to generate your CMYK file in.
Using Krita to export CMYK with Inkscape is ideal if you need a rasterized format like PNG, JPG, TIF, etc.
However, there's no way to create editable vector files (like PDF) with Krita.
Go ahead and click OK to finalize.
All you have to do now is simply go to File > Export and choose the format you'd like to generate your CMYK file in.
Using Krita to export CMYK with Inkscape is ideal if you need a rasterized format like PNG, JPG, TIF, etc.
However, there's no way to create editable vector files (like PDF) with Krita.
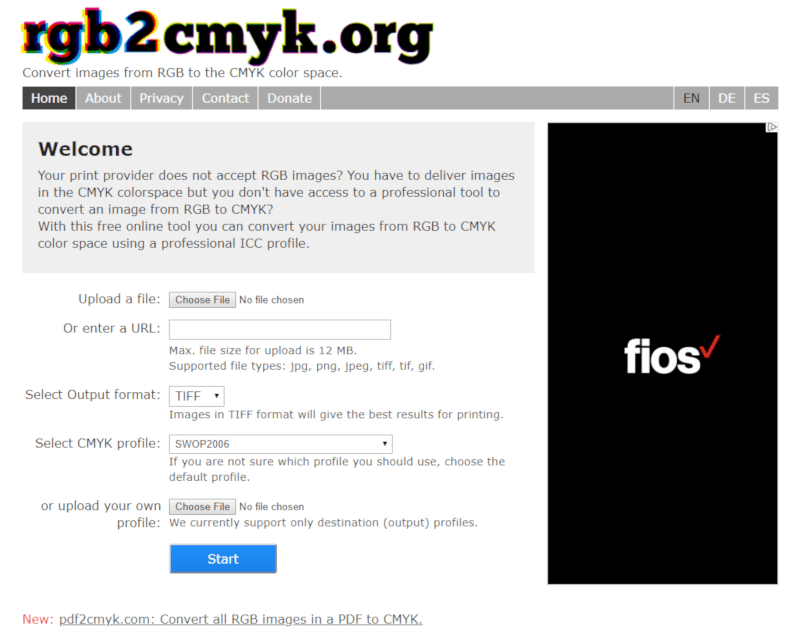 The site is great if you need to export CMYK with Inkscape in raster formats.
It's very simple, self-explanatory, and helpful.
However, much like Krita, this solution isn't viable if you need an editable vector file like PDF.
One problem I've noticed with rgb2cmyk.org is that the color conversion is sometimes pretty far off.
This is to be expected any time you convert an RGB document to CMYK, but the difference here can be pretty stark.
I've encountered color banding and contrasting issues at times.
The site is great if you need to export CMYK with Inkscape in raster formats.
It's very simple, self-explanatory, and helpful.
However, much like Krita, this solution isn't viable if you need an editable vector file like PDF.
One problem I've noticed with rgb2cmyk.org is that the color conversion is sometimes pretty far off.
This is to be expected any time you convert an RGB document to CMYK, but the difference here can be pretty stark.
I've encountered color banding and contrasting issues at times.
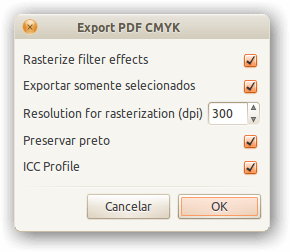 Unfortunately this extension is only available for Linux users, so if you're a Windows user and you need to export CMYK with Inkscape, you'll have to look elsewhere.
For you Linux users though, you can find the download link and installation instructions on the Wiki page.
One downside to using this extension is that it only produces PDF files, so you'll have to use one of the other solutions if raster formats are required.
Unfortunately this extension is only available for Linux users, so if you're a Windows user and you need to export CMYK with Inkscape, you'll have to look elsewhere.
For you Linux users though, you can find the download link and installation instructions on the Wiki page.
One downside to using this extension is that it only produces PDF files, so you'll have to use one of the other solutions if raster formats are required.
 You'll know your document is within the CMYK gamut by referring to the canvas tab at the top of the screen, which will indicate either RGB or CMYK.
 Now all you have to do is simple save or export your document in any format you'd like, and you're all set!
 Next we'll create three separate hexagons that gradually decrease in size and place them over the bottom third of the two rings.
These will serve as a reference point for where we cut the rings to make the circular banner.
Next we'll create three separate hexagons that gradually decrease in size and place them over the bottom third of the two rings.
These will serve as a reference point for where we cut the rings to make the circular banner.
 Using some path effect magic, we'll go ahead and clip off the designated areas of the rings using the hexagons.
We'll be left with the base shape for the banner.
Using some path effect magic, we'll go ahead and clip off the designated areas of the rings using the hexagons.
We'll be left with the base shape for the banner.
 Now we'll use the Edit Paths By Nodes tool to add a couple of fishtail ends to our banner.
 The foundation of our logo is now set.
Lets going ahead and use the Bezier Pen in Inkscape to manually draw in some shapes where shadows would typically be, then color it in however you'd like.
For this logo the color I chose for the banner template is #FF002A.
The foundation of our logo is now set.
Lets going ahead and use the Bezier Pen in Inkscape to manually draw in some shapes where shadows would typically be, then color it in however you'd like.
For this logo the color I chose for the banner template is #FF002A.
 Now it's time to add some text that follows the circular edges of the banner.
In order to do that, we'll create a smaller circle within the center of the page.
Now it's time to add some text that follows the circular edges of the banner.
In order to do that, we'll create a smaller circle within the center of the page.
 Go ahead and grab the text tool, write out some text, then we'll use the Put On Path function to wrap the text around the edge of our logo.
 This next part is optional, but if you'd like to add another banner going around the top, simply duplicate the entire graphic and flip it vertically.
Make sure to edit your text accordingly though.
This next part is optional, but if you'd like to add another banner going around the top, simply duplicate the entire graphic and flip it vertically.
Make sure to edit your text accordingly though.
 And with that, our logo design is complete!
 The text is completely editable.
Simply open the SVG file with Inkscape, grab the text tool, then click on the text in order to replace it with your own.
The green circles inside the design represent the paths that the text is place on.
You can use the Select tool to rotate those circles in order to rotate your text along with it.
Once you've finished adding your text, select the text objects and go to Path > Object To Path, then delete the green circles and you're good to go!
The text is completely editable.
Simply open the SVG file with Inkscape, grab the text tool, then click on the text in order to replace it with your own.
The green circles inside the design represent the paths that the text is place on.
You can use the Select tool to rotate those circles in order to rotate your text along with it.
Once you've finished adding your text, select the text objects and go to Path > Object To Path, then delete the green circles and you're good to go!
 Next we're going to use the Select tool to shear the text one step to the left, then rotate it two steps counter-clockwise.
 Now we're going to enable snapping (in the toolbar) and use the Bezier Pen to manually draw shapes within the letters that start at the corners and come straight down vertically.
The shapes will alternate between two different shades of the same color.
For this example I used blue, but you can use whatever you'd like.
Now we're going to enable snapping (in the toolbar) and use the Bezier Pen to manually draw shapes within the letters that start at the corners and come straight down vertically.
The shapes will alternate between two different shades of the same color.
For this example I used blue, but you can use whatever you'd like.
 One trick for determining which color which shape should be is to identify the angle of the top of that shape.
In my example, each shape which has an angle going down and to the right at the top was colored in with light blue.
Each shape which has an angle going down and to the left is colored with dark blue.
One trick for determining which color which shape should be is to identify the angle of the top of that shape.
In my example, each shape which has an angle going down and to the right at the top was colored in with light blue.
Each shape which has an angle going down and to the left is colored with dark blue.
 It may seem a little tricky at first, but it's much simpler than it appears once you get the hang of it.
I would really recommend watching the video tutorial at the top of the page for this one.
It might help you grasp it better.
It may seem a little tricky at first, but it's much simpler than it appears once you get the hang of it.
I would really recommend watching the video tutorial at the top of the page for this one.
It might help you grasp it better.
 Once you've gone through and created shapes over each of the letters you can go ahead and delete the original green letters beneath them.
And with that, our isometric carved text is finished!
Once you've gone through and created shapes over each of the letters you can go ahead and delete the original green letters beneath them.
And with that, our isometric carved text is finished!
 If you're like me, you've probably gotten in the habit of installing fonts directly from the zip folder they came in, but in order to install the font for all users, you'll need to drag and drop the file somewhere else, like your desktop.
Once you've installed the font for all users, go ahead and relaunch Inkscape.
Your Inkscape fonts should no longer be missing.
If you're like me, you've probably gotten in the habit of installing fonts directly from the zip folder they came in, but in order to install the font for all users, you'll need to drag and drop the file somewhere else, like your desktop.
Once you've installed the font for all users, go ahead and relaunch Inkscape.
Your Inkscape fonts should no longer be missing.
 Inkscape allows you to choose the same anchor points and then some…
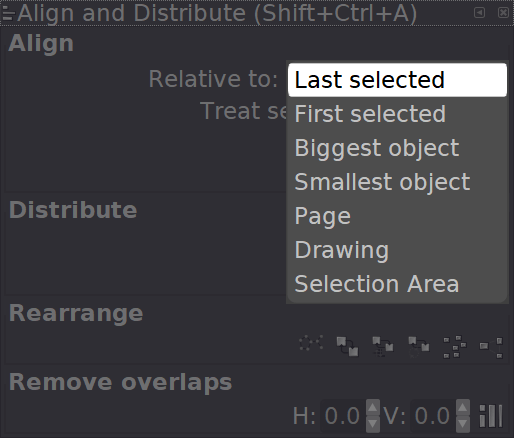 Inkscape also offers more alignment options and distribution methods.
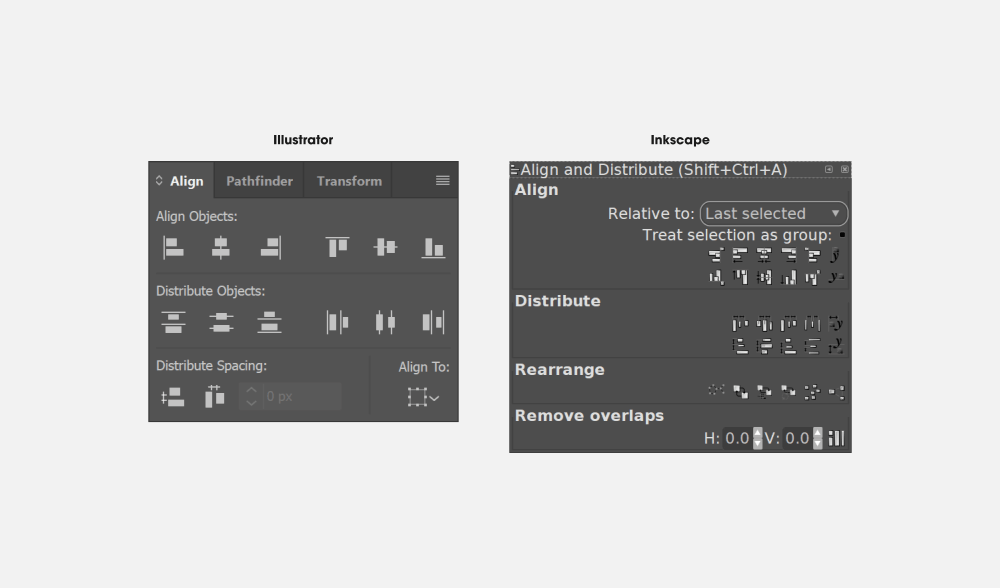
 While it's true that Linux users only represent a very small, niche user base, if you are a Linux user and want to get into graphic design, Adobe software is simply not an option for you.
Luckily there's software designers in this world who do care about Linux users, otherwise we wouldn't have great alternative like GIMP and Inkscape.
While it's true that Linux users only represent a very small, niche user base, if you are a Linux user and want to get into graphic design, Adobe software is simply not an option for you.
Luckily there's software designers in this world who do care about Linux users, otherwise we wouldn't have great alternative like GIMP and Inkscape.
 Finally, the most obvious reason why Inkscape may be a better choice for you — price.
Illustrator is quite expensive.
The monthly/yearly payment for it may not seem like much, but when you consider that it's an ongoing rental that you need to pay for indefinitely, it adds up pretty quick.
In fact, I'm probably going to cancel my own subscription this summer when my plan is up.
For those of you who don't find the software-as-a-service payment model practical, great news: Inkscape is free.
Finally, the most obvious reason why Inkscape may be a better choice for you — price.
Illustrator is quite expensive.
The monthly/yearly payment for it may not seem like much, but when you consider that it's an ongoing rental that you need to pay for indefinitely, it adds up pretty quick.
In fact, I'm probably going to cancel my own subscription this summer when my plan is up.
For those of you who don't find the software-as-a-service payment model practical, great news: Inkscape is free.


 Pressing the tip of the pen against the pad performs the same function as a left mouse click.
The two buttons on the side can be programmed however you'd like.
As previously mentioned, I recommend programming them for undo and redo.
It's perfect for when you make a bad stroke and want to quickly erase it without having to drop the pen and reach for your mouse and/or keyboard.
Pressing the tip of the pen against the pad performs the same function as a left mouse click.
The two buttons on the side can be programmed however you'd like.
As previously mentioned, I recommend programming them for undo and redo.
It's perfect for when you make a bad stroke and want to quickly erase it without having to drop the pen and reach for your mouse and/or keyboard.
 Personally, I find that the drawing tablet works best with the Draw Freehand Lines tool and the Calligraphy Pen, but it could also prove useful for other lesser-used tools like the Eraser.
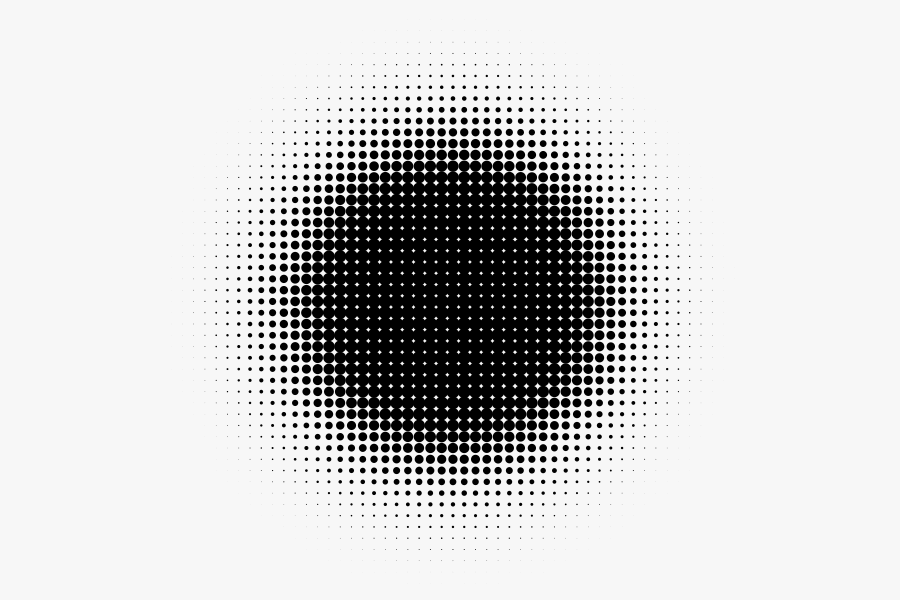 Next we are going to use the Stars and Polygons tool to create a pink star with 8 corners, then we'll make the inner corners of that star smooth so we end up with the following shape…
 Now we're going to place the star over our halftone pattern and create a slightly larger black copy to place beneath it and act as somewhat of a border/drop shadow.
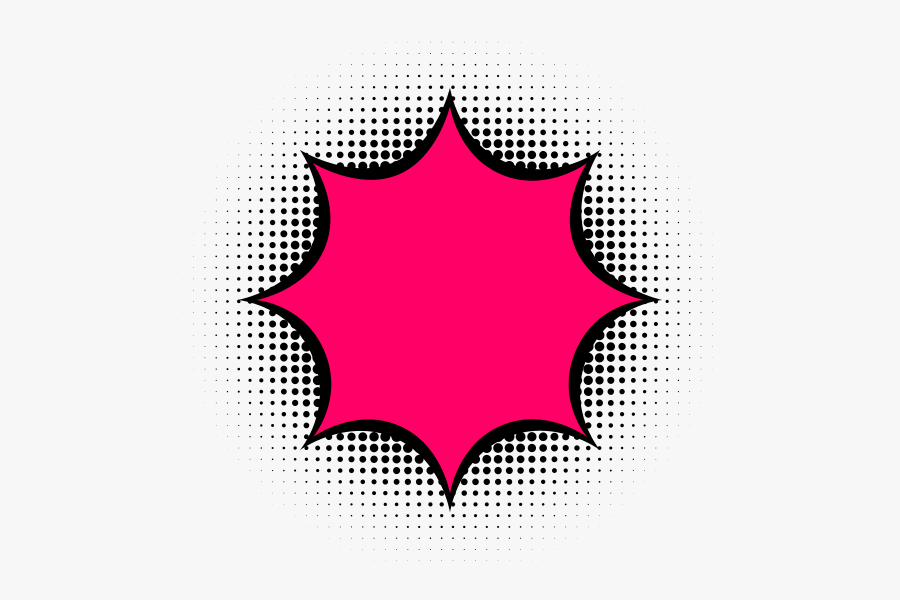 Our next step is to create the text.
For this design I am using the Komika Axis font, which can be downloaded from FontSquirrel here.
Our next step is to create the text.
For this design I am using the Komika Axis font, which can be downloaded from FontSquirrel here.
 As depicted above, I made the text white, added a black stroke around each letter, then layered each letter above each other in reverse order.
Then I created a duplicate copy of the entire word, made it black, and layered it beneath to create a makeshift 3D sort of effect.
The final step is to place the text over the rest of the design, and with that our comic logo is complete!
As depicted above, I made the text white, added a black stroke around each letter, then layered each letter above each other in reverse order.
Then I created a duplicate copy of the entire word, made it black, and layered it beneath to create a makeshift 3D sort of effect.
The final step is to place the text over the rest of the design, and with that our comic logo is complete!
 If you have any questions simply leave a comment below, and as always, thanks for watching!
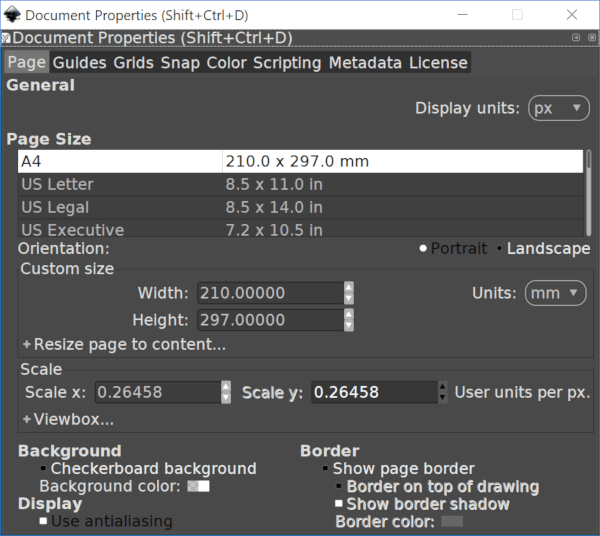 Go to File -> Document Properties, then click on the white stripe in the Background Color area.
Another menu will pop up where you can manually change the background color of the document to whatever you'd like.
Go to File -> Document Properties, then click on the white stripe in the Background Color area.
Another menu will pop up where you can manually change the background color of the document to whatever you'd like.
 Illustrator is a vector graphics application by Adobe.
It is widely recognized as the industry standard tool for vector design and is used by the overwhelming majority of studios, agencies, and professional designers.
Illustrator is a vector graphics application by Adobe.
It is widely recognized as the industry standard tool for vector design and is used by the overwhelming majority of studios, agencies, and professional designers.
 CorelDraw is a vectors graphics application by the Corel Corporation.
Although I have little experience working with it, it does seem to be a nice middle-of-the-road option.
CorelDraw is a vectors graphics application by the Corel Corporation.
Although I have little experience working with it, it does seem to be a nice middle-of-the-road option.

 Next, we'll create multiple copies of the design and stack them next to and on top of each other.
We'll want to 14 rows and 6 columns, as depicted below.
Next, we'll create multiple copies of the design and stack them next to and on top of each other.
We'll want to 14 rows and 6 columns, as depicted below.
 Once we have that set we can start coloring in the pieces to form our pattern.
I would suggest making the canvas a different color if you plan on using white like I did.
Once we have that set we can start coloring in the pieces to form our pattern.
I would suggest making the canvas a different color if you plan on using white like I did.
 Now all we have to do is create a new rectangle and make it the same size as the entire group of objects we previously created.
Make it a darker shade of green, layer it beneath the group of objects, then align the two together.
Make sure to group everything.
Now all we have to do is create a new rectangle and make it the same size as the entire group of objects we previously created.
Make it a darker shade of green, layer it beneath the group of objects, then align the two together.
Make sure to group everything.
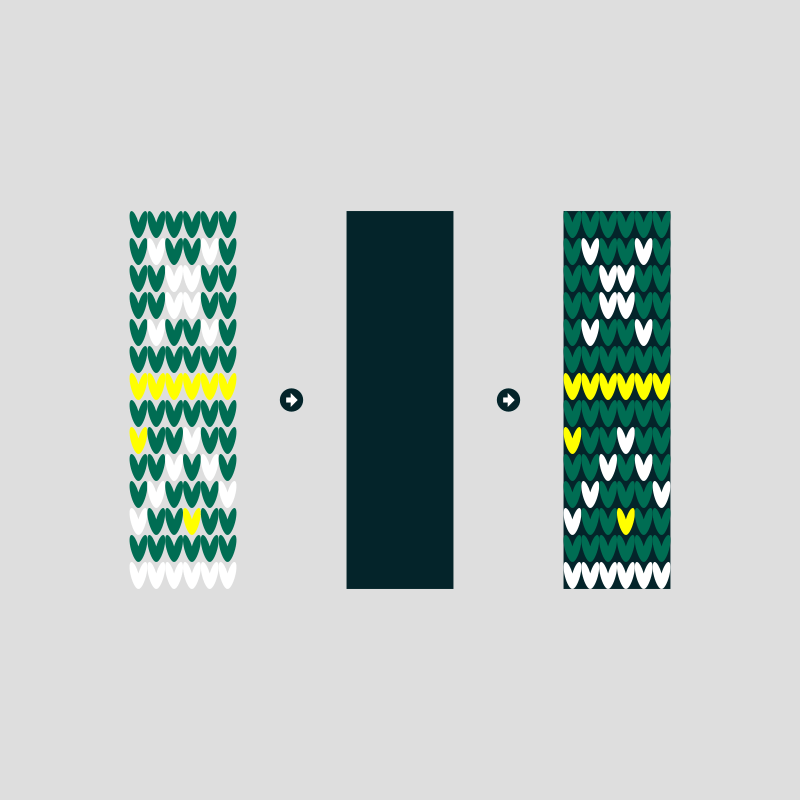 Once that's done you will have an individual tile that can be repeated infinitely.
This would work great as a background pattern for a website.
One little trick you can use to easily create lots of copies of the tile is to use the Create Tiled Clones feature in Inkscape.
To access it, simply go to Edit > Clone > Create Tiled Clones.
Once that's done you will have an individual tile that can be repeated infinitely.
This would work great as a background pattern for a website.
One little trick you can use to easily create lots of copies of the tile is to use the Create Tiled Clones feature in Inkscape.
To access it, simply go to Edit > Clone > Create Tiled Clones.
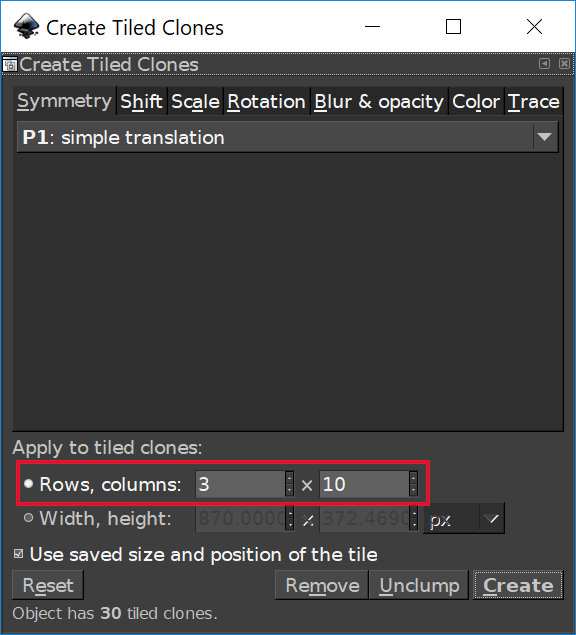 You can choose to clone the tile either by volume (rows, columns) or by specifying a size you'd like it to fill (width, height).
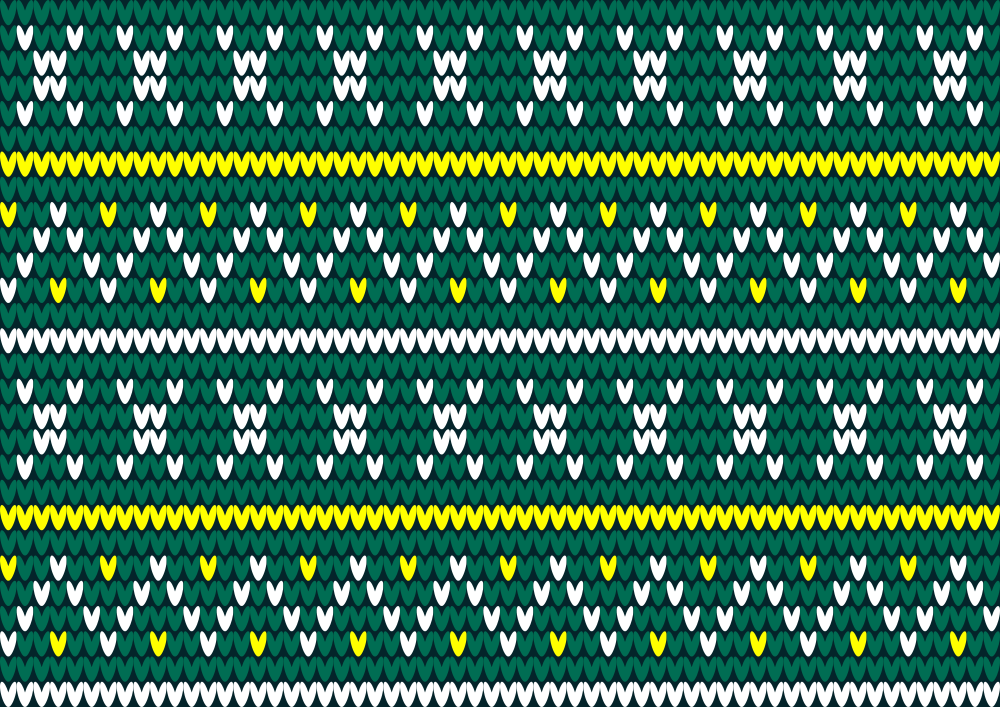 And with that, our design is complete!
 Once that's done we'll put it aside for the time being and start creating the stem.
In order to create the stem we'll use a couple of circles strategically positioned over a rectangle, then use them as a reference point for slicing off the edges of the rectangle so that the rectangle ends ups with smooth, curved edges.
Once that's done we'll put it aside for the time being and start creating the stem.
In order to create the stem we'll use a couple of circles strategically positioned over a rectangle, then use them as a reference point for slicing off the edges of the rectangle so that the rectangle ends ups with smooth, curved edges.
 We'll now put that aside and start creating the eyes.
The first eye shape is made by taking the intersecting area between 3 circles, then simulating a beveled sort of effect so that it looks like it was carved into the pumpkin.
We'll then duplicate that eye, flip it horizontally, then use it as the other eye.
We'll now put that aside and start creating the eyes.
The first eye shape is made by taking the intersecting area between 3 circles, then simulating a beveled sort of effect so that it looks like it was carved into the pumpkin.
We'll then duplicate that eye, flip it horizontally, then use it as the other eye.
 The final step is to create the mouth, which will be made of the intersecting area of a circle and a rectangle, as depicted below.
We'll then use some squares to punch holes in the upper and lower portions of the mouth so that our vector carved pumpkin will have some teeth.
The final step is to create the mouth, which will be made of the intersecting area of a circle and a rectangle, as depicted below.
We'll then use some squares to punch holes in the upper and lower portions of the mouth so that our vector carved pumpkin will have some teeth.
 Once that's done we will put all of the individual objects together to create the final vector pumpkin design.
The design seems to look best when placed on a dark background — particularly the same shade of purple used for the outline — so I would recommend doing that.
Otherwise, we are done!
Once that's done we will put all of the individual objects together to create the final vector pumpkin design.
The design seems to look best when placed on a dark background — particularly the same shade of purple used for the outline — so I would recommend doing that.
Otherwise, we are done!
 If you have any questions just leave a comment below, and as always, thanks for watching!
 The Inkscape Export menu will open either in its own window or docked to the side of your screen.
It will look something like this…
The Inkscape Export menu will open either in its own window or docked to the side of your screen.
It will look something like this…
 The first thing we have to do is define the export area.
Inkscape gives us 4 options…
The first thing we have to do is define the export area.
Inkscape gives us 4 options…
 Next, we're going to use Strokes and the Stroke To Path function in order to create a boarder around the shape with some negative space padding within it.
 Once we've done that we will add our text and center it up on the page, then delete a portion of the shape where the text will go, add some accent pieces, and finally, add a few stars to top it off.
 You don't necessarily have to use stars.
You can use whatever imagery you'd like there, or you can even leave it blank.
We can now bring the opacity all the way up to 100% and color it in however you'd like, and with that, our design is complete! We have created a simple but professional-looking logo using Inkscape.
You don't necessarily have to use stars.
You can use whatever imagery you'd like there, or you can even leave it blank.
We can now bring the opacity all the way up to 100% and color it in however you'd like, and with that, our design is complete! We have created a simple but professional-looking logo using Inkscape.
 The following is a brief outline of the steps taken to achieve this result.
More experienced users of Inkscape should be able to duplicate this process quite easily without further explanation.
However, if you're a new or novice user, I would recommend skipping to the bottom of the post to watch the video tutorial.
The video tutorial has complete step-by-step instructions that even a first-time user of Inkscape could follow along with.
The following is a brief outline of the steps taken to achieve this result.
More experienced users of Inkscape should be able to duplicate this process quite easily without further explanation.
However, if you're a new or novice user, I would recommend skipping to the bottom of the post to watch the video tutorial.
The video tutorial has complete step-by-step instructions that even a first-time user of Inkscape could follow along with.
 Next, we're going to manually delete some of those squares to create the shape of a maze.
Be sure to keep the pathways of the maze at a consistent size of 1 unit all around.
Don't worry about making it into an actual puzzle.
We're just going for an aesthetic design here.
If you'd like to put the extra time into doing so, then go right ahead.
It isn't necessary though.
Next, we're going to manually delete some of those squares to create the shape of a maze.
Be sure to keep the pathways of the maze at a consistent size of 1 unit all around.
Don't worry about making it into an actual puzzle.
We're just going for an aesthetic design here.
If you'd like to put the extra time into doing so, then go right ahead.
It isn't necessary though.
 Once we have our maze shape, we're going to unify all of the squares together and rotate it around so that the corners are pointing vertically and horizontally.
Then, we'll create a duplicate, make it a different color, and stack directly above the original, as depicted below…
Once we have our maze shape, we're going to unify all of the squares together and rotate it around so that the corners are pointing vertically and horizontally.
Then, we'll create a duplicate, make it a different color, and stack directly above the original, as depicted below…
 This next part is a little tricky and requires a bit of an imaginative eye, but it's not something that can't be figured out relatively quickly.
We're going to take the Bezier Pen and use it to manually create shapes that connect the corners together of both objects and color them in so that they create the illusion of depth.
This next part is a little tricky and requires a bit of an imaginative eye, but it's not something that can't be figured out relatively quickly.
We're going to take the Bezier Pen and use it to manually create shapes that connect the corners together of both objects and color them in so that they create the illusion of depth.
 Next, convert all of the strokes to paths and unify them together.
Use the Bezier Pen to slice out a quadrant of the circle design, as depicted below.
Next, convert all of the strokes to paths and unify them together.
Use the Bezier Pen to slice out a quadrant of the circle design, as depicted below.
 Create 4 copies and snap them next to each other, as depicted below…
 Now create a 5th copy and arrange it as depicted below.
I would recommend making it a different color so that you can easily differentiate it from the other objects.
Now create a 5th copy and arrange it as depicted below.
I would recommend making it a different color so that you can easily differentiate it from the other objects.
 Use the intersecting black object as a reference point to slice the red object…
 We can now take the red object and the [previously] intersecting black object and unify them together, then discard the other 3 shapes.
 The remaining shape is your tileable background! It should be equal in both width and height, and you should be able to stack copies of it next to each other, creating a seamless pattern.
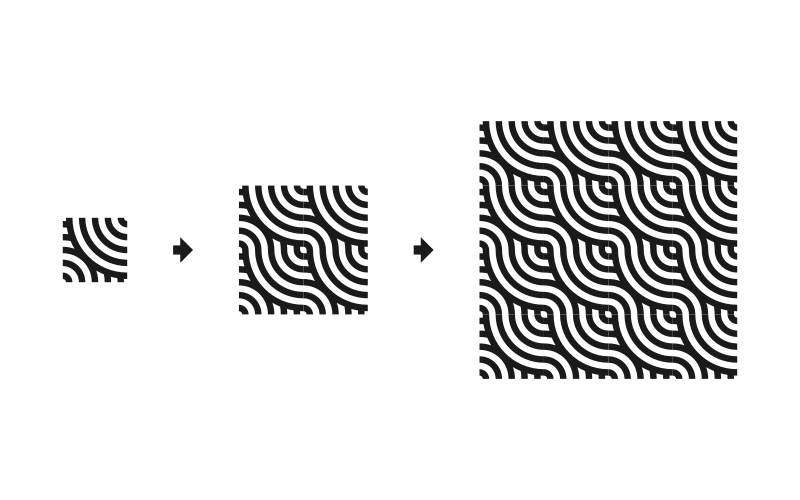 Add your own stylistic touch and you're done! Our vector repeated background pattern is complete!

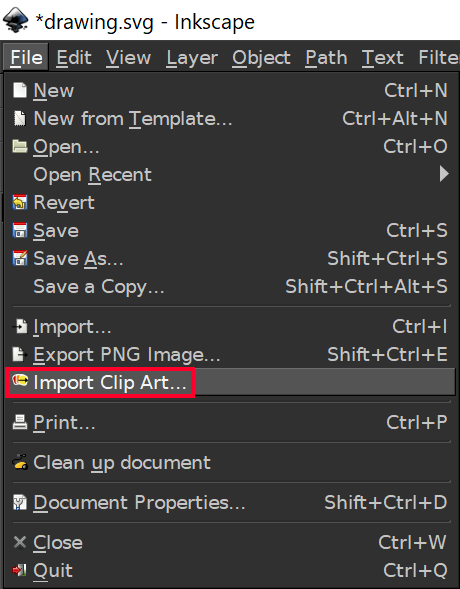 You'll be presented with a menu that allows you to search through a massive library of vector clipart.
Watch the tutorial video at the top of the page to see how simple it is to use.
You'll be presented with a menu that allows you to search through a massive library of vector clipart.
Watch the tutorial video at the top of the page to see how simple it is to use.
 The clipart library is populated by OpenClipart.org — a collection of free vector clipart created and contributed by volunteers.
Inkscape's clipart menu links directly to the OpenClipart library so that you don't have to download and import files manually from their website.
The clipart library is populated by OpenClipart.org — a collection of free vector clipart created and contributed by volunteers.
Inkscape's clipart menu links directly to the OpenClipart library so that you don't have to download and import files manually from their website.
 Although the site claims their clipart is free to use in logos, I would highly advise against using it for logo design — especially if it's for a client.
Clients often file for trademarks using their logo, and if you used clipart in their logo, their request is going to be declined.
Not only will you have an unsatisfied client on your hands, but it'll also hurt your reputation as a designer.
Most importantly though, it just isn't professional to use clipart in logo design.
It kind of goes against the entire point of branding in the first place.
Clients hire you to create a unique representation of their brand.
There's nothing unique about clip art that's been used by thousands of other people.
I would recommend limiting your usage of this clipart library to personal projects, infographics, illustrations, and other non-branding-related design.
Although the site claims their clipart is free to use in logos, I would highly advise against using it for logo design — especially if it's for a client.
Clients often file for trademarks using their logo, and if you used clipart in their logo, their request is going to be declined.
Not only will you have an unsatisfied client on your hands, but it'll also hurt your reputation as a designer.
Most importantly though, it just isn't professional to use clipart in logo design.
It kind of goes against the entire point of branding in the first place.
Clients hire you to create a unique representation of their brand.
There's nothing unique about clip art that's been used by thousands of other people.
I would recommend limiting your usage of this clipart library to personal projects, infographics, illustrations, and other non-branding-related design.
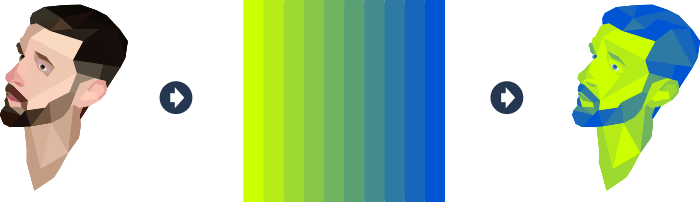
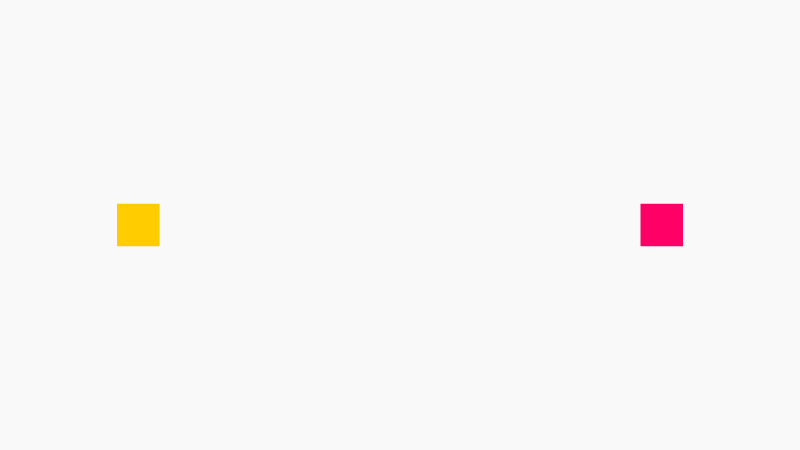 Next, we're going to use the Interpolate extension (Extensions > Generate from path > Interpolate).
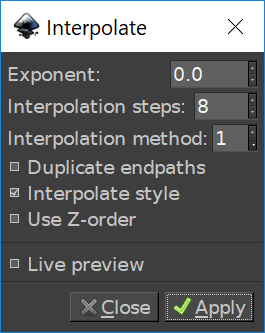 Set the values as depicted in the above image.
Please note that the interpolation steps input reflects how many different colors you'd like in your palette + 2.
For this example I'm creating a swatch with 10 colors, so I input 8.
The reason for this is because two of those colors are defined by the two squares you've already created.
Once applied, a series of objects reflective of your simulated gradient will be generated…
Set the values as depicted in the above image.
Please note that the interpolation steps input reflects how many different colors you'd like in your palette + 2.
For this example I'm creating a swatch with 10 colors, so I input 8.
The reason for this is because two of those colors are defined by the two squares you've already created.
Once applied, a series of objects reflective of your simulated gradient will be generated…
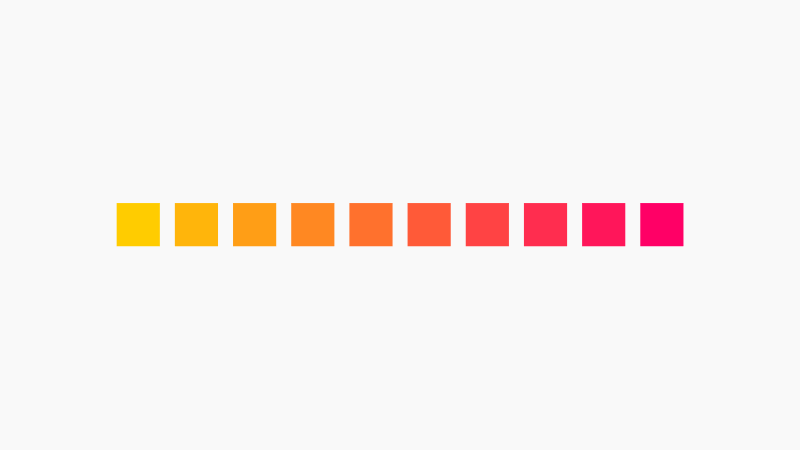 Now it's time to create our custom swatch.
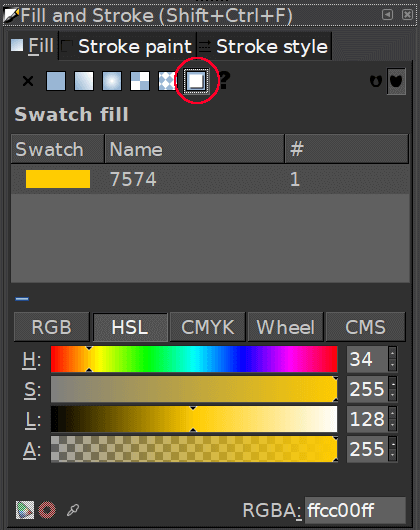 You won't notice anything happen on your screen, but the color of the selected object will be added to your swatch.
Now, go through the rest of the squares and do the same thing.
To view your custom swatch, simply open the Swatches menu by going to View > Swatches.
You won't notice anything happen on your screen, but the color of the selected object will be added to your swatch.
Now, go through the rest of the squares and do the same thing.
To view your custom swatch, simply open the Swatches menu by going to View > Swatches.
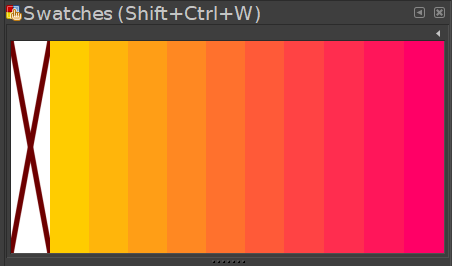 And there's your newly-created gradient color palette! You can now use those colors to color in objects the same way you would using colors from Inkscape's stock color menu.
 As mentioned earlier, I included guidelines to represent the bleed and safe area.
I've also made sure that the template is divided up into thirds so that you can size each individual panel with precision when designing.
As mentioned earlier, I included guidelines to represent the bleed and safe area.
I've also made sure that the template is divided up into thirds so that you can size each individual panel with precision when designing.
 The template sits on two different layers — the Contents layer is where your design will go.
The Guides layer is locked and only there as a reference so you'll know where important contents should and shouldn't go.
The template sits on two different layers — the Contents layer is where your design will go.
The Guides layer is locked and only there as a reference so you'll know where important contents should and shouldn't go.
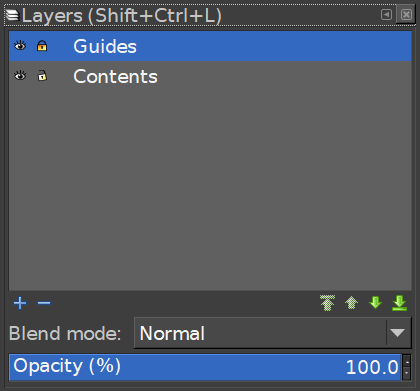 Once you've finished your design and you're ready to export it, simply toggle off the visibility of that layer and you'll be good to go.
 As depicted in the above screenshot, the full size of the documents should be 3,331 by 2,587 pixels, which is the exact size of the template.
Simply export it at the preset DPI setting and you should be fine.
Here's an example of a design I created for a client earlier this year…
As depicted in the above screenshot, the full size of the documents should be 3,331 by 2,587 pixels, which is the exact size of the template.
Simply export it at the preset DPI setting and you should be fine.
Here's an example of a design I created for a client earlier this year…
 When it comes to logo design software for Ubuntu — or any kind of vector design for that matter — Inkscape is the biggest, most capable option with the most support, and it's the one most comparable to Adobe Illustrator.
All of the tools you need to create a great logo design, including pen tools for drawing, sketching, tracing, creating fluid, scalable and symmetrical shapes, are all there.
And working in a true vector environment makes Inkscape a complete alternative to Adobe Illustrator.
What matters most though is if Inkscape is capable of creating professional logo designs, and the answer is yes! Inkscape provides everything you would ever need for creating professional logos on the Ubuntu platform.
You can even open Inkscape files with Illustrator and edit them as if they were made with Illustrator.
The difference between the two applications and their capabilities is negligible.
When it comes to logo design software for Ubuntu — or any kind of vector design for that matter — Inkscape is the biggest, most capable option with the most support, and it's the one most comparable to Adobe Illustrator.
All of the tools you need to create a great logo design, including pen tools for drawing, sketching, tracing, creating fluid, scalable and symmetrical shapes, are all there.
And working in a true vector environment makes Inkscape a complete alternative to Adobe Illustrator.
What matters most though is if Inkscape is capable of creating professional logo designs, and the answer is yes! Inkscape provides everything you would ever need for creating professional logos on the Ubuntu platform.
You can even open Inkscape files with Illustrator and edit them as if they were made with Illustrator.
The difference between the two applications and their capabilities is negligible.
 Gravit Designer is a revolution! A vector software you can use in your web browser.
That not only makes it a logo design software for Ubuntu, but a viable option for all operating systems as well, and it's free to use.
Gravit allows you to create logos and apply your design knowledge.
I've tried it a little bit myself and it's really good.
The most important tools for creating logos are there, the modern UI is refreshing, and everything we need can be accessed on their website.
Gravit Designer is a revolution! A vector software you can use in your web browser.
That not only makes it a logo design software for Ubuntu, but a viable option for all operating systems as well, and it's free to use.
Gravit allows you to create logos and apply your design knowledge.
I've tried it a little bit myself and it's really good.
The most important tools for creating logos are there, the modern UI is refreshing, and everything we need can be accessed on their website.
 Next, create some rectangles that vary in height going over the text sporadically.
Make sure the rectangle are wider than the text, and you might want to make them a different color than the text and lower their transparency to 50% so you can see the text beneath it as I've done.
Next, create some rectangles that vary in height going over the text sporadically.
Make sure the rectangle are wider than the text, and you might want to make them a different color than the text and lower their transparency to 50% so you can see the text beneath it as I've done.
 Those rectangles will now be used as a reference point to break up the text into individual pieces using the Division function in Inkscape.
Once completed, unify each horizontal row together and randomly shift them left and right as depicted below.
Those rectangles will now be used as a reference point to break up the text into individual pieces using the Division function in Inkscape.
Once completed, unify each horizontal row together and randomly shift them left and right as depicted below.
 Next, we'll simply create two copies of what we have so far, color them blue and pink respectively, then lower them beneath the original text.
Shift the blue copy to the left and the pink copy to the right.
Next, we'll simply create two copies of what we have so far, color them blue and pink respectively, then lower them beneath the original text.
Shift the blue copy to the left and the pink copy to the right.
 Finally, we'll use the Edit Paths By Nodes tool to select everything and tighten up the letter spacing a bit.
 And with that, our glitched text effect is complete!

 Next, we're going to create a rectangle half the height of the text and use it as a reference point to perform a division path effect.
This will split the text in half horizontally, as depicted below…
Next, we're going to create a rectangle half the height of the text and use it as a reference point to perform a division path effect.
This will split the text in half horizontally, as depicted below…
 Once that's done, we're going to create another rectangle that matches the size of the lower half of the text.
This rectangle will be the reference point for applying a perspective to the bottom half of the text.
Once that's done, we're going to create another rectangle that matches the size of the lower half of the text.
This rectangle will be the reference point for applying a perspective to the bottom half of the text.
 Now we're going to grab the edit paths by nodes tool and use it to bring the bottom two nodes of the rectangle up further, then scale them outward to form the following shape…
 Finally, we'll use the perspective live path effect to make the bottom half of the text take the shape of our rectangle.
 And with that, our design is complete!
 The first thing we need to do is download and install the FreeSerif font.
Make sure to do so before you open Inkscape.
If you install the font while Inkscape is already open, it won't show up in the font directory until you restart the application.
Download the FreeSerif font here: http://www.fontspace.com/gnu-freefont/freeserif
The first thing we need to do is download and install the FreeSerif font.
Make sure to do so before you open Inkscape.
If you install the font while Inkscape is already open, it won't show up in the font directory until you restart the application.
Download the FreeSerif font here: http://www.fontspace.com/gnu-freefont/freeserif
 After that's done, we'll be creating a circular stroke pattern for the inside area of the design.
This will be used as the starburst sort of effect.
After that's done, we'll be creating a circular stroke pattern for the inside area of the design.
This will be used as the starburst sort of effect.
 Finally, we'll be creating a stylized star and placing it in the center of our design.
We'll use a larger copy of the star as a reference point for cutting the paths of the starburst pattern so that those lines don't intersect with the star shape.
Finally, we'll be creating a stylized star and placing it in the center of our design.
We'll use a larger copy of the star as a reference point for cutting the paths of the starburst pattern so that those lines don't intersect with the star shape.
 After that, we'll be using each grouping of half circles to construct the letters of the word "LOGO", then manually creating the straight segments that connect the letter G and make up the straight part of the letter L.
 As you see depicted in the above diagram, we'll be cutting out the intersecting areas of the letters so that they have the appearance of looping around and overlapping each other.
Finally, we'll use the cut path function to cut out random segments of each line.
The final design is as follows…
As you see depicted in the above diagram, we'll be cutting out the intersecting areas of the letters so that they have the appearance of looping around and overlapping each other.
Finally, we'll use the cut path function to cut out random segments of each line.
The final design is as follows…
 Once that's created, we'll be coloring it in using three different shades of a single color — medium, dark and light — then adding a slight lip to the bottom of the block in order to create a little separation between all of the blocks once we start stacking them on top of each other.
 Next, we can simply create duplicate copies of the block and color them all in accordingly.
 Now that we have our blocks created, we can enable snapping on the Inkscape toolbar and start creating duplicate copies and stacking them on top of each other to form whatever letters, numbers and characters we desire.
 After following along with the tutorial, you'll have created a vector Lego text that reads "2018" in an isometric style.
Creating letters and numbers out of the blocks can be a little tricky and requires you to use your imagination a bit.
I would recommend experimenting with it a bit in order to get a feel for where each block should be placed, or you can look at similar designs for inspiration.
After following along with the tutorial, you'll have created a vector Lego text that reads "2018" in an isometric style.
Creating letters and numbers out of the blocks can be a little tricky and requires you to use your imagination a bit.
I would recommend experimenting with it a bit in order to get a feel for where each block should be placed, or you can look at similar designs for inspiration.
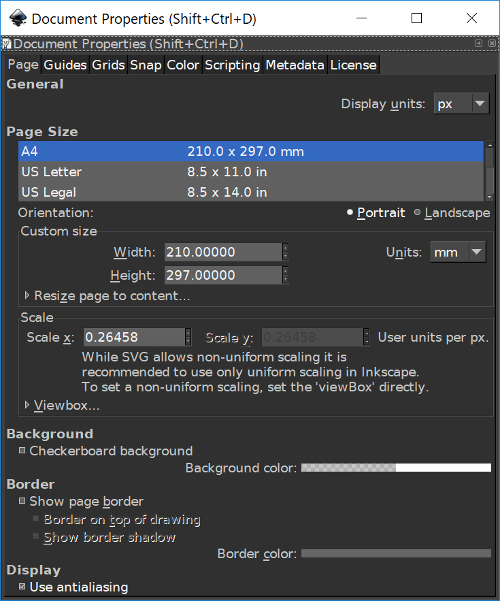 When this happens, simply press Ctrl + W on the keyboard.
This will close the Document Properties window.
Even though you can't see the menu on your screen, if you clicked on it or used the keyboard shortcuts to open it, it'll still be open and active.
After you've used Ctrl + W to close the window, try opening it again.
It should now be opening on your screen.
When this happens, simply press Ctrl + W on the keyboard.
This will close the Document Properties window.
Even though you can't see the menu on your screen, if you clicked on it or used the keyboard shortcuts to open it, it'll still be open and active.
After you've used Ctrl + W to close the window, try opening it again.
It should now be opening on your screen.
 Next, snap the Bezier Pen onto the bottom left corner of the polygon and create a shape the runs parallel to the polygon's bottom left edge.
Make it extend outside of the circle, make the color green and set the opacity to 50%, as depicted below.
Next, snap the Bezier Pen onto the bottom left corner of the polygon and create a shape the runs parallel to the polygon's bottom left edge.
Make it extend outside of the circle, make the color green and set the opacity to 50%, as depicted below.
 Using the Bezier Pen again, create another shape from the same bottom left point, only make it cut horizontally through the green shape and use it to perform a Difference on the green shape.
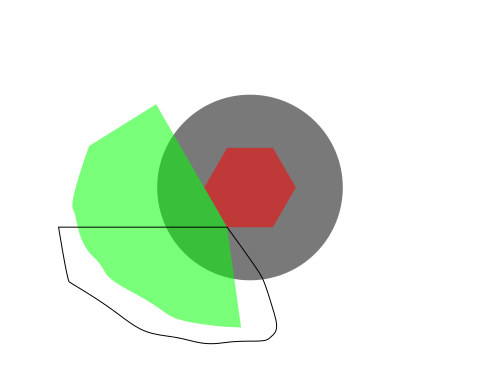
 Now select both the green shape and black circle and perform an Intersection function on them.
 To download a free copy of this design in various vector formats, use this link: infographic-template.zip
The text will be editable.
Before opening the design file with Inkscape, I would suggest downloading and installing the Lato font first because that is the font used in this design.
Without it, Inkscape will default to another font in your system.
To download a free copy of this design in various vector formats, use this link: infographic-template.zip
The text will be editable.
Before opening the design file with Inkscape, I would suggest downloading and installing the Lato font first because that is the font used in this design.
Without it, Inkscape will default to another font in your system.
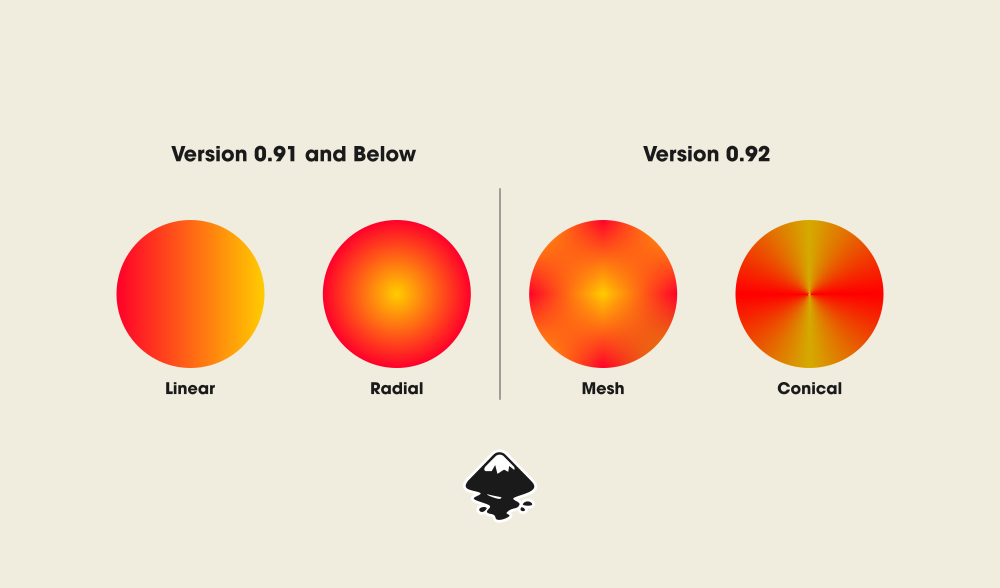 Thankfully that changed with Inkscape's most recent release.
There's now an added tool in the left-hand toolbar called Create and edit meshes, but you must be using Inkscape version 0.92 (or later, if you're reading this in the future) in order to have access to it.
If you're not sure which version on Inkscape you're using, just go to Help > About Inkscape and a menu displaying the version type shall appear.
Thankfully that changed with Inkscape's most recent release.
There's now an added tool in the left-hand toolbar called Create and edit meshes, but you must be using Inkscape version 0.92 (or later, if you're reading this in the future) in order to have access to it.
If you're not sure which version on Inkscape you're using, just go to Help > About Inkscape and a menu displaying the version type shall appear.
 If it turns out that you're using an older version, go ahead and upgrade to version 0.92 before continuing on with the tutorial.
 After that, grab the Create and edit meshes tool from the left-hand toolbar, and a menu should appear at the top of the page similar to what is depicted below.
Set all of the values in that menu to exactly what you see on my screen.
Note that there's 8 columns and 8 rows.
After that, grab the Create and edit meshes tool from the left-hand toolbar, and a menu should appear at the top of the page similar to what is depicted below.
Set all of the values in that menu to exactly what you see on my screen.
Note that there's 8 columns and 8 rows.
 If you'd like to make Inkscape appear dark like you see on my screen, be sure to check out my Inkscape dark theme tutorial.
Once those values are set, simply click and drag on the canvas going across the circle and a conical grid with nodes should appear, as depicted below.
If you'd like to make Inkscape appear dark like you see on my screen, be sure to check out my Inkscape dark theme tutorial.
Once those values are set, simply click and drag on the canvas going across the circle and a conical grid with nodes should appear, as depicted below.
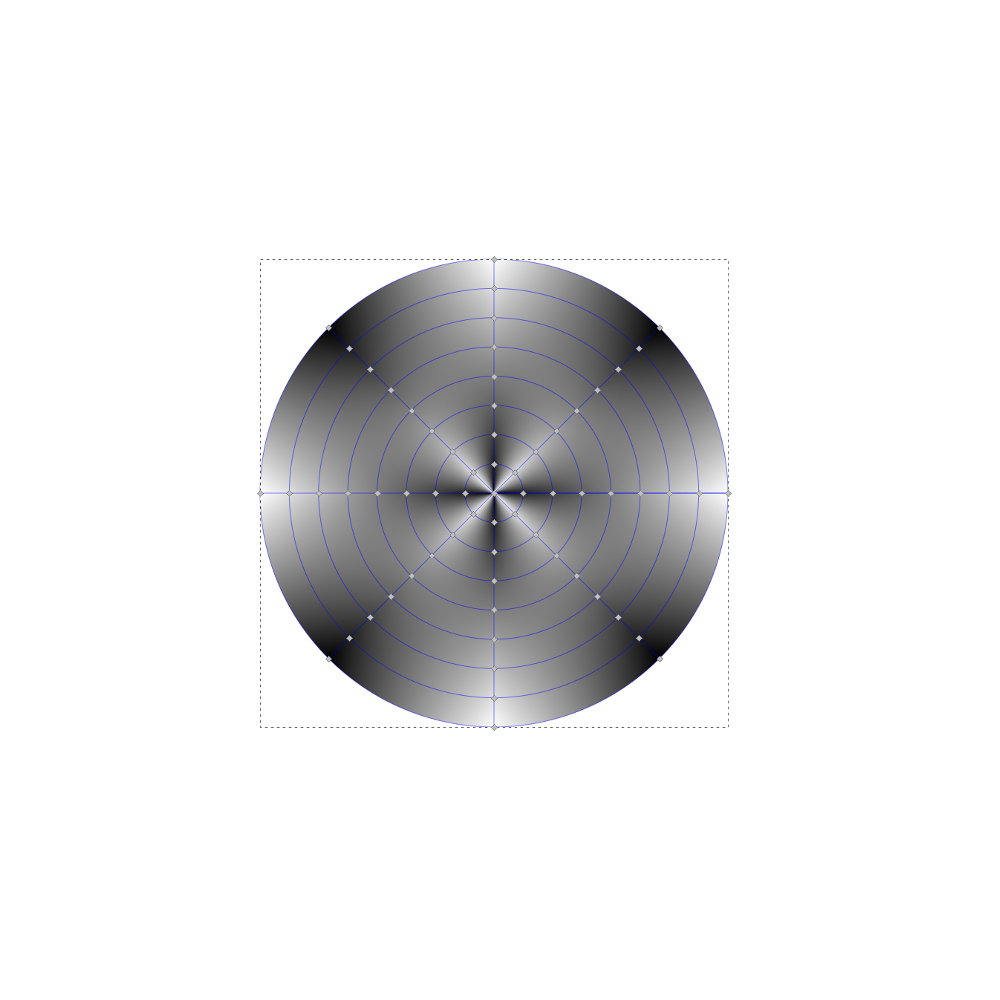 Click and drag over all of the nodes on the left-hand row to select them, then click on the color red in your color picker.
The entire row should turn red.
Click and drag over all of the nodes on the left-hand row to select them, then click on the color red in your color picker.
The entire row should turn red.
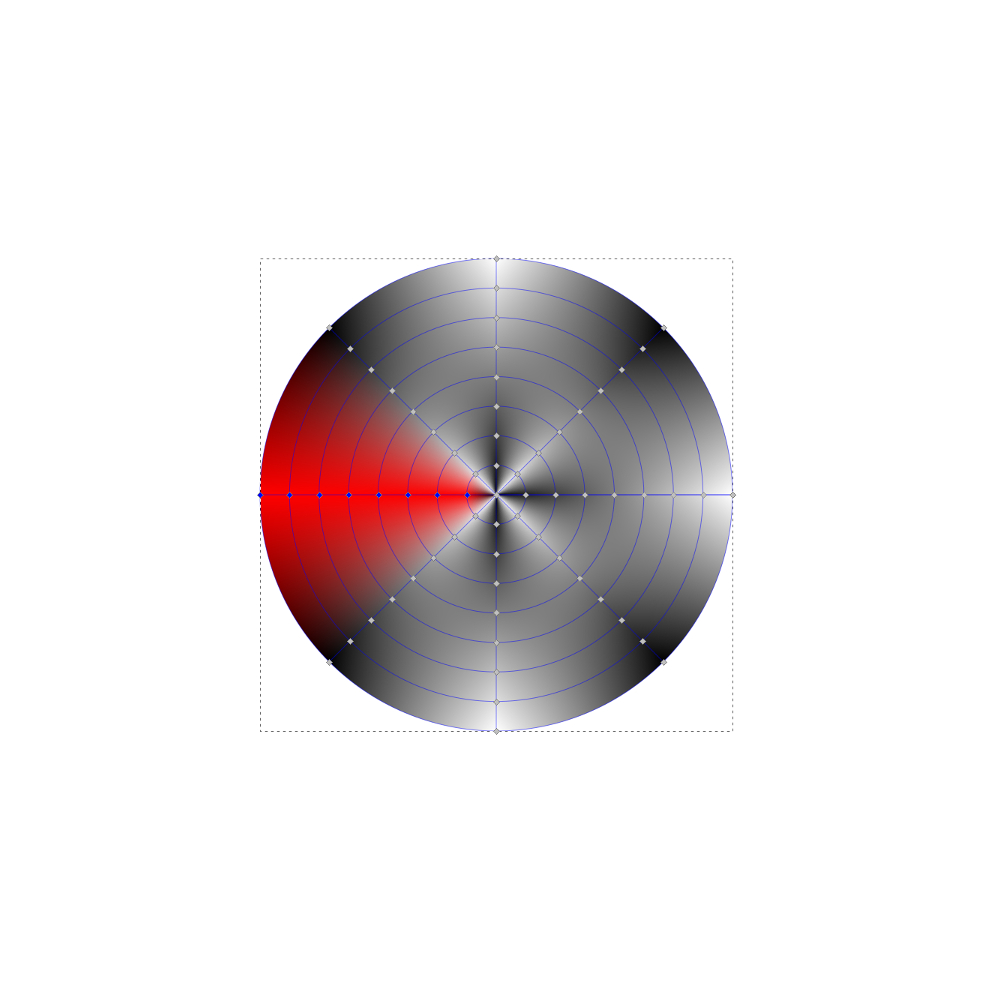 Now simply repeat this process going around the entire circle, selecting each row of nodes individually and changing them to their respective shades — orange, yellow, green, etc.
Once finished, your conical gradient is complete!
Now simply repeat this process going around the entire circle, selecting each row of nodes individually and changing them to their respective shades — orange, yellow, green, etc.
Once finished, your conical gradient is complete!
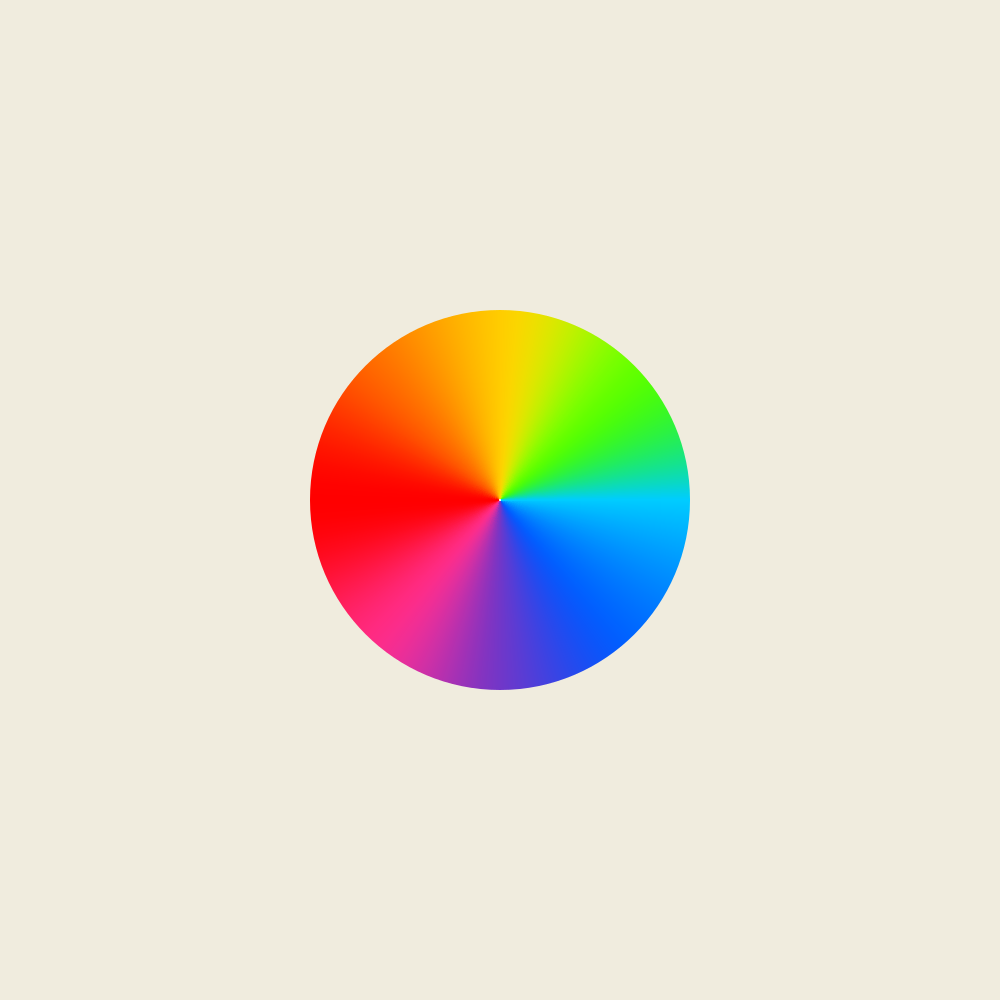
 Once prompted, make sure to choose the Embed option instead of Link.
If you choose link, Inkscape is just going to create a mirror reflection of the original image file, so any changes you make to it will also be reflected in the original image and vice verse.
Also, if you delete the original image, it will return a broken image error within Inkscape.
Choosing to embed the image will instead create an entirely new copy of the image that exists solely within that particular Inkscape document.
The upside with embedding is that you get a dedicated, independent image to work with.
The downside is that it requires a tad bit more CPU power from your computer while using slightly more system memory, but it's negligible at best and hardly a concern for most modern machines — even budget laptops.
Unless you're working with an enormous image on a machine from 2011, I recommend embedding for everyone.
Once prompted, make sure to choose the Embed option instead of Link.
If you choose link, Inkscape is just going to create a mirror reflection of the original image file, so any changes you make to it will also be reflected in the original image and vice verse.
Also, if you delete the original image, it will return a broken image error within Inkscape.
Choosing to embed the image will instead create an entirely new copy of the image that exists solely within that particular Inkscape document.
The upside with embedding is that you get a dedicated, independent image to work with.
The downside is that it requires a tad bit more CPU power from your computer while using slightly more system memory, but it's negligible at best and hardly a concern for most modern machines — even budget laptops.
Unless you're working with an enormous image on a machine from 2011, I recommend embedding for everyone.
 To use your newly drawn outline as a clipping path, simply select both the outline and the image at the same time, then go to Object > Clip > Set.
This will effectively crop your subject and remove the background.
Make sure to bring the opacity of your subject image back up to 100% before you do so.
To use your newly drawn outline as a clipping path, simply select both the outline and the image at the same time, then go to Object > Clip > Set.
This will effectively crop your subject and remove the background.
Make sure to bring the opacity of your subject image back up to 100% before you do so.
 Tip – when making Clipping Paths in Inkscape, always make sure that the shape you want to use layered above the image you want to crop.
Inkscape will always use the highest layered selected object as its clipping path.
The beautiful thing about this technique is that it is not permanent — your background (along with your drawn outline) can still be recovered if you end up needing it down the road.
Just select the object and go to Object > Clip > Release.
This will remove the object from its clipping path bring you right back to where you were before you applied it.
Tip – when making Clipping Paths in Inkscape, always make sure that the shape you want to use layered above the image you want to crop.
Inkscape will always use the highest layered selected object as its clipping path.
The beautiful thing about this technique is that it is not permanent — your background (along with your drawn outline) can still be recovered if you end up needing it down the road.
Just select the object and go to Object > Clip > Release.
This will remove the object from its clipping path bring you right back to where you were before you applied it.
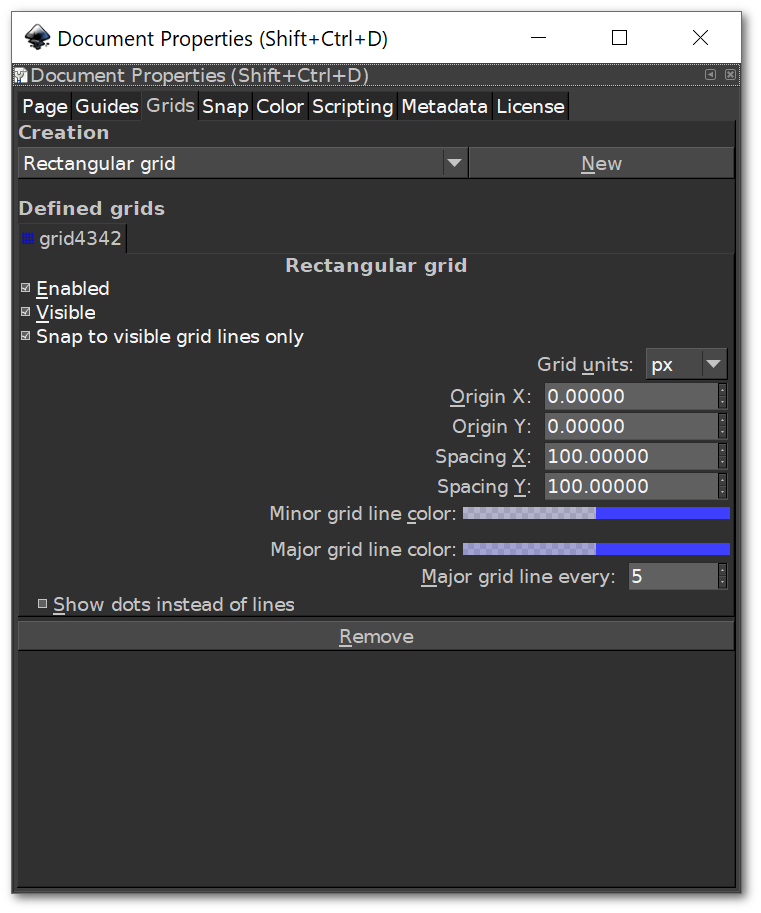 Once in the Document Properties window, go to the Grids tab and click New in order to generate a grid on the canvas.
After that, change Spacing X and Spacing Y each to 75 px.
If you're working with a monitor resolution greater than 1080p, I would recommend setting those values to 100 px instead.
This is not overly important though, it'll just make your workflow a little easier.
Once you've done that, go ahead and close of the window and you should now have a blue rectangular grid on your canvas.
Once in the Document Properties window, go to the Grids tab and click New in order to generate a grid on the canvas.
After that, change Spacing X and Spacing Y each to 75 px.
If you're working with a monitor resolution greater than 1080p, I would recommend setting those values to 100 px instead.
This is not overly important though, it'll just make your workflow a little easier.
Once you've done that, go ahead and close of the window and you should now have a blue rectangular grid on your canvas.
 Since .ai is a proprietary format of Adobe, our options for cross-platform use as Inkscape users are quite limited.
For a while I was using online file conversion sites.
This method was unreliable and unsafe though, and paying a monthly subscription for Illustrator CC solely for the purpose of occasionally opening and creating AI files isn't a practical use of funds.
Fortunately, both Inkscape and Illustrator have evolved over the years, and there are now very simple and effective ways to both create and open AI files with Inkscape, which I'll be covering in this post.
Since .ai is a proprietary format of Adobe, our options for cross-platform use as Inkscape users are quite limited.
For a while I was using online file conversion sites.
This method was unreliable and unsafe though, and paying a monthly subscription for Illustrator CC solely for the purpose of occasionally opening and creating AI files isn't a practical use of funds.
Fortunately, both Inkscape and Illustrator have evolved over the years, and there are now very simple and effective ways to both create and open AI files with Inkscape, which I'll be covering in this post.
 There are various different types of Illustrator formats, and if you're having problems opening an AI file with Inkscape, the first step is to determine what version AI file you're working with.
Just because the file ends with the .ai extension, it doesn't mean it's actually structured in the same format as other AI files. Older releases of Illustrator used different file structures ranging from the more recent Illustrator CC all the way down to version 3.0.
There are various different types of Illustrator formats, and if you're having problems opening an AI file with Inkscape, the first step is to determine what version AI file you're working with.
Just because the file ends with the .ai extension, it doesn't mean it's actually structured in the same format as other AI files. Older releases of Illustrator used different file structures ranging from the more recent Illustrator CC all the way down to version 3.0.
 Before you install Ghostscript, be sure to change the extension of the AI file you're trying to open from .ai to .eps by renaming it.
Once you've done that, watch the following video for step-by-step instructions on how to install Ghostscript and configure it to work with Inkscape.
A special thanks to Open Source Bug on Youtube for making this helpful video.
Before you install Ghostscript, be sure to change the extension of the AI file you're trying to open from .ai to .eps by renaming it.
Once you've done that, watch the following video for step-by-step instructions on how to install Ghostscript and configure it to work with Inkscape.
A special thanks to Open Source Bug on Youtube for making this helpful video.
 Check out my post on making Inkscape's interface dark if you'd like to do so yourself.
 Another thing to take into consideration is that whenever you open a file with an application other than that in which it was created, there's likely going to be properties that get lost in translation.
This is the unfortunate nature of working cross-platform, and it extends far beyond Inkscape and Illustrator.
For example, text objects that weren't converted to curves before saving the AI file likely won't translate well once you open them with Inkscape.
The same can be said for other features and extensions within Illustrator that aren't present in Inkscape.
Sometimes AI files just don't translate the way they're supposed to when opened with Inkscape, and unfortunately there isn't much that can be done about it.
In an ideal world, you would open the AI file with Illustrator first, then save it as an SVG before opening it with Inkscape.
Another thing to take into consideration is that whenever you open a file with an application other than that in which it was created, there's likely going to be properties that get lost in translation.
This is the unfortunate nature of working cross-platform, and it extends far beyond Inkscape and Illustrator.
For example, text objects that weren't converted to curves before saving the AI file likely won't translate well once you open them with Inkscape.
The same can be said for other features and extensions within Illustrator that aren't present in Inkscape.
Sometimes AI files just don't translate the way they're supposed to when opened with Inkscape, and unfortunately there isn't much that can be done about it.
In an ideal world, you would open the AI file with Illustrator first, then save it as an SVG before opening it with Inkscape.
 If you've encountered a client or colleague who needs a copy of whatever you've been working on in Inkscape, but they're requesting it in AI format, you're in luck.
This is actually quite simple.
Although Inkscape doesn't allow you to directly save files in AI format, you can simply save it in PDF format, then change the extension from .pdf to .ai by renaming it.
This will transform it into a makeshift Illustrator file and the person on the receiving end won't know the difference.
If you've encountered a client or colleague who needs a copy of whatever you've been working on in Inkscape, but they're requesting it in AI format, you're in luck.
This is actually quite simple.
Although Inkscape doesn't allow you to directly save files in AI format, you can simply save it in PDF format, then change the extension from .pdf to .ai by renaming it.
This will transform it into a makeshift Illustrator file and the person on the receiving end won't know the difference.
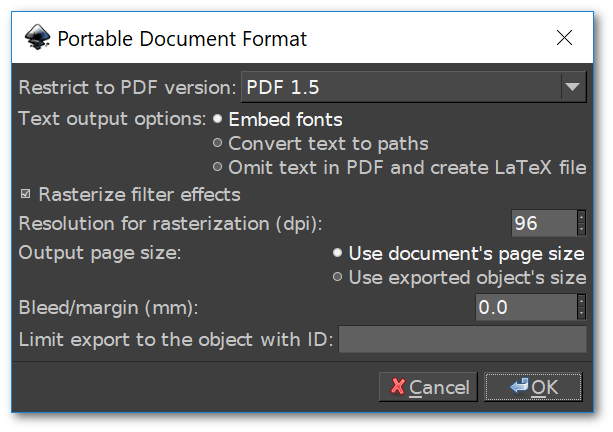 Of course SVG, EPS and PDF files will open with Illustrator just as well, but sometimes it's easier to just give someone what they asked for than it is to explain that there's virtually no difference.
The only downside to doing this is that you need to be careful about properties getting lost in translation once the file is opened with Illustrator.
It is highly advised that you make sure your design does not contain any clips, masks, filters, blurs, have any objects with opacity less than 100%, and all text objects are converted to paths before you save your PDF file with Inkscape. These are all elements that will not be recognized by Illustrator once opened.
Of course SVG, EPS and PDF files will open with Illustrator just as well, but sometimes it's easier to just give someone what they asked for than it is to explain that there's virtually no difference.
The only downside to doing this is that you need to be careful about properties getting lost in translation once the file is opened with Illustrator.
It is highly advised that you make sure your design does not contain any clips, masks, filters, blurs, have any objects with opacity less than 100%, and all text objects are converted to paths before you save your PDF file with Inkscape. These are all elements that will not be recognized by Illustrator once opened.
 In order to create a true vector SVG file from a PNG, you'll have to create an entirely new SVG file by tracing over your PNG. There's two ways to go about tracing a PNG with Inkscape, and luckily neither of them require you to be an expert with the software.
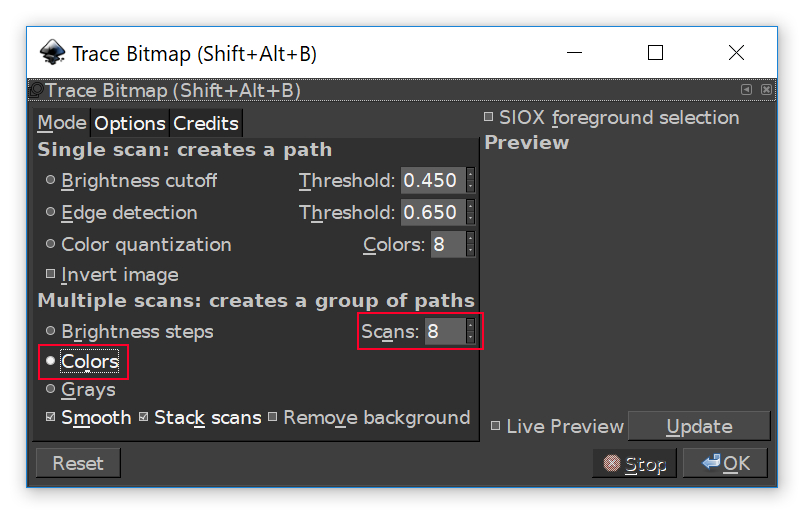 To use the Trace Bitmap function, simply select the object you'd like to trace, then go to Path > Trace Bitmap.
This will bring up the interface menu depicted above (check out my Inkscape dark theme tutorial if you'd like a dark interface like mine.)
Assuming you'd like to create a complete retrace of the image and not just a monotone silhouette, choose Color from the Multiple Scans menu.
After that it's time to set the Scans.
Scans are basically the number of colors that will be used in the tracing.
If you're working with a really simple PNG that only uses 2 or 3 colors, set the Scans to 2 or 3.
If it has more, use more.
It may be worth it to experiment with different numbers of scans to see what works out best.
You can click the Update button to generate a preview in the preview window before finalizing your selection.
To use the Trace Bitmap function, simply select the object you'd like to trace, then go to Path > Trace Bitmap.
This will bring up the interface menu depicted above (check out my Inkscape dark theme tutorial if you'd like a dark interface like mine.)
Assuming you'd like to create a complete retrace of the image and not just a monotone silhouette, choose Color from the Multiple Scans menu.
After that it's time to set the Scans.
Scans are basically the number of colors that will be used in the tracing.
If you're working with a really simple PNG that only uses 2 or 3 colors, set the Scans to 2 or 3.
If it has more, use more.
It may be worth it to experiment with different numbers of scans to see what works out best.
You can click the Update button to generate a preview in the preview window before finalizing your selection.
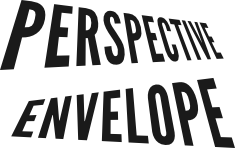 As it currently stands, using these tools requires you to manually draw a 4 point object in the shape of the perspective you'd like the object to take, then wait for the extension to render before you can see how it looks.
I often find myself not liking the end result on the first try and having to undo, alter the defining shape, then waiting for it to render again for another try.
In Inkscape 92 though, you'll have the ability to alter these key nodes in real time, which will save us lots of waiting and undoing.
This is great as these features already exist in the likes of Adobe Illustrator, so adding them to Inkscape will narrow the gap between the two applications even more.
As it currently stands, using these tools requires you to manually draw a 4 point object in the shape of the perspective you'd like the object to take, then wait for the extension to render before you can see how it looks.
I often find myself not liking the end result on the first try and having to undo, alter the defining shape, then waiting for it to render again for another try.
In Inkscape 92 though, you'll have the ability to alter these key nodes in real time, which will save us lots of waiting and undoing.
This is great as these features already exist in the likes of Adobe Illustrator, so adding them to Inkscape will narrow the gap between the two applications even more.
 I've saved my favorite for last.
If you read my post about Inkscape VS Illustrator, you know that the only true shortcoming I feel Inkscape has is its inability to output documents with a CMYK color profile, which makes designing for print a hassle.
Apparently the Inkscape team has been working towards a solution for this though.
According to the New Features Focus section of the Inkscape Wiki Roadmap, there has been a focus on improving support for CMYK/spot colors.
As the Wiki page states, the current goals are…
I've saved my favorite for last.
If you read my post about Inkscape VS Illustrator, you know that the only true shortcoming I feel Inkscape has is its inability to output documents with a CMYK color profile, which makes designing for print a hassle.
Apparently the Inkscape team has been working towards a solution for this though.
According to the New Features Focus section of the Inkscape Wiki Roadmap, there has been a focus on improving support for CMYK/spot colors.
As the Wiki page states, the current goals are…
 There's no way to look at a poster on the subway and determine which software was used to design it, which operating system that software was running on, or which manufacturer built the hardware that was used, so these things really aren't all that important in the grand scheme of things.
It's not the tools that matter; it's the person using the tools that matters.
And when it comes down to the question of Inkscape vs Illustrator, the only real question is whether or not Inkscape is equipped with everything you will need for your vector design work.
My answer to that question: almost! It's really, really close though.
There's only one true shortcoming that Inkscape has, in my opinion.
There's no way to look at a poster on the subway and determine which software was used to design it, which operating system that software was running on, or which manufacturer built the hardware that was used, so these things really aren't all that important in the grand scheme of things.
It's not the tools that matter; it's the person using the tools that matters.
And when it comes down to the question of Inkscape vs Illustrator, the only real question is whether or not Inkscape is equipped with everything you will need for your vector design work.
My answer to that question: almost! It's really, really close though.
There's only one true shortcoming that Inkscape has, in my opinion.
 Unfortunately, Inkscape doesn't have the ability to output files in CMYK color profiles, which will make designing anything for print a real challenge.
However, there is a workaround that I went over in one of my Youtube videos.
There's also a few other solutions that are a little more elaborate, here and here.
So as long as you're not designing leaflets or postcards or anything else that will be sent off to the printers, Inkscape is fully-equipped and completely capable of handling any kind of vector design work you may need it for, and you can even use it for print work too if you're willing to use the workarounds.
When it comes to things like website icons, channel art, Facebook cover photos, mobile application GUI, and so on, Inkscape truly is a viable alternative to Illustrator.
Anything that was designed in Illustrator can, theoretically, be designed in Inkscape as well.
Inkscape is a fully-featured, complete and professional vector graphics application.
And as print media continues to die off while digital becomes more and more the standard, the gap between the two applications will shorten.
But for now, I have to give Illustrator a slight edge, and that is in no way an indictment of Inkscape.
It's a pretty damn impressive application when you consider that it was created by a team of volunteers and is given away for free.
Unfortunately, Inkscape doesn't have the ability to output files in CMYK color profiles, which will make designing anything for print a real challenge.
However, there is a workaround that I went over in one of my Youtube videos.
There's also a few other solutions that are a little more elaborate, here and here.
So as long as you're not designing leaflets or postcards or anything else that will be sent off to the printers, Inkscape is fully-equipped and completely capable of handling any kind of vector design work you may need it for, and you can even use it for print work too if you're willing to use the workarounds.
When it comes to things like website icons, channel art, Facebook cover photos, mobile application GUI, and so on, Inkscape truly is a viable alternative to Illustrator.
Anything that was designed in Illustrator can, theoretically, be designed in Inkscape as well.
Inkscape is a fully-featured, complete and professional vector graphics application.
And as print media continues to die off while digital becomes more and more the standard, the gap between the two applications will shorten.
But for now, I have to give Illustrator a slight edge, and that is in no way an indictment of Inkscape.
It's a pretty damn impressive application when you consider that it was created by a team of volunteers and is given away for free.

 To set this up, I like to use layers for each individual element, then lock the bleed and safe area layers until I'm finished with the design.
Since this is a lot to explain by typing, I put together a brief screencast tutorial demonstrating how to prepare the document in Inkscape…
Here's the document formatted & prepared for print, which you can keep on file as a template if you'd like: USBusinessCardQuarterInchBleed.svg
To set this up, I like to use layers for each individual element, then lock the bleed and safe area layers until I'm finished with the design.
Since this is a lot to explain by typing, I put together a brief screencast tutorial demonstrating how to prepare the document in Inkscape…
Here's the document formatted & prepared for print, which you can keep on file as a template if you'd like: USBusinessCardQuarterInchBleed.svg

 In addition, sometimes the color menu doesn't even appear when you select a stop.
I'll have to close and reopen Inkscape in order to get it back.
Not sure if this is some kind of glitch, or something else that I'm overlooking.
In addition, sometimes the color menu doesn't even appear when you select a stop.
I'll have to close and reopen Inkscape in order to get it back.
Not sure if this is some kind of glitch, or something else that I'm overlooking.
 I don't understand why this feature needs to exist.
It hasn't proven useful [to me] yet, and has only deteriorated the efficiency of my workflow by costing me unecessary clicks.
I know that sounds like a trivial thing to complain about, but when you're spending a minimum of 8 hours using the software every day, those extra clicks add up.
I don't understand why this feature needs to exist.
It hasn't proven useful [to me] yet, and has only deteriorated the efficiency of my workflow by costing me unecessary clicks.
I know that sounds like a trivial thing to complain about, but when you're spending a minimum of 8 hours using the software every day, those extra clicks add up.
 There used to be numeric input boxes for each that were separate from the sliding handles.
In 0.91, the numeric inputs have been combined with the sliding handles.
So now, when you go to click on the numbers to change them, Inkscape first recognizes that action as changing the sliding handle, which is rather annoying when you want to give something a precise numeric blur, only to click on the digits and first end up with a 98% blur.
I liked it much better before.
There used to be numeric input boxes for each that were separate from the sliding handles.
In 0.91, the numeric inputs have been combined with the sliding handles.
So now, when you go to click on the numbers to change them, Inkscape first recognizes that action as changing the sliding handle, which is rather annoying when you want to give something a precise numeric blur, only to click on the digits and first end up with a 98% blur.
I liked it much better before.
 Again, this sounds like a trivial thing to complain about, but having to manually type ".png" after the title of every file I export, when I never had to do that in previous versions, is a new habit to adapt to (that very often slips my mind) and somewhat of a step backwards for the software.
I don't know if this is a Linux issue or not (it could very well be,) but I didn't have this problem [on Linux] with any of the previous versions.
Again, this sounds like a trivial thing to complain about, but having to manually type ".png" after the title of every file I export, when I never had to do that in previous versions, is a new habit to adapt to (that very often slips my mind) and somewhat of a step backwards for the software.
I don't know if this is a Linux issue or not (it could very well be,) but I didn't have this problem [on Linux] with any of the previous versions.